
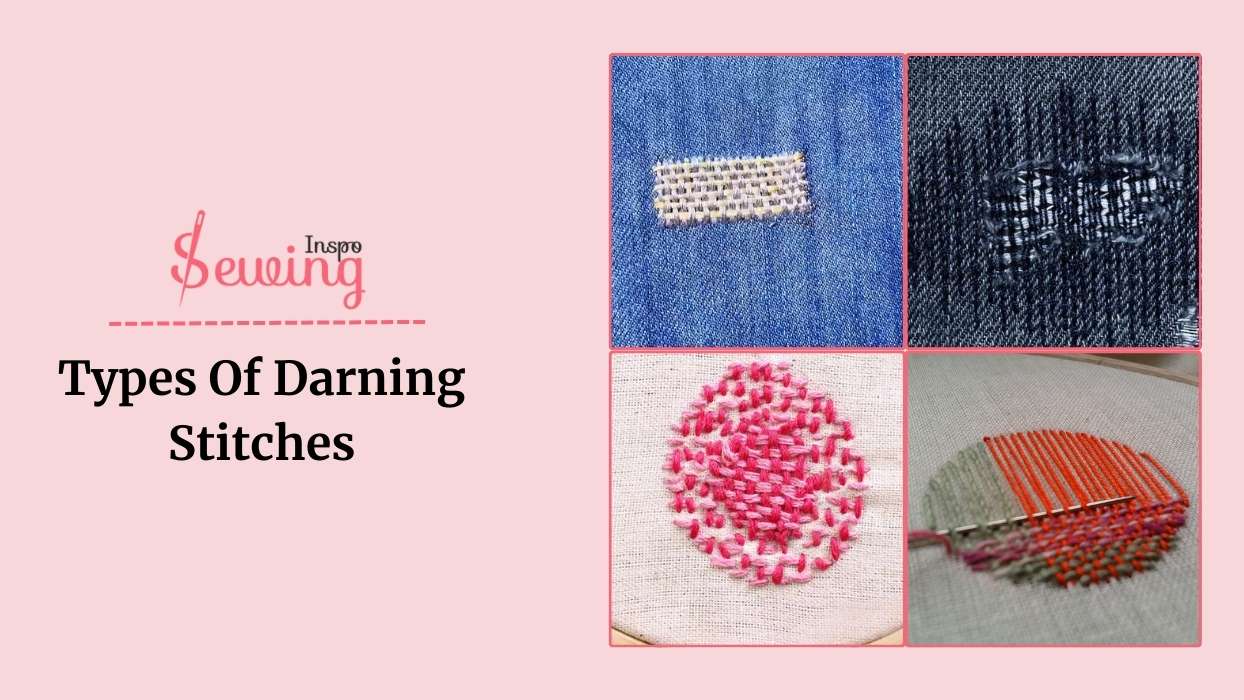
As I was searching for the darning stitch, I came to know types of darning stitches I never knew existed. Until then, I’d only used it to patch up holes, but a thought struck me: why stop there? What if I could explore new stitches that repair my clothes and add a touch of creativity?
So I searched and found out that there are 12 types of darning stitches, and all those, i found a few interesting ones. Which are-
Darning Stitch Types
Types of darning Sounds interesting, right? You will be more amazed to know than individually. Let me tell you about them. I’ll let you know and take note of it for the sewing book. If you are wondering how to darn a hole then this post is for you.
At a glance:
- Darning stitches are not just for mending holes; they can add creative and decorative touches to your fabric.
- There are 12 unique darning stitches, including Scotch, Invisible, Linen, Twill, Surface, Japanese, Sashiko, Diagonal, etc.
- Japanese Darning and Honeycomb Darning can be used for embroidery.
- These darning stitches are perfect for different fabric types, from cotton and linen to denim and knitted.
Table of Contents
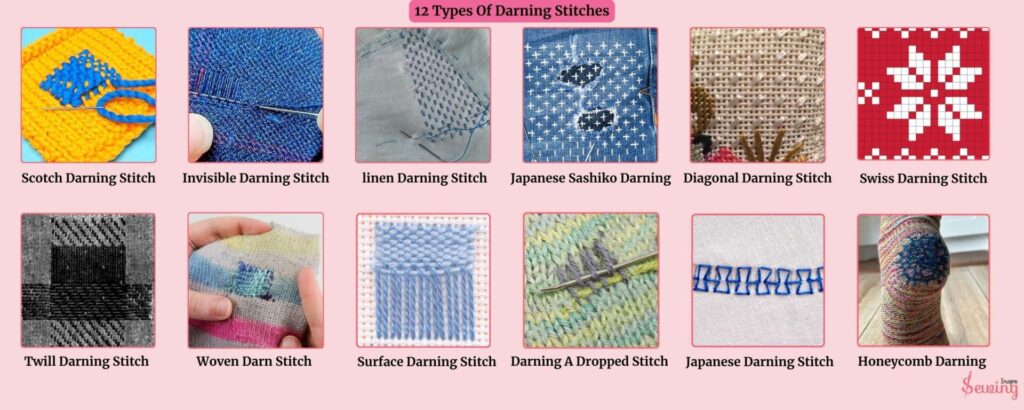
12 Types Of Darning Stitches
Darning stitch is mainly used to repair holes in cloths. But sewists find 12 types of darning stitch. Such as:
- Japanese Sashiko Darning
- Diagonal Darning Stitch
- Swiss Darning Stitch
- Woven Darn Stitch
- Darning A Dropped Stitch
- Honeycomb Darning
Now, let’s learn about all those darning stitch closely.
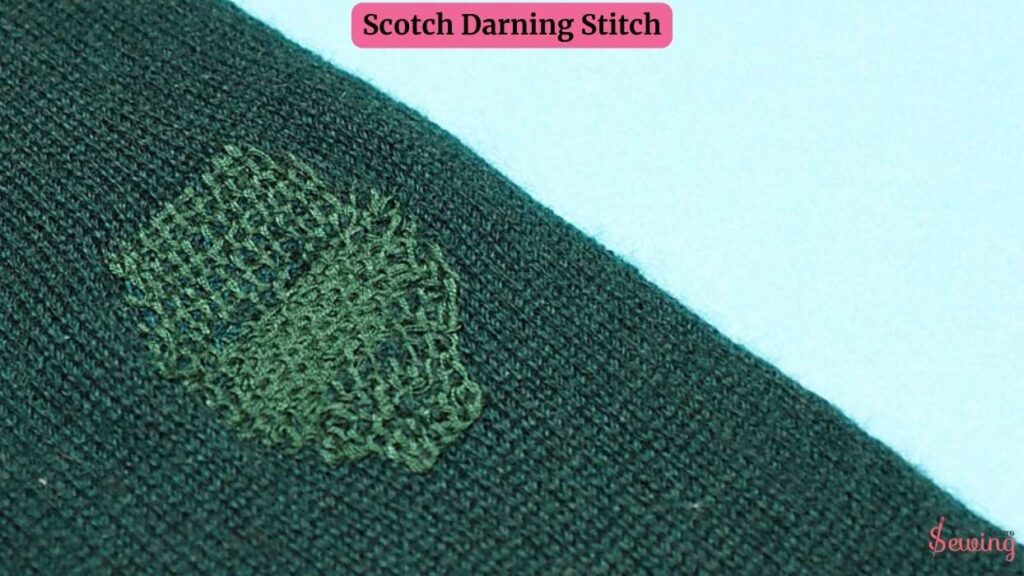
Scotch Darning Stitch
Scottish darning is actually rows or rounds of blanket stitches that build on each other to create a stretchy fabric. It even works well in needlepoint.
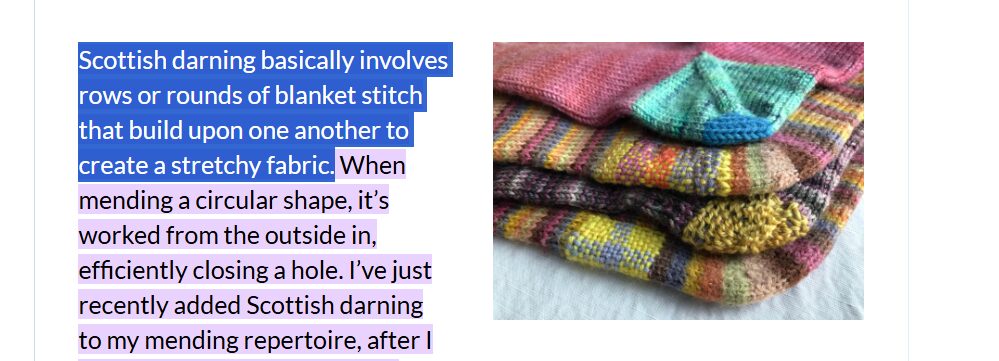
Scottish darning looks simple but unique. For circular holes, the stitches form rings that look like ripples. For straight tears, they create neat rows. That’s what does darn mean in sewing.
Scotch darning is so basic, but my favourite. What’s really cool is how it works like magic on circular shapes. You start from the outside and work your way in, neatly closing up holes. After a sock heel disaster, I only recently added this to my mending toolkit. You can do it with the darning ball.
That’s What does darning mean.
Yep, I completely blew out the bottom of a relatively new pair of socks, probably from all those long pandemic walks. Now, thanks to Scottish darning, those socks are good as new (and maybe even better)!

Invisible Darning Stitch
Invisible darning stitches are where you place them so carefully that they’re nearly invisible in the fabric. It inserts the needle through the fabric from the underside, only catching a few threads at a time.
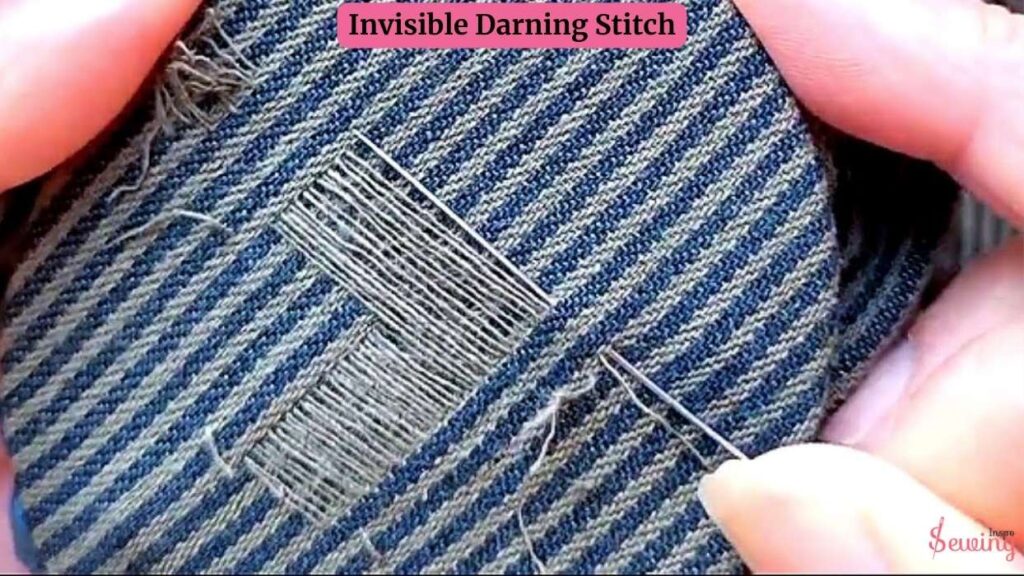
Then, you bring the needle up through the fabric on the opposite side. This creates a “ladder-like” pattern, where the stitches blend into the fabric.
So it’s almost invisible once finished. It creates small, precise stitches that don’t stand out. It repairs look like it was never needed.
When done right, it’s hard to tell there was a hole in the first place. It’s used to repair small holes or tears. Almost like “re-weaving” the damaged area.
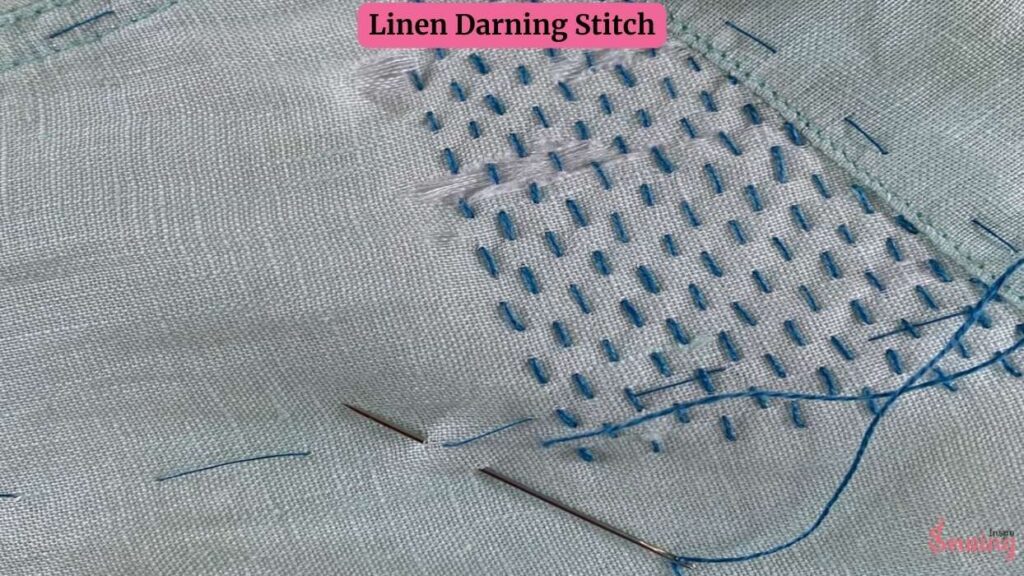
Linen Darning Stitch
Linen darning is basically a row of straight stitches covering the damaged area. It’s done on the wrong side of the fabric, where you lay down threads in one direction (the warp) and then weave new threads across them (the weft).
And following the fabric’s natural pattern. The stitches are woven over and under to fill the hole. Its repair looks neat and durable. Surface Darning Stitch.
Surface Darning Stitch
Surface darning stitch isn’t just for repairing holes. It creates beautiful, decorative patterns. It involves stitching straight, slightly spaced threads on the surface, then weaving another set of threads at a 90-degree angle to create a striking design.
After that,
Reposition the fabric and weave through the threads to form a basket-weave pattern. Don’t pull the thread too tight—just snug enough to keep everything neat. It’s perfect for adding a decorative touch to your clothes and repairing moth holes.

Once you get the rhythm, you’ll be hooked! Try it out and share your creations with the sewing community.
Twill Darning Stitch
Twill Darning Stitch is a diagonal stitch around the hole of the fabric. It is a technique used to repair twill fabric, like denim, by copying the fabric’s diagonal weave. You weave the thread across a hole or tear to create the same “rib” or diagonal lines seen in the original fabric.
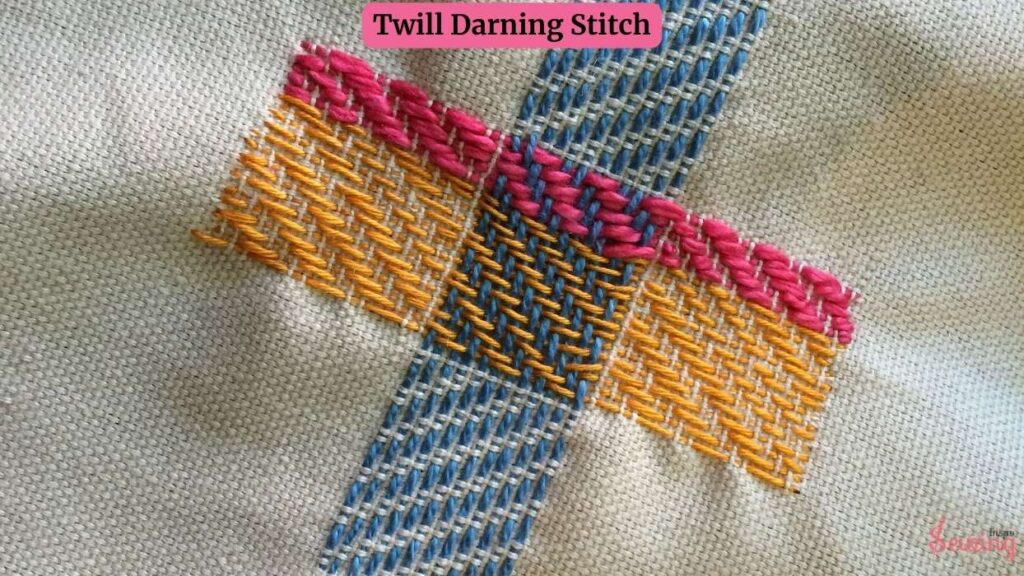
It’s like you’re reweaving the fabric, blending the repair while keeping that strong, textured twill look. It’s a neat, seamless way to fix fabric and ensure the pattern stays intact. This is perfect for darning stitch patterns.
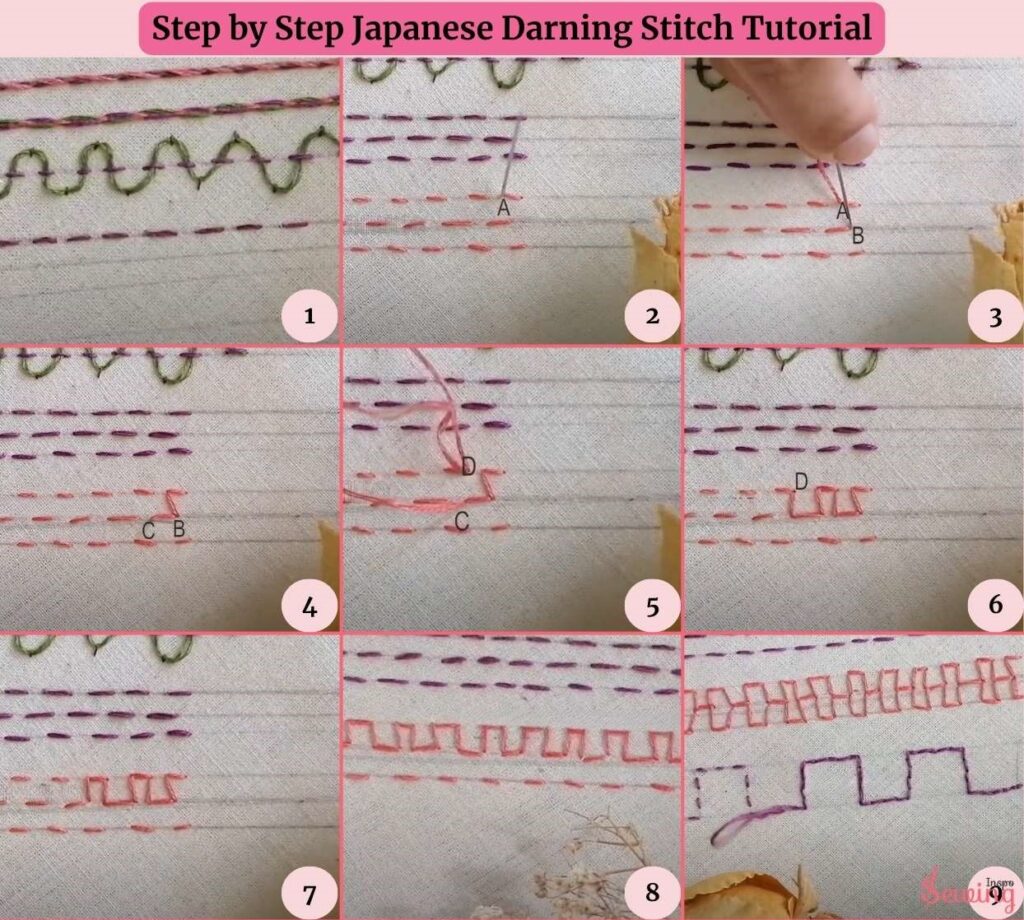
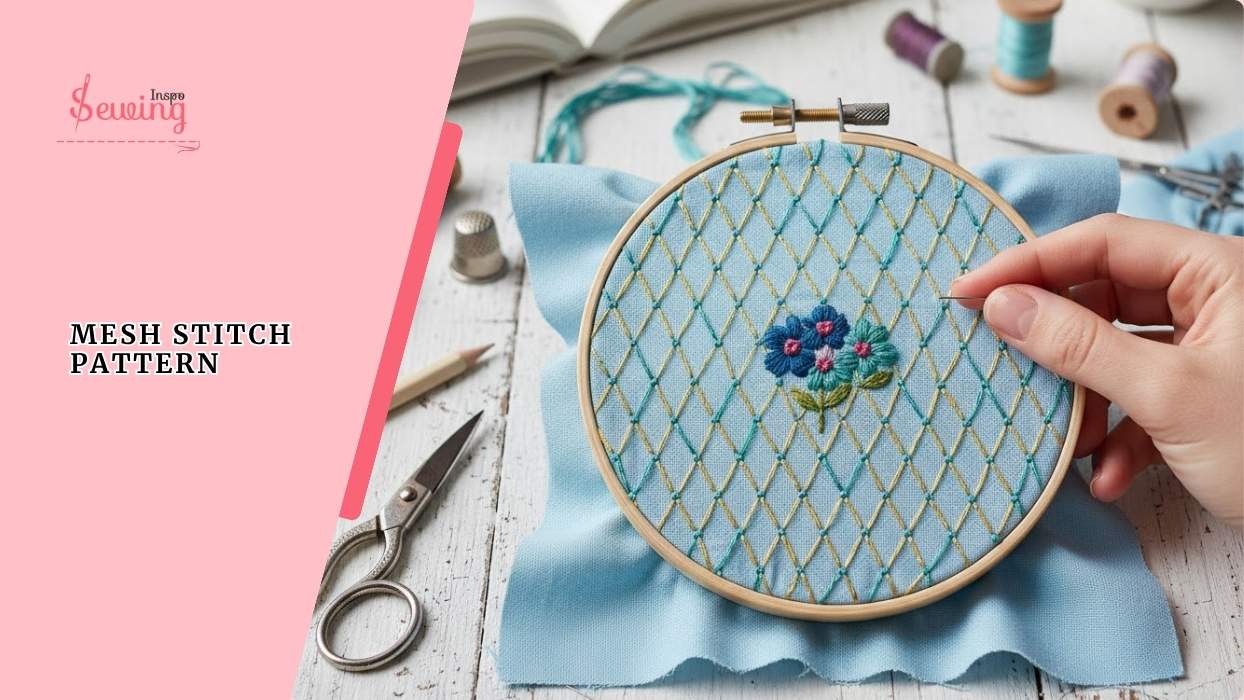
Japanese Darning Stitch
If I say The Japanese darning stitch in one sentence, it is a visible mending technique that uses rows of straight stitches to repair fabric, often creating a decorative, woven look.
Japanese darning stitch is 2 parallel lines of running stitches linked with diagonal stitches. The Japanese darning stitch fills larger areas and creates a beautiful geometric pattern. Japanese darning stitch looks so interesting.
Yes, you heard it right. This type of darning stitch is for embroidery or not for filling the holes!
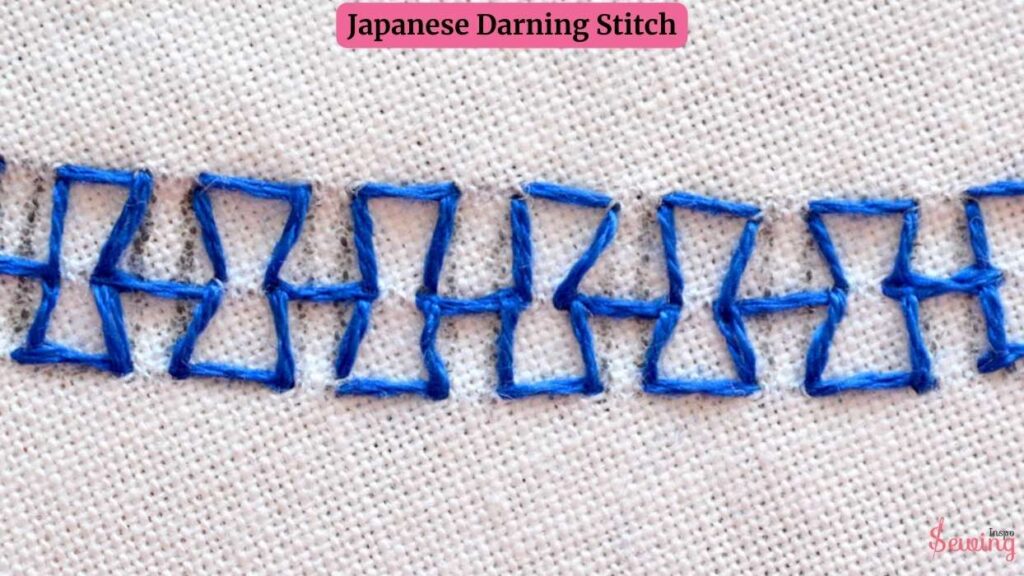

Japanese darning stitch looks like a series of neat, crisscrossed threads that form a grid or lattice pattern. The stitches are often worked in bright, contrasting colours, and repairing is a decorative feature.
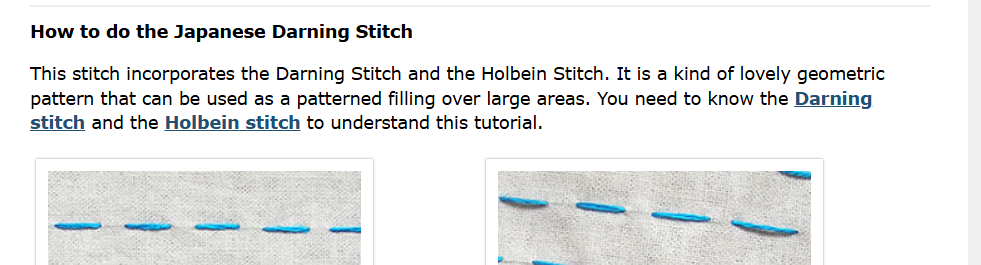
The crisscrossing creates a textured, woven look that blends beautifully with the fabric. It adds function and style to the mend. It’s a way to turn a simple repair into a unique design element.
Japanese Sashiko Darning Stitch
You may think Japanese Sashiko Darning and Japanese Darning are the same, but they are not!
Sashiko means ‘little stabs’, and Japanese Sashiko Darning is a stitch that uses simple, running stitches to create a pattern that mends the fabric and adds a decorative touch. The stitches are usually spaced evenly and are worked in a repetitive pattern.
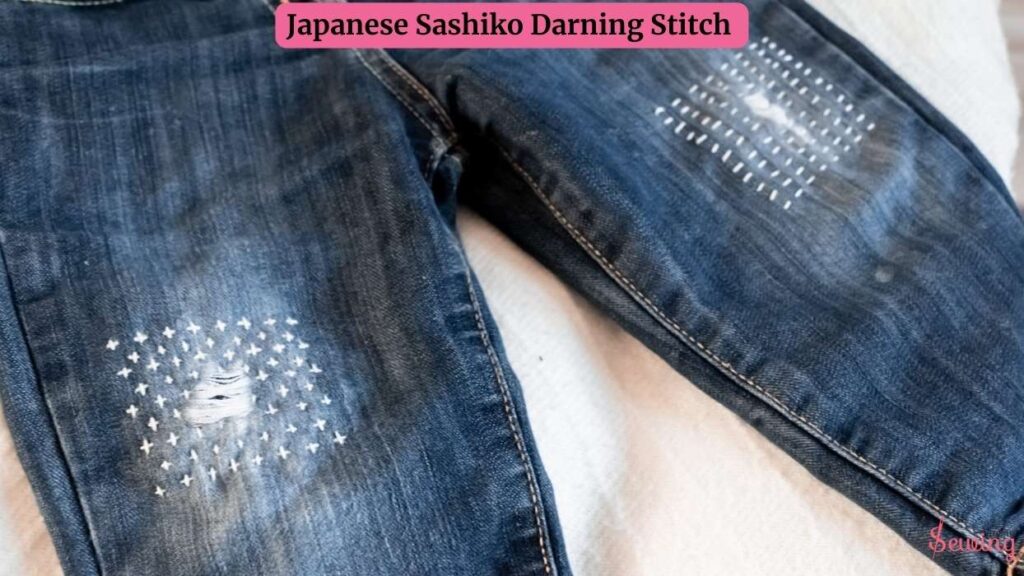
This stitch looks like dots spreading through the whole cloth. The stitches are typically small and even and run in straight lines, forming geometric shapes like squares, diamonds, or hexagons. It will be easy if you use a darning egg to do it.
That looks also perfect for embroidery looks. What do you say? Will you use this stitch for your next sewing project?
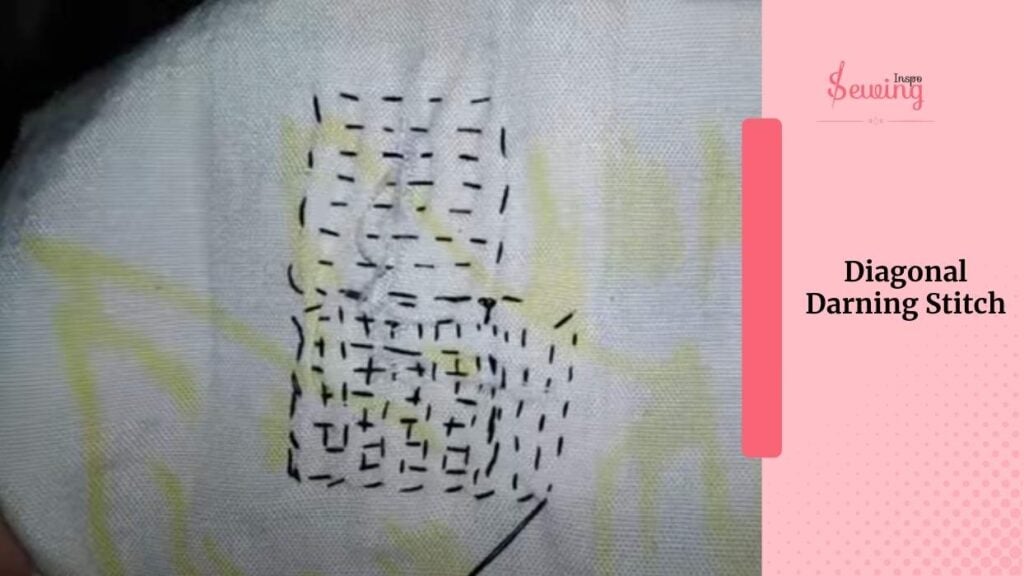
Diagonal Darning Stitch
Diagonal darning stitch is a mending technique where the thread is woven across a hole or tear in a fabric, following a diagonal pattern.
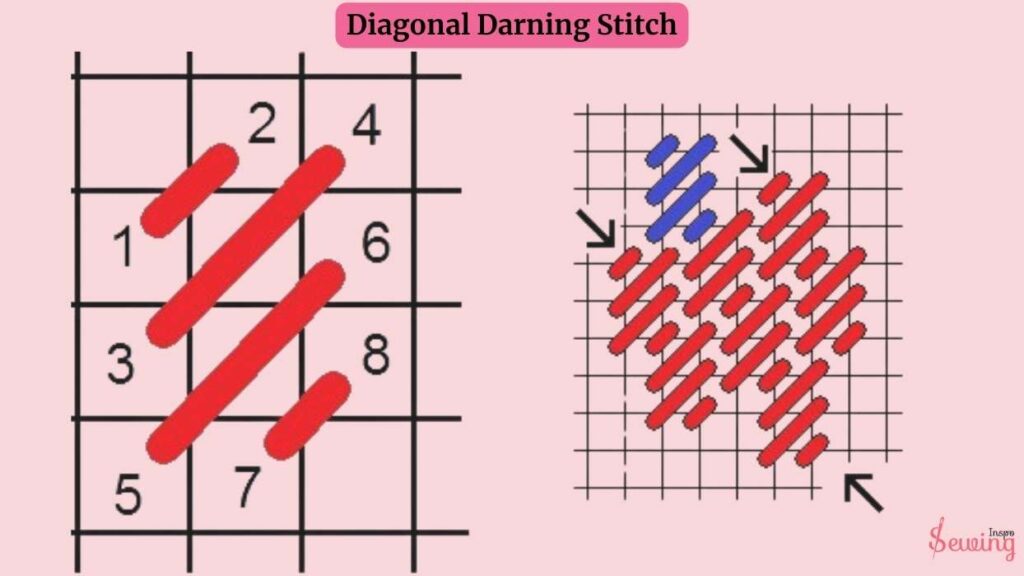
This stitch creates a strong, durable repair while mimicking the fabric’s natural weave or creating a new pattern if desired.
These darning stitches are perfect for areas where you want to soften things up or let some beautiful painting show through.
I use them for floors, walls, skies, sand, and tree trunks. They help add texture and depth to the design! The design will be much better than stitching. Here is how to do it,
- Trim any frayed edges.
- Use an embroidery hoop or darning egg for better tension.
- Thread your needle and tie a small knot at the end.
- Bring the needle up from the back to the front, anchoring the knot underneath.
- Sew diagonally to the opposite side.
- Maintain spacing between 2–4 mm.
When finished, knot on the back side and snip excess thread.
Continue filling the area with evenly spaced diagonal lines.
Pull thread gently to avoid puckering.
Swiss Darning Stitch
Swiss darning stitch, also known as duplicate stitch, is a technique where you “duplicate” the shape of an existing knit stitch by sewing over it with a contrasting yarn. Basically, Swiss darning is for knitting.
It’s a bit fiddly and time-consuming. But it works wonders, especially on knitted fabrics. This method is perfect for mending small holes or adding little details to a project without needing complex techniques like intarsia.
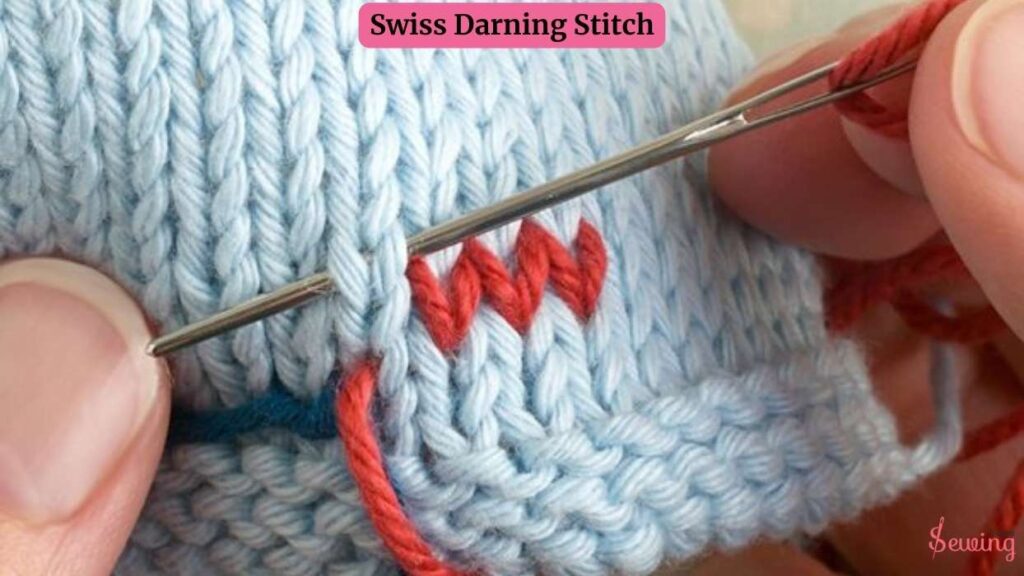
If you’ve got a noticeable spot in your knit, Swiss darning is a great option to repair and blend in beautifully!

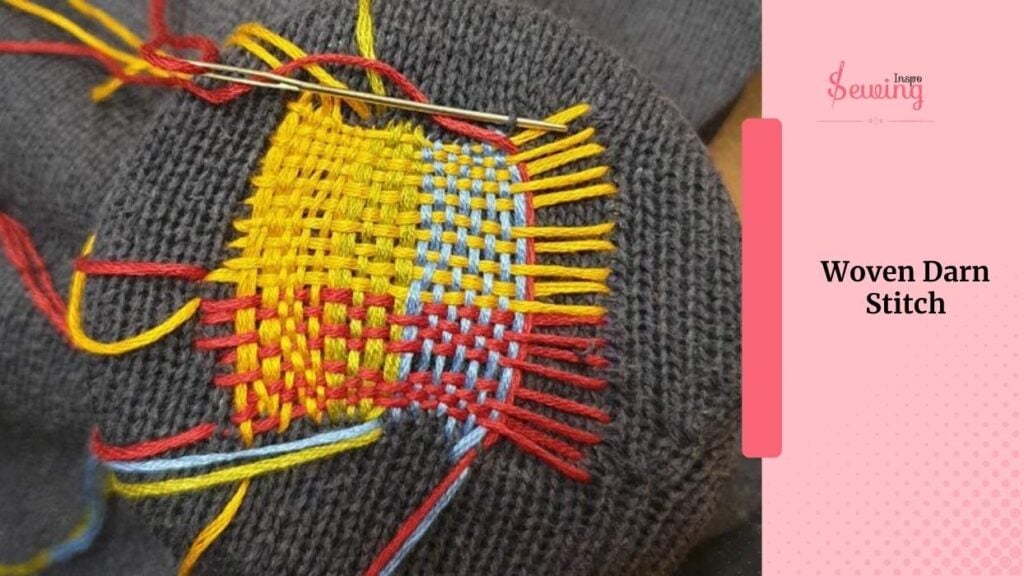
Woven Darn Stitch
A woven darn stitch is stitched by weaving thread over and under the existing fibres to fill in a hole or tear. It creates a woven texture that closely resembles the original fabric, repairing the blend seamlessly with the surrounding area.
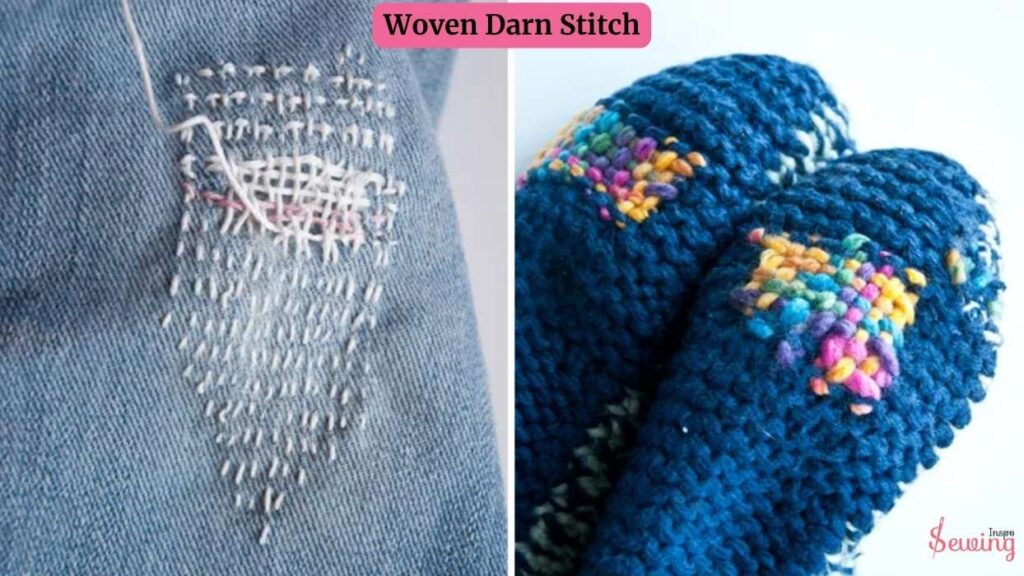
The stitch follows the fabric’s natural weave, and the thread is carefully placed.
Woven darning is especially effective for fabrics like denim or cotton, where you want a durable repair that looks neat and discreet. It blends in well with the fabric and provides a strong, durable repair. Curious how woven darn works? Here is how,
- Bring the needle up from the right side to the left, as if stitching straight.
- Gently pull the thread through similar to scotch darning, not diagonal.
- Push the needle back down where you started, then up at the bottom of the V next to it.
- Follow the V-shape to create neat, structured lines.
- Repeat: Right to left, down, up, just like weaving fabric.
- Avoid tight or loose stitches; relaxed tension blends better.
- If a gap remains, add a whip stitch to fill it.
- Once one row is done, move up slightly and start the next row.
- Repeat the rhythm: up at the bottom of the V, stitch right to left again.
Use a matching thread for invisible repairs or contrasting for decorative mending.
Keep going until the worn area is fully covered.
It is especially for woven fabrics like denim or cotton. It’s both functional and visually pleasing, giving the mended area a clean, seamless look.
Darning A Dropped Stitch
Darning a dropped stitch is a technique used to repair a stitch that has come undone in knitting. When a stitch drops, it can unravel and create a hole in the fabric.
To fix it, you use a darning needle to pick up the dropped stitch, then carefully weave the yarn through the remaining stitches to rebuild the fabric.
When done properly, the repair looks seamless and blends well with the rest of the knitting. It may create a small, tidy patch where the dropped stitch was.
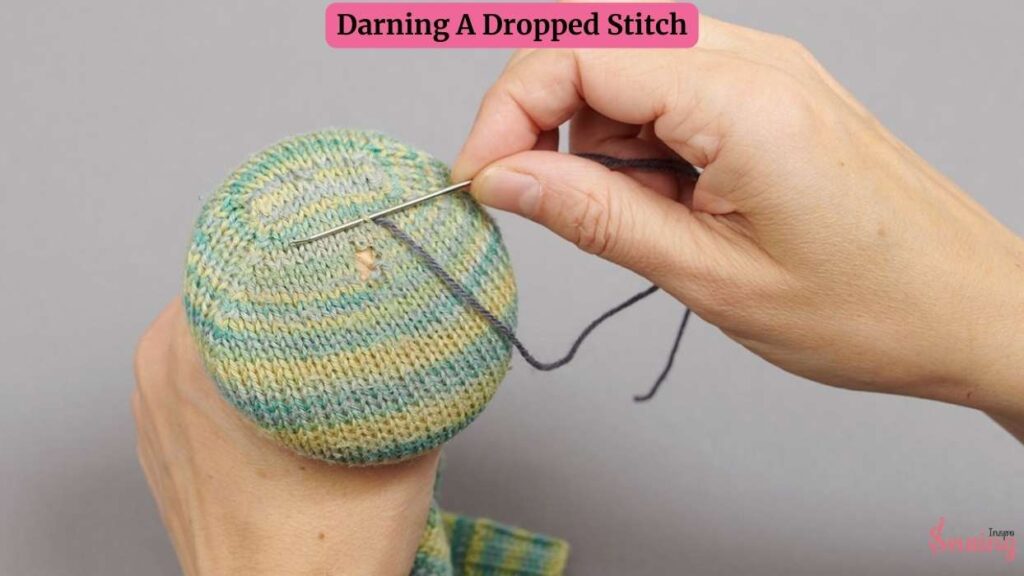
But the overall fabric will maintain its smooth texture. The repaired area usually blends so well that it’s hard to spot.
Honeycomb Darning Stitch
Honeycomb Darning Stitch actually live through its name. It looks exactly like a honeycomb. This is an easily pulled thread stitch with alternating angled stitches that create a honeycomb pattern.
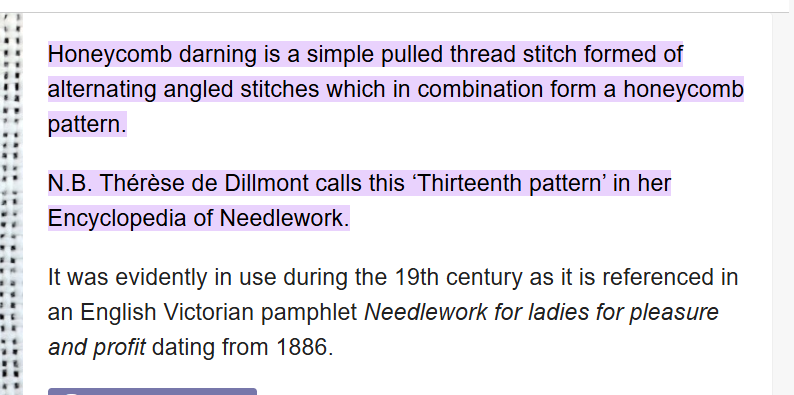
Honeycomb darning is a simple stitch that creates a honeycomb pattern using alternating angled stitches. You weave the thread back and forth, forming hexagonal shapes that resemble a beehive. This one of the easy darning sitich pattern

This is great for mending fabric where you want the repair to be visible, especially in areas with thinner fabric that need a more delicate fix. It’s both a functional and decorative way to mend your clothes.

Honeycomb darning is not just for darning; it can also be used for embroidery.
Types Of All Darning Stitches Visual Guide
Double Darning Stitch
A double darning stitch is created by weaving threads in two directions—first vertically and then horizontally—to recreate the missing fabric. It’s like making a mini woven patch directly into the fabric.
It gives it both strength and invisibility. Great for socks, sweaters, and vintage repairs!

Darning Patterns You Can Try for Clothes and Linen
Here are some darning patterns you can try for clothes and linen.
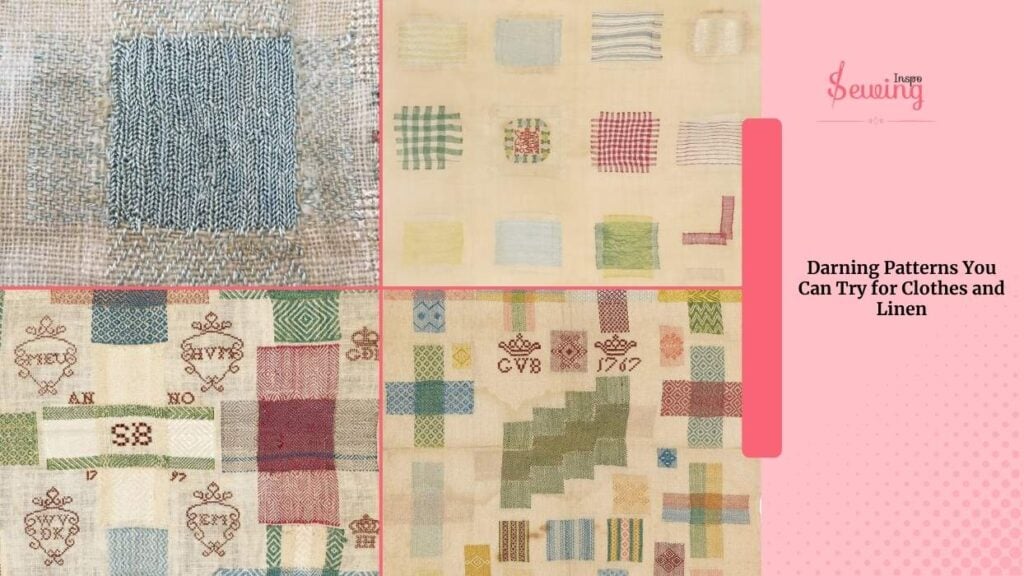
Whether you’re fixing a hole or just adding a bit of handmade charm. Here i tried few have a look,
Embroidery Darning Stitch
I love using darning stitches for fabric repair, but this time, I went decorative with an embroidery darning stitch inspired by Japanese Sashiko.
I’ve tried many types from double to invisible darning, but today’s focus is Hitomezashi, a simple yet beautiful sashiko method.

I drew a 5mm grid inside circles on my fabric (you can use ¼ inch if you prefer) and stitched along the grid horizontally. Then vertically to create a woven, durable pattern. I didn’t use any tools like a darning egg, just stitched flat on a table.
The result?
A strong, eye-catching hand repair that’s perfect for jeans and visible mending.
All Darning Stitch Types In One PDF
Warp Up
After learning about all types of darning stitches, I came to know that darning stitches aren’t just for repair. You can use it for embroidery purposes, too. You just have to know when and what type to use. So what do you think? Which one is your favourite so far?Comment on sewinginspo.


Leave a Reply