
When I switched to machine stitch, I thought there weren’t many options to explore. What & how can a machine let me do embroidery like hand stitch, right? But well………. I’m wrong. There are also options to explore, like types of stitches.
There are actually 29+ types of stitching on a sewing machine. Yes, you heard it right. You must have heard the common ones like backstitch or zigzag. But there are more varieties than that, also.
My favorite type of machine stitch are,
My favorite type of machine stitch are,
- Buttonhole Stitch
- Scallop Stitch
- Herringbone Stitch
- Smocking Stitch
What? Shocked seeing some of the names? Well then, I can’t wait to see your face when I say all of the types of stitches embroidery machine.
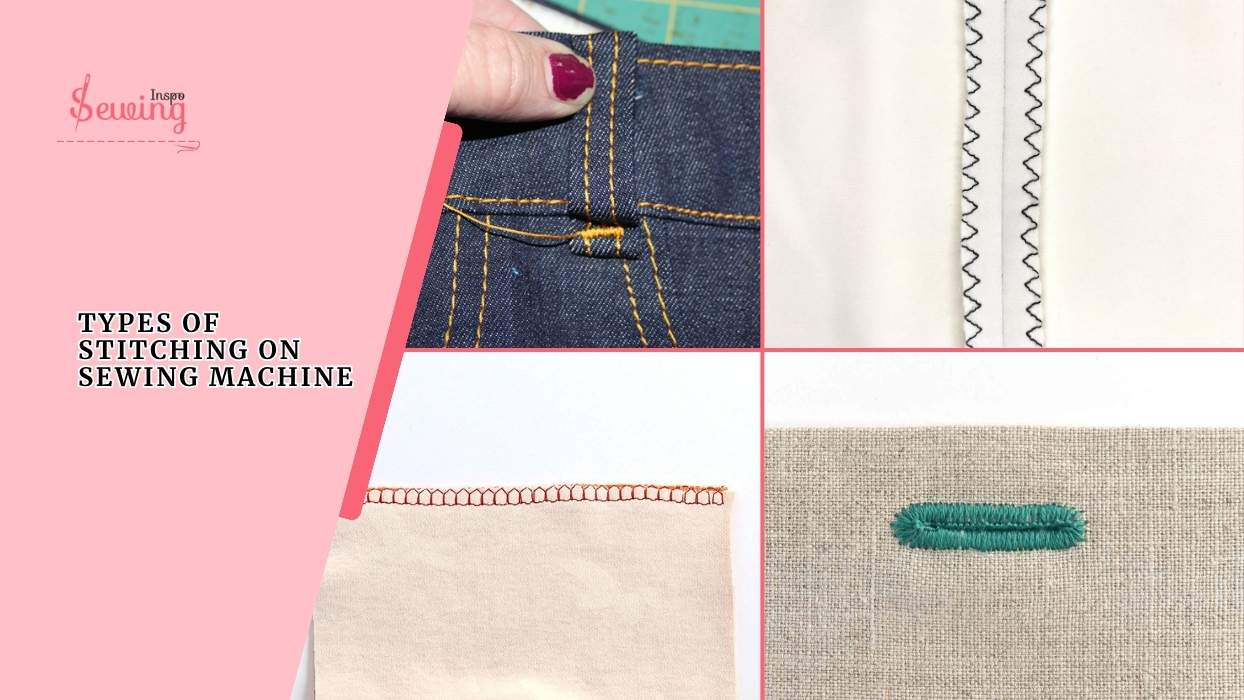
Table of Contents
Sewing Machine Stitches And Their Uses
Sewing machines typically come with a variety of different stitches, each serving a specific purpose. For intense,
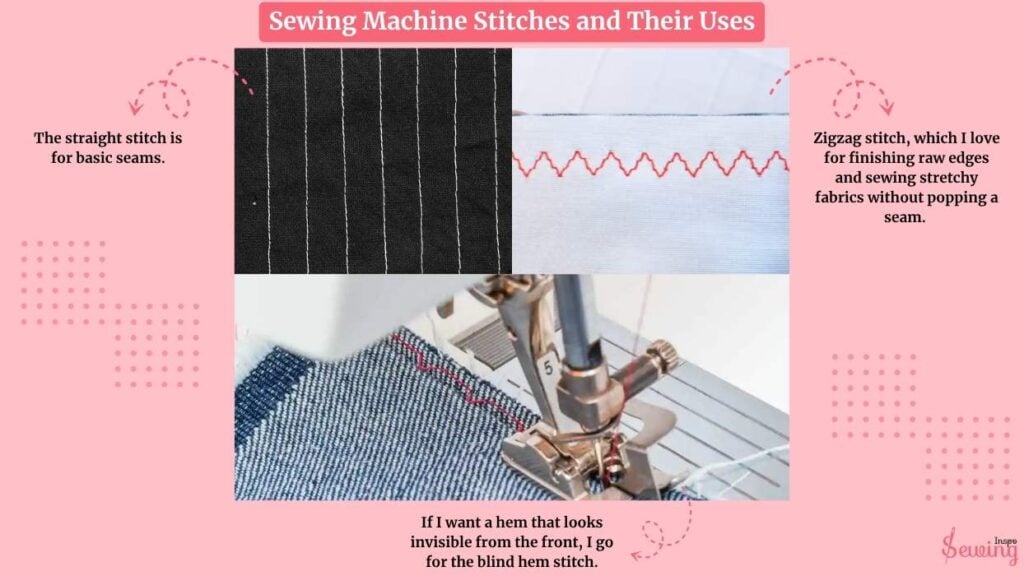
- The straight stitch is for basic seams.
- Zigzag stitch, which I love for finishing raw edges and sewing stretchy fabrics without popping a seam.
- If I want a hem that looks invisible from the front, I go for the blind hem stitch.
Beyond that,
If you want something stronger, there are overlock (for cleaning up edges), decorative stitches. Once you know what they all do, it really opens up what you can make!
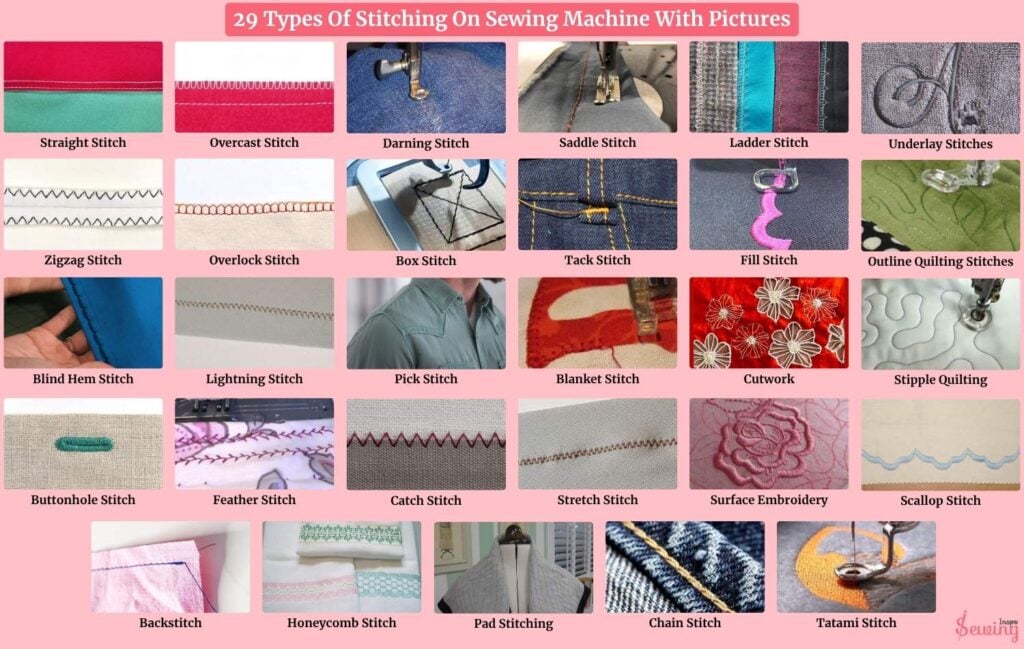
29 Types Of Stitching On Sewing Machine With Pictures
There are 29 types of machine stitches, as in,
- Straight Stitch
- Zigzag Stitch
- Blind Hem Stitch
- Buttonhole Stitch
- Backstitch
- Overcast Stitch
- Overlock Stitch
- Lightning Stitch
- Feather Stitch
- Honeycomb Stitch
- Darning Stitch
- Box Stitch
- Pick Stitch
- Catch Stitch
- Pad Stitching
- Saddle Stitch
- Tack Stitch
- Blanket Stitch
- Stretch Stitch
- Chain Stitch
- Ladder Stitch
- Fill Stitch
- Cutwork
- Surface Embroidery
- Tatami Stitch
- Underlay Stitches
- Outline Quilting Stitches
- Stipple Quilting
- Scallop Stitch
Now let’s get to know types of stitches sewing machine with pictures.
Straight Running Stitch
A running stitch sewing machine is a machine that sews in a straight line, and that’s it. It’s super simple. This is the most common types of stitches on singer sewing machine.
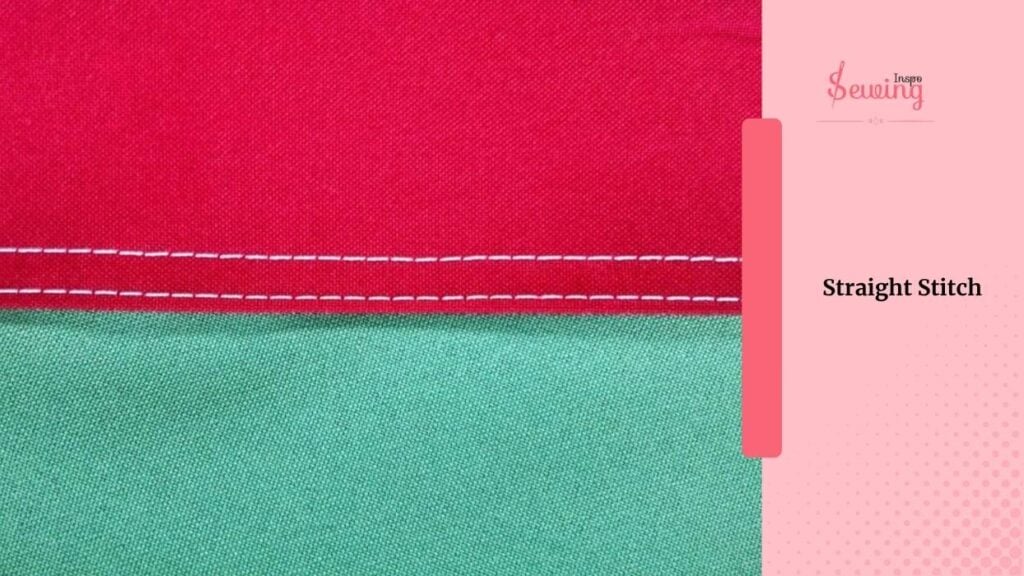
That’s why it’s perfect if you’re just starting out or if your project mostly needs basic seams. I like how easy it is to use, no fuss, just clean, straight stitching.And oh, in sewing machines, running stitch and straight stitch are actually the same.
The stitch length is usually adjustable, too. Most machines let you set it anywhere from 0mm to around 5 or 6mm.
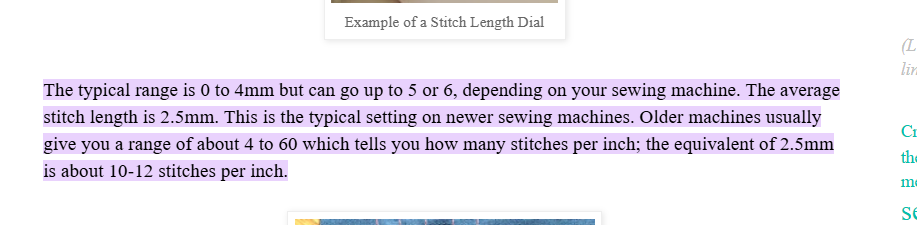
For everyday sewing,
I usually stick to 2.5mm. It’s a solid, standard length. However, if I’m working with thicker fabric or doing basting, I’ll lengthen it slightly. It’s one of those foundational stitches you’ll use all the time.
The fun thing is you can use this stitch everywhere.
Zigzag Stitch Sewing Machine
The zigzag stitch is unlike the straight stitch, it moves side to side in a zigzag pattern, which gives your seams a bit of flexibility. The zig zag pattern makes it perfect for sewing knit fabrics, elastic, or even just finishing raw edges when you don’t have a serger.
And trust me, it is very handy stitches I use all the time, especially when I’m working with fabrics that stretch or fray easily. These are common types of stitches on brother sewing machine.
The fun thing is the stitch length on a zig-zag stitch basically controls how far apart each “point” of the zig-zag is. So, it’s basically how much space is there between where the needle enters and exits as it moves side to side.
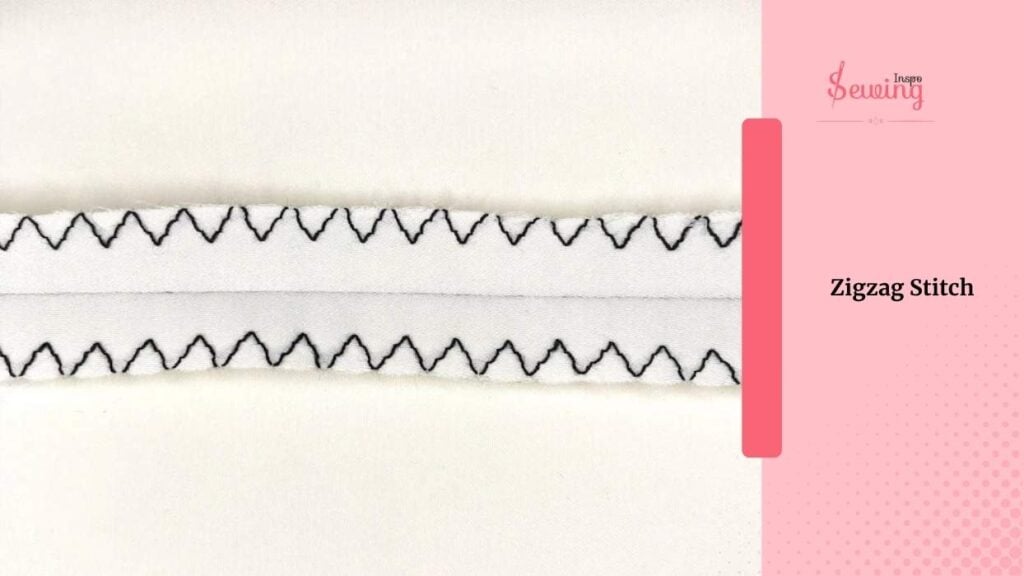
So, adjust it on your machine using the stitch length dial or digital settings. Most machines allow you to set the stitch length anywhere from 0mm to around 5mm or 6mm. A good, all-purpose setting is usually 2.5mm.
I like to shorten it for tighter stitches and lengthen it when I want the zigzag to look more open or decorative. There are 3 types of zigzag stitch sewing machine, too depending on the length for example,
- Regular Zigzag Stitch
- 3-Step Zigzag
- Satin Stitch
Blind Stitch Sewing Machine
The blind hem stitch is one of those stitches I reach for when I want a clean, professional finish, without the stitching showing on the outside. It works by sewing a row of straight stitches on the hem allowance, with small zigzag “bites” that barely catch the outer fabric. That’s where they got the blind stitch sewing machine name.
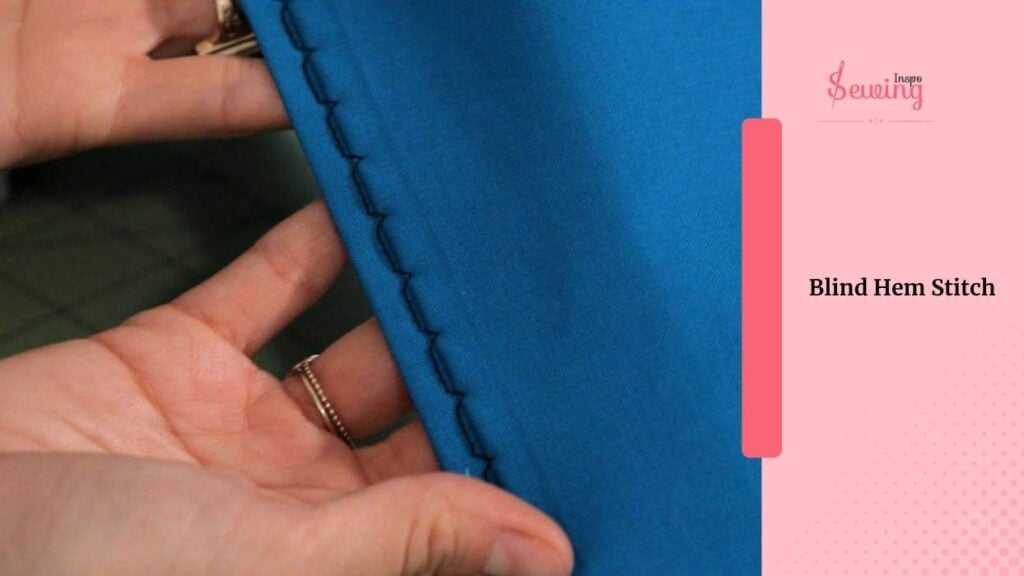
That’s what keeps the hem in place while staying nearly invisible. This stitch is simple. You actually have to go through a lot of hassles. You can do it with a blind hem foot.
On most machines, some even have stitch options for wovens and knits. I usually set the stitch length to 2–3 for machine blind stitch. However, you can adjust it according to the fabric. Once you get the fold right, it’s quick, clean, and looks professional.
Buttonhole With A Sewing Machine
A buttonhole stitch on a sewing machine is a tight zigzag stitch that supports and finishes the edges of buttonholes. It keeps them neat and prevents fraying.
The stitch is a total lifesaver when you’re adding buttons to anything shirts, dresses, pillow covers, you name it. It’s the stitch your machine uses to create those neat little slots for buttons to slide through, and most machines today make it super easy.
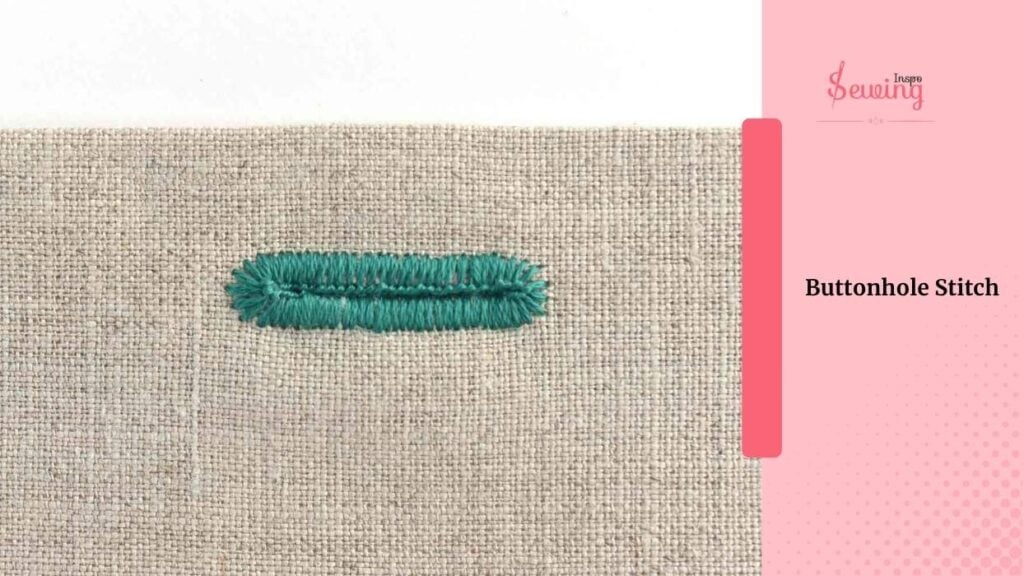
There are a couple of styles depending on your machine:
The stitch length is usually extremely short, typically between 0 and 1, and sometimes even slightly negative, depending on your machine. That’s because you want a dense satin stitch that really locks down the edges of the buttonhole so it won’t fray or stretch out.
Backstitch Sewing Machine
The backstitch sewing machine is one of those simple but super important stitches I use all the time. It’s essentially what you do to secure your stitches in place at the beginning and end of a seam, preventing anything from unravelling.
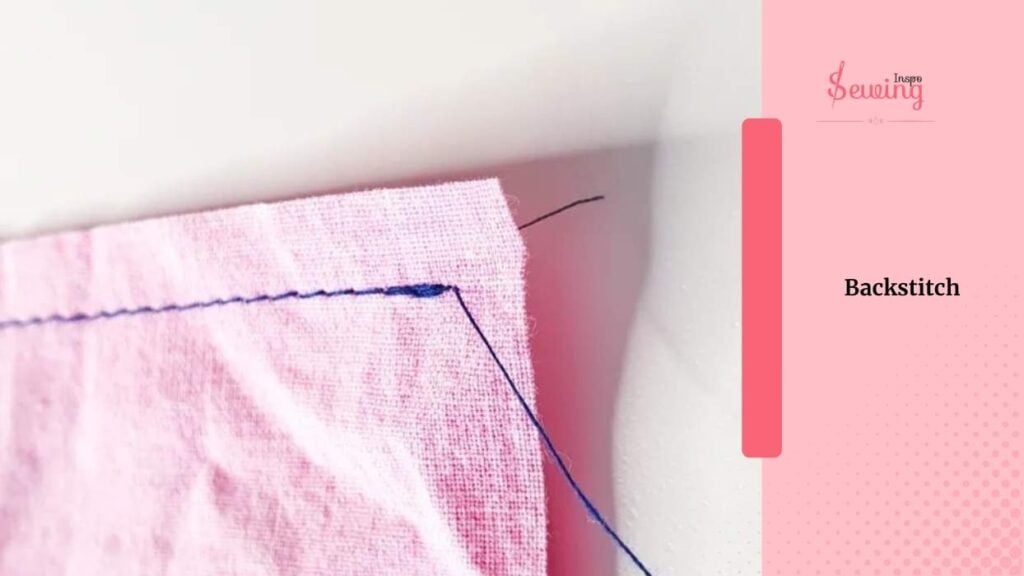
On most sewing machines, you can do this by holding down the reverse stitch button for a few seconds at the start and finish of your seam. The machine stitches backwards over your previous stitches, creating a strong little “knot” that keeps everything secure.
It’s quick and easy. But you need it to secure each and every stitch. If you are wondering how to end a stitch sewing machine then do a backstitch.
Machine Overcast Stitch
The overcast stitch is the stitch that wraps around the edge of the fabric, securing it so it won’t unravel over time. I usually use it on woven fabrics or anything that tends to fray easily, especially if I don’t have a serger handy.
Most machines have an overcast stitch built in. It’s usually a tight zigzag or a special stitch pattern designed to hug the edge neatly.
You just need to use an overcast foot, which helps guide the fabric so the stitch stays perfectly placed right on the edge.
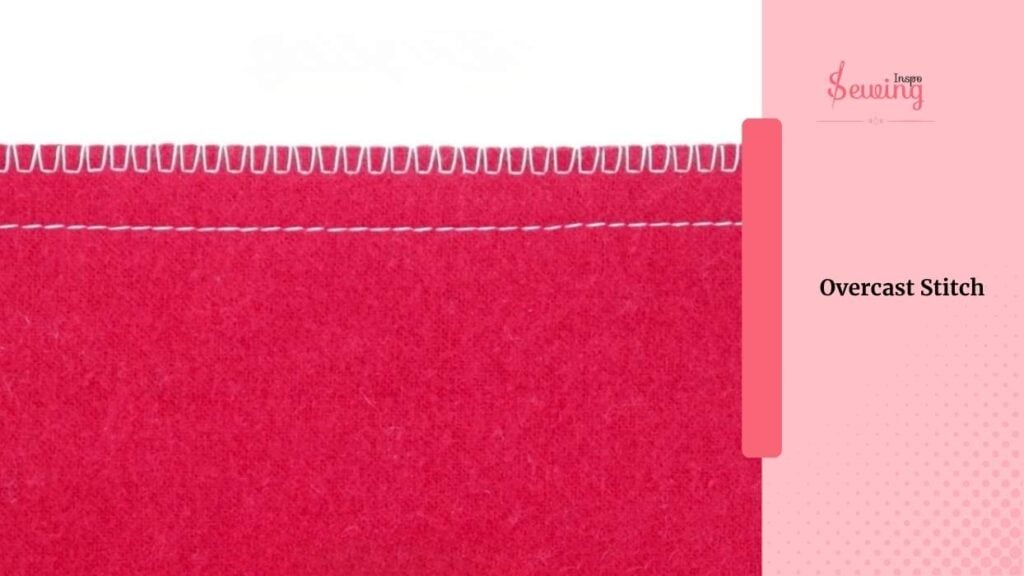
It’s a quick and easy way to give your seams a clean, professional finish without any fancy equipment. You just need to find the overcast stitch symbol and start doing it.
Overlock Stitch Sewing Machine
The overlock stitch is a stitch that wraps around the edge of the fabric, similar to what you’d see on store-bought clothes. It is also a serger stitch.
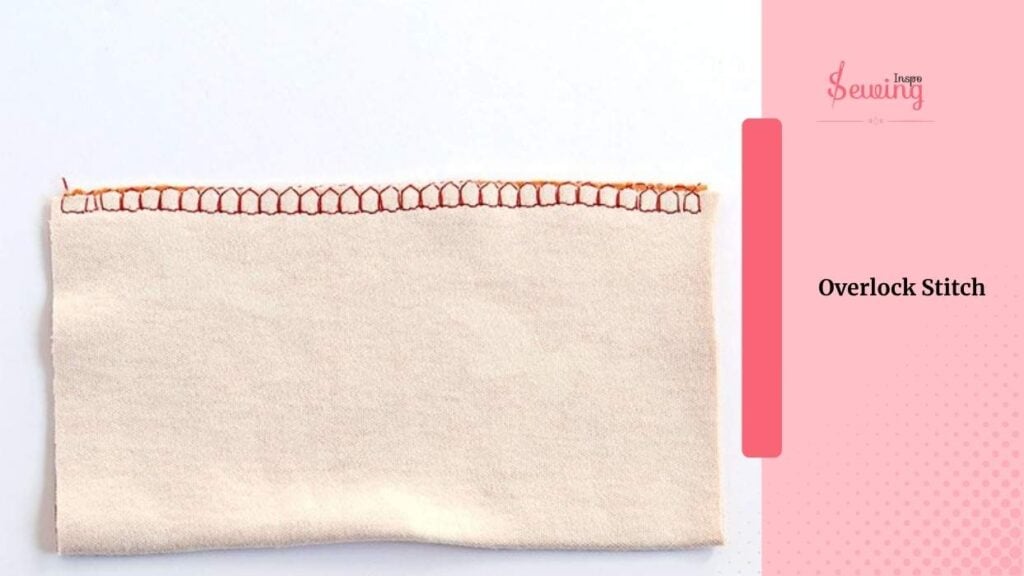
Even if you don’t have a serger, you can still get a similar look using your regular sewing machine, with either a zigzag stitch or a special overlock foot. That’s why it is also called among the serger stitch family.
When it comes to settings,
The stitch length is usually adjustable most machines let you go anywhere from 0 to 5 mm, and I’ve found that around 3 mm works well for medium-weight fabrics.
If I’m working with something heavier or lighter, I simply adjust it slightly using the dial or the setting control. It’s one of those stitches that instantly makes your project look way more polished.
There are even other kinds of overlock stitches, too, for example,
- 4-thread
- 3-thread
- 2-thread overlock stitches
If you can’t find any of that on your sewing machine, then do a mock overlock stitch. It’s like mimicking the overlock. It’s better than nothing, right?
Lightning Stitch Sewing Machine
The lightning stitch is a special version of the zigzag stitch, but instead of sharp angles, it forms a soft, zigzag line that resembles a lightning bolt.
What makes it great is that it stretches with your fabric, so your seams don’t pop when the fabric moves. It’s perfect for sewing leggings, T-shirts, or any item with knit material. Plus, it looks neater than a regular zigzag and lays flatter, which is a nice bonus.
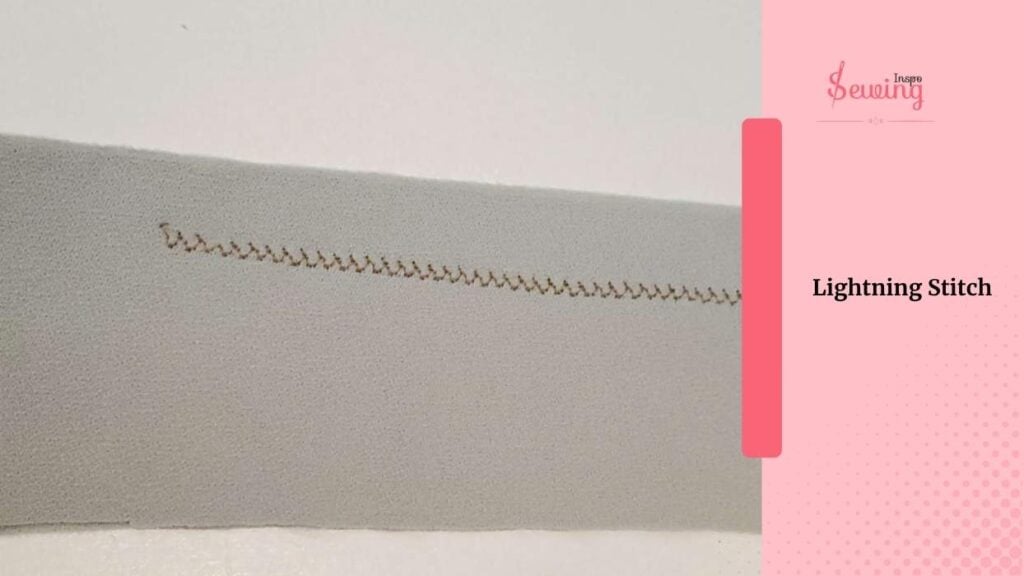
Most machines that have stretch stitches will include the lightning stitch sewing machine.
I usually set the stitch length around 2.5 to 3 mm, but I’ll adjust it depending on how stretchy the fabric is. Once I discovered this stitch, it totally changed how I approached sewing with knits. No more broken threads!
Feather Stitch Sewing Machine
The feather stitch is composed of small, crisscrossing stitches that branch out like feathers. I love using it when I want to add a bit of flair to something simple, like a baby blanket, a table runner, or the edge of a quilt block.
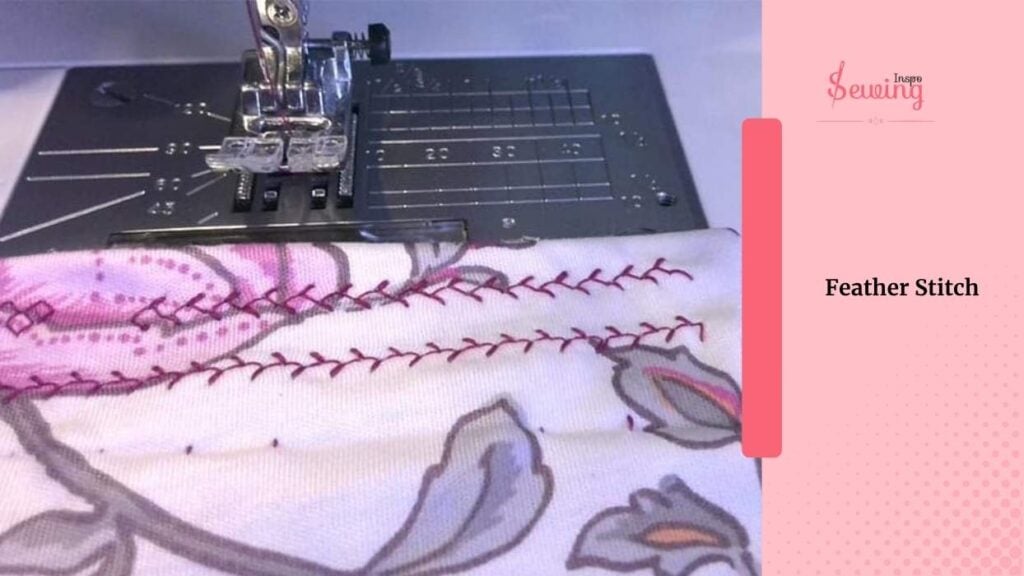
Even though it looks fancy, most modern machines have a built-in feather stitch option, so you don’t have to do anything by hand.
Simply select the stitch, then set your length and width. I usually go somewhere around 2.5mm for length, and 4mm for width, depending on how bold I want it. And let the machine do the feather stitch sewing machine work by itself.
It’s not a structural stitch, so I don’t use it for seams. But it’s perfect for embellishment, crazy quilting, or even joining two pieces of fabric with a decorative touch in between.
If your machine doesn’t have the stitch built in, then you need to twist some things to do it. Here is what I am saying-
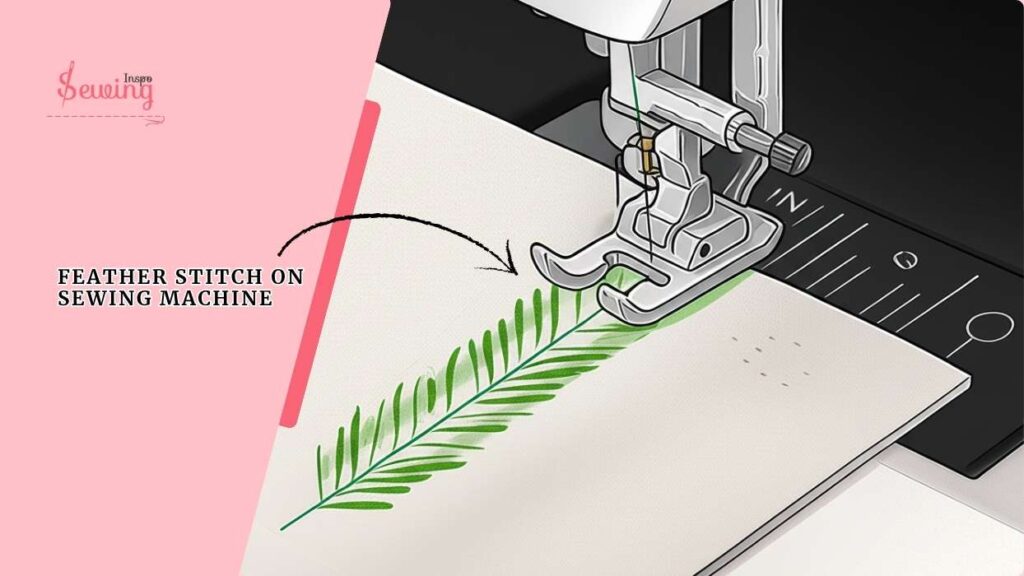
- Set stitch length to 2.5 and width to 5.0.
- Use size 80/12 for cotton, 90/14 for thick fabrics; polyester thread recommended.
- Clean, press, and stabilize lightweight fabrics.
- Place under zigzag foot, align needle ¼” from edge.
- Lower the Presser Foot and hold the thread tails behind.
- Let the machine follow its feather pattern; guide fabric gently.
- Keep the needle down, lift your foot, adjust the angle, and continue.
Honeycomb Stitch Sewing Machine
The honeycomb stitch resembles a stretched-out zigzag with double lines, giving it a honeycomb-like appearance. It’s one of those decorative stitches that looks just as cool as it sounds. It creates a pattern that literally looks like a row of tiny honeycombs.
It looks fun, but it’s a tricky stitch type. That’s why you need a special machine with a pressure foot for a honeycomb stitch. Not all machines can do it. Sad? Well, it’s, but it’s true.
However, no worries, most machines will have the honeycomb stitch in the decorative or stretch stitch section. For settings,
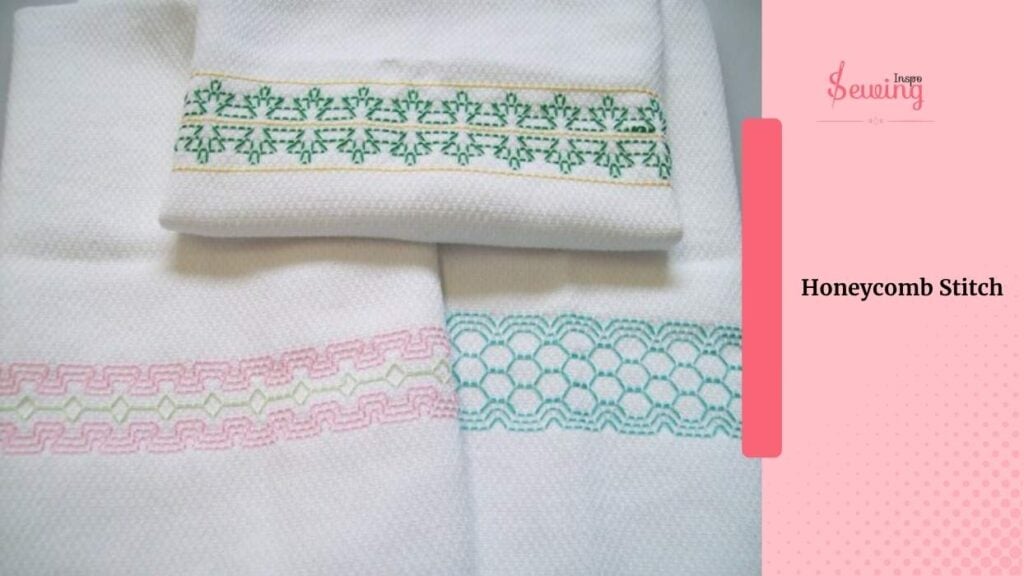
I usually start with a length of about 2.5mm for the honeycomb sewing machine stitch. However, you can adjust it to suit your preference for a denser or more open pattern.
It’s not a stitch I use every day, but when I want something fun and eye-catching. However, it’s somewhat challenging to track. So, practice it as much as possible.
Darning Machine Stitch
The darning sewing machine is a built-in fix-it tool on your sewing machine. It works by creating a tight back-and-forth stitch that fills in the damaged area, like weaving a mini patch directly into the fabric.
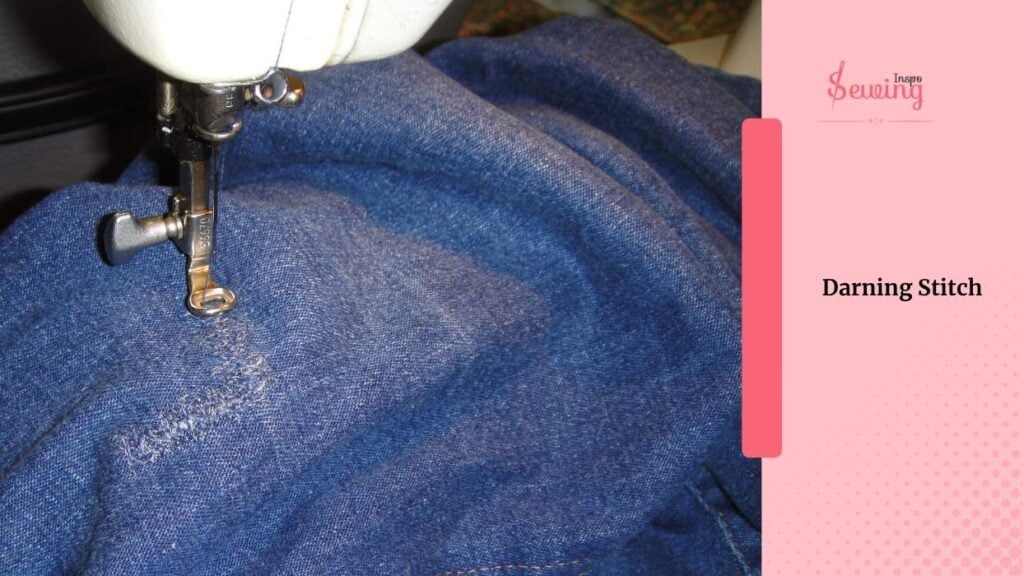
Most machines have a darning or mending stitch option, and some even let you move the fabric freely using free-motion darning. It is great for odd-shaped holes or tricky spots. You can either stitch in straight rows or create a crisscross pattern for extra reinforcement.
And about the length,
I usually set the stitch length really short, between 0 and 1mm, or even to zero if I want the needle to stay in one spot while I manually move the fabric.
That way, I can create a little woven patch by guiding the fabric back and forth under the needle. The darning looks and feels smoother than hand-knit one.
Box Stitch Sewing Machine
The box stitch is a sturdy stitch that’s often used to support stress points, such as the corners of tote bag handles, belts, or straps.
It’s called a “box stitch” because, well, it literally forms a box or square with an X inside. This shape helps evenly distribute tension, so whatever you’re sewing doesn’t rip or tear when pulled.
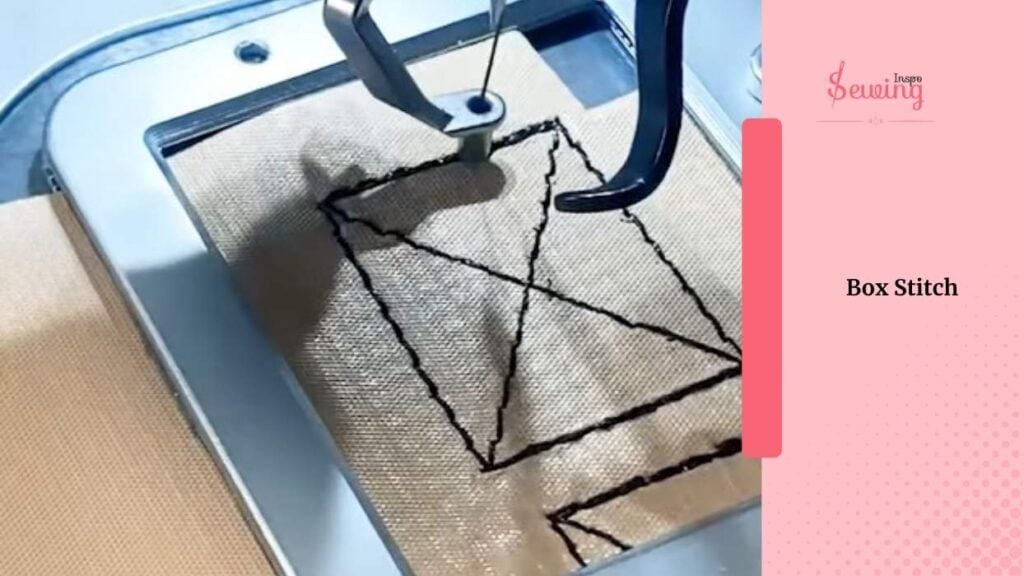
Now, not every sewing machine has a pre-programmed box stitch, especially basic or older models. However, the good news is that you can still do it manually with just a straight stitch.
Here is how how box stitch sewing machine works,
I usually sew a square first, then add diagonal stitches to make the “X” across the middle. It takes a little practice. But once you get the hang of it, it’s super satisfying and makes your project way more durable.
So, if your machine doesn’t have this built-in, don’t get sad. Just do 2 x stitch and you are done. It’s one of those simple tricks that instantly makes your sewing feel a bit more pro.
Pick Stitch Sewing Machine
The pick stitch creates tiny, evenly spaced stitches on the outside of the fabric, with longer ones hidden on the inside.
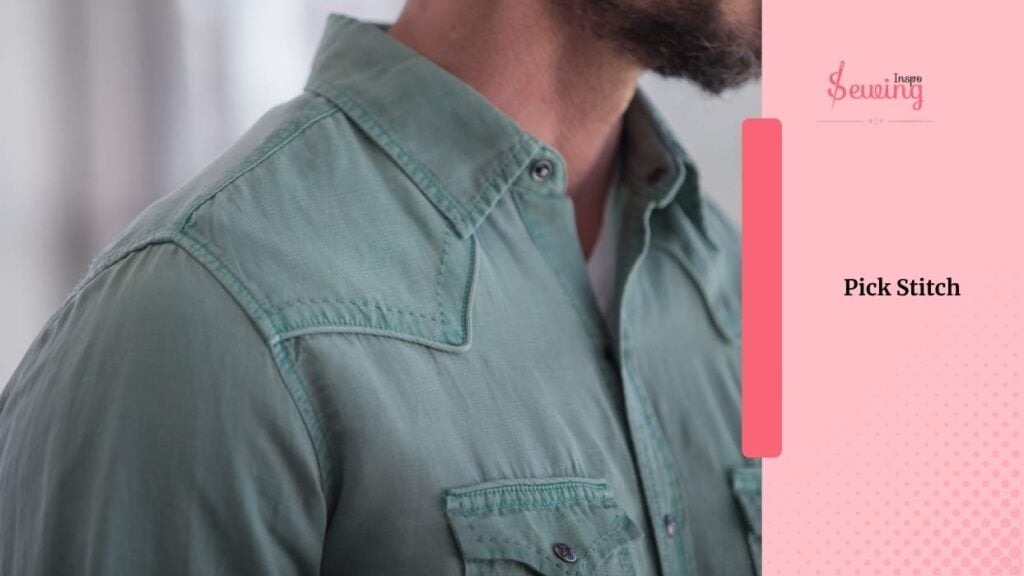
It’s one of those little details that can make your project look really polished. But still a bit handmade in the best way. But still pick stitch machine works too.
It’s extremely popular for tasks such as hemming formal wear, tailoring jackets, or even adding a subtle design element along seams. I like it because it gives a clean, professional look without being overly attention-seeking.
Catch Stitch Sewing Machine
The catch stitch is one of those stitches I reach for when I want to secure a hem but still keep it a little flexible and almost invisible from the outside. It’s a hand stitch that forms little crisscrosses (like Xs) across the back of the fabric, catching just a few threads of the outer layer.
It’s perfect for hemming thicker fabrics, such as wool, or for areas where you don’t want the hem to show through, like on skirts, jackets, or unlined coats.
The cool thing is, even though it holds everything in place, the stitch has a bit of give. So it moves with the fabric instead of pulling or puckering. Most sewing machines don’t have a true catch stitch built in.
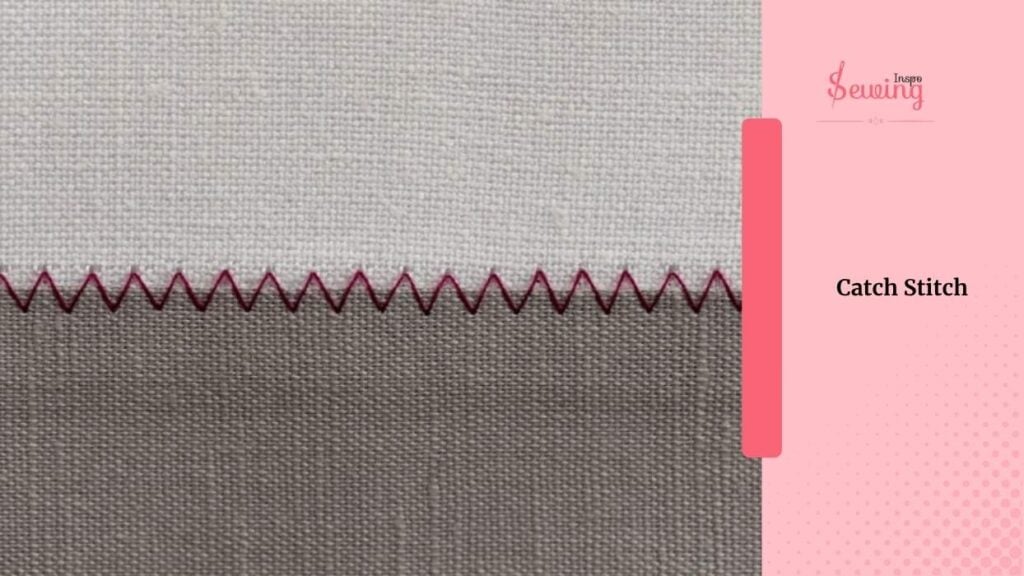
You need a special machine to do it, actually. If no special catch stitch sewing machine, then no catch stitch.
With a special catch stitch sewing machine, here is how you can do it-
- Choose the right thread & setting
- Align fabric
- Do a test stitch
- Press the fabric under the pressure foot
- Guide the fabric
- End catch stitch with a backstitch
Pad Stitching Machine
A pad stitching machine is one of those old-school tailoring techniques that focuses on structure and shape. It’s done by hand and is mainly used to attach layers of interfacing to fabric, especially in items such as jacket lapels, collars, or tailored bodices.
What makes it special is how the tiny diagonal stitches are sewn in a brick-like pattern, letting you shape the fabric as you go.
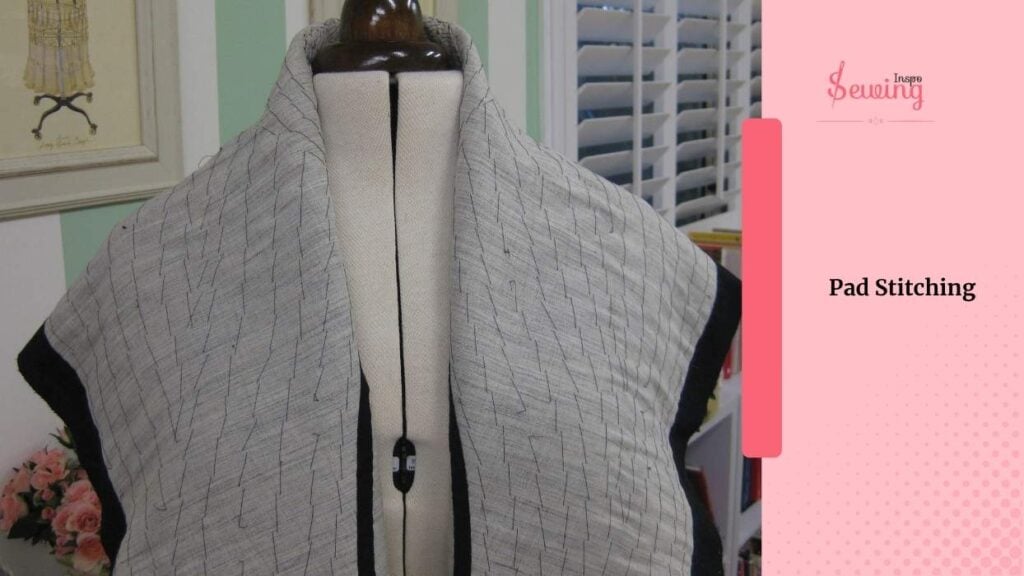
The stitches are small on the outside, but grab a bit more of the interfacing underneath. As you stitch, the fabric starts to curve or roll naturally, which is perfect when you’re building in that crisp lapel roll or sculpted shoulder line.
It takes more time than regular stitching. But if you’re diving into more advanced garment sewing or classic tailoring, pad stitching is your secret weapon.
It gives structure, support, and that lovely handmade feel that’s built to last.
Saddle Stitch Machine
The saddle stitch is a technique known for its exceptional strength and durability. You’ll mostly see it in leatherwork, such as wallets, belts, bags, or any project that requires seams to last forever.
Unlike machine stitches, the saddle stitching machine employs two needles and a single thread. You pass each needle through the same hole from opposite sides, like a crisscross.
What’s awesome is that even if one side of the thread breaks, the other holds everything together. So, it’s way sturdier than a lockstitch from a machine.
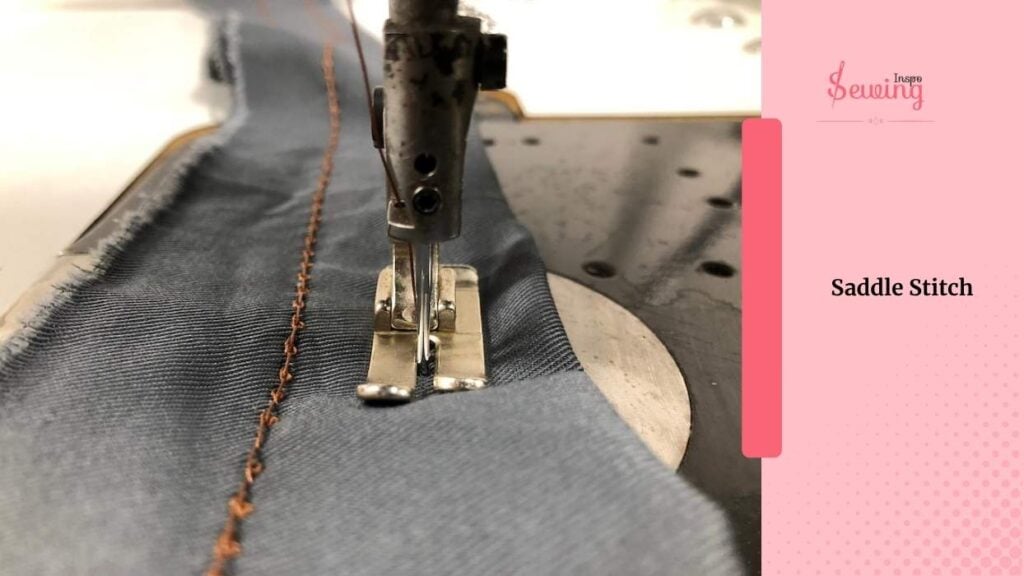
It does take a little time and patience (especially punching the holes evenly), but the result is a clean, professional-looking stitch that’s built to last. I like using it when I’m making something special by hand and want that handmade, yet perfect, finish.
Tack Down Stitch
The tack down stitch is one of those short and sweet stitches I use when I need to hold something in place temporarily or support a small area. It’s a series of tight, repeated stitches in one place, like a mini knot made by the sewing machine.
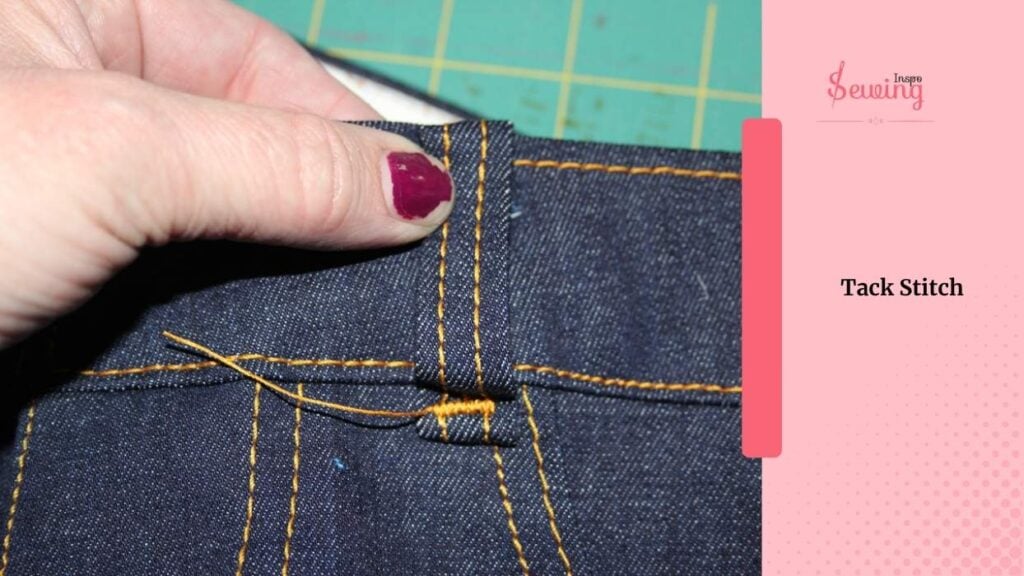
I use it to secure items like belt loops, pleats, zippers, or the corners of pockets and straps anywhere that might get tugged or pulled frequently.
It’s also handy for temporarily attaching layers together before final stitching.
It’s small, quick, and super strong, like the little bodyguard of your seams. There are even some versions of machine tack stitch,
- Diagonal Basting
- Bar Tack
- Nap Tack Stitch
Blanket Stitch Sewing Machine
The blanket stitch is a straight stitch along the edge of your fabric with a little side stitch that dips into the fabric, kind of like an “L” shape. The sewing machine blanket stitch symbol also looks the same.
That creates a nice outline around your appliqué or hem and helps secure the edges to prevent fraying.
I like using it when I want to add a visible, decorative touch, especially on quilts, fleece blankets, or even crafty projects like felt ornaments. It’s one of those stitches that makes your work look polished without being too formal.
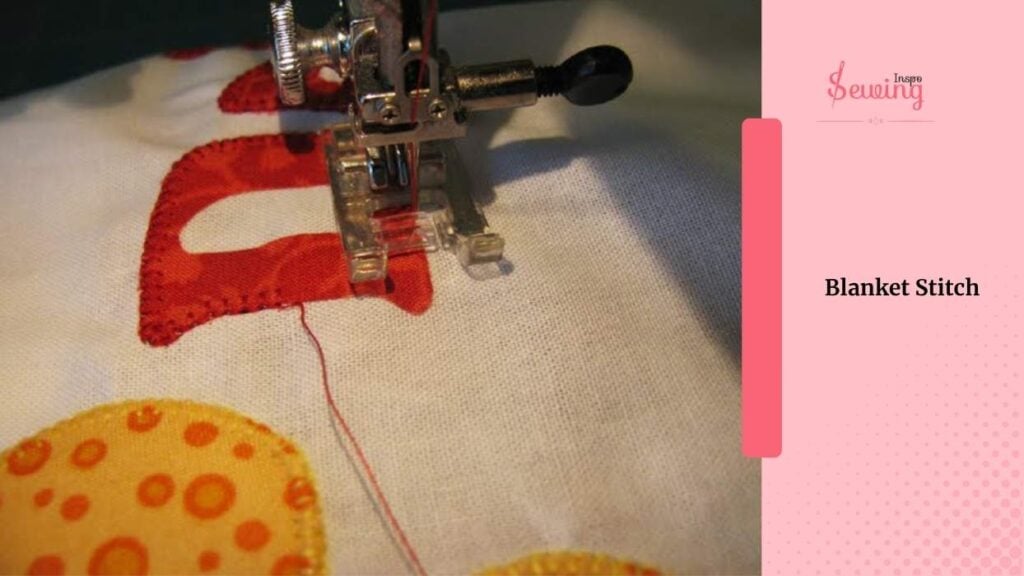
When I use the machine version, I usually pair it with a stabiliser. And I slow down the speed a bit so I can keep things lined up nicely along the edge.
Stretch Stitch On A Sewing Machine
The stretch stitch looks like a regular straight stitch, but it’s specially designed for stretchy fabrics. It’s made up of tiny back-and-forth motions that let the seam stretch along with the fabric. The stretch stitch symbol may look like lightning.
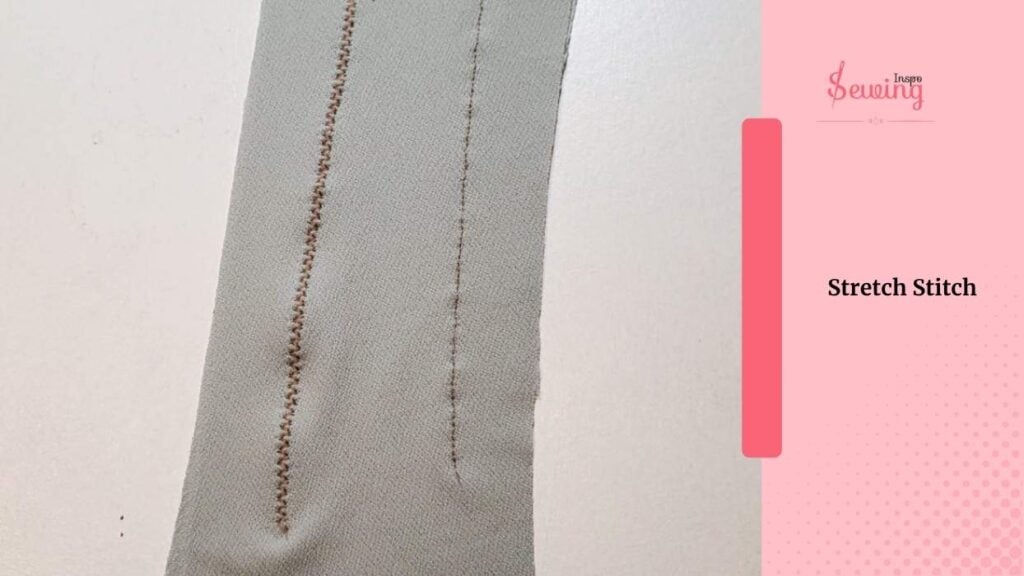
So, you don’t end up with popped seams. The stitch reinforces itself by sewing forward and backwards in quick succession. It gives your stretchy clothes the durability they need.
There are even some different versions of stretch stitch. For intense,
It sews a little slower since it’s reinforcing each stitch as it goes, but that extra strength is so worth it. Honestly, once I found this stitch, it became my secret weapon for stretchy fabrics.
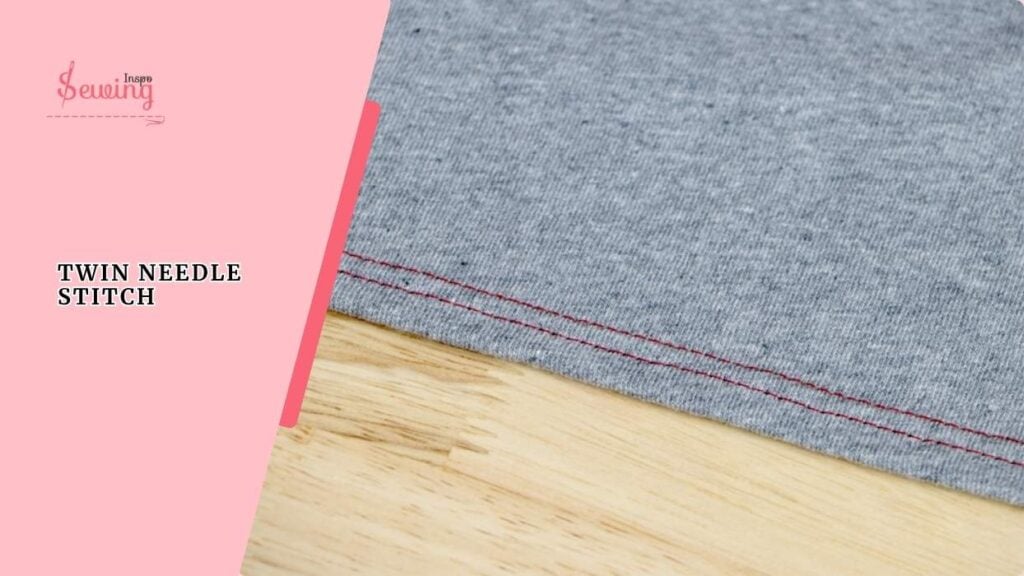
Twin Needle Stitch
Twin needle stitch is the interesting one. So i get questions about it the most. So i thought add a glance of this stitch. So A twin needle is two needles joined by a single shank at the top, so it fits into your sewing machine just like a regular needle.
It’s looks like 2 parallel lines on the front of your fabric. Now flip it over, and you’ll find a stretchy zigzag on the back that lets the seam flex without breaking.
Chain Stitch Machine
The chain stitch is a small, chain-shaped stitch that runs along your fabric. It’s known for its flexibility and strength. Chain stitch machine is great for decorative stitching, basting, or even seams that require a bit of give, such as those on stretchy or heavy fabrics.
Now here’s the thing,
Not every regular sewing machine can do a true chain stitch. It’s usually found on coverstitch machines, industrial machines, or specialised chain stitch machines.
So if you’re using a basic home sewing machine, chances are it doesn’t have this option built in. That said,
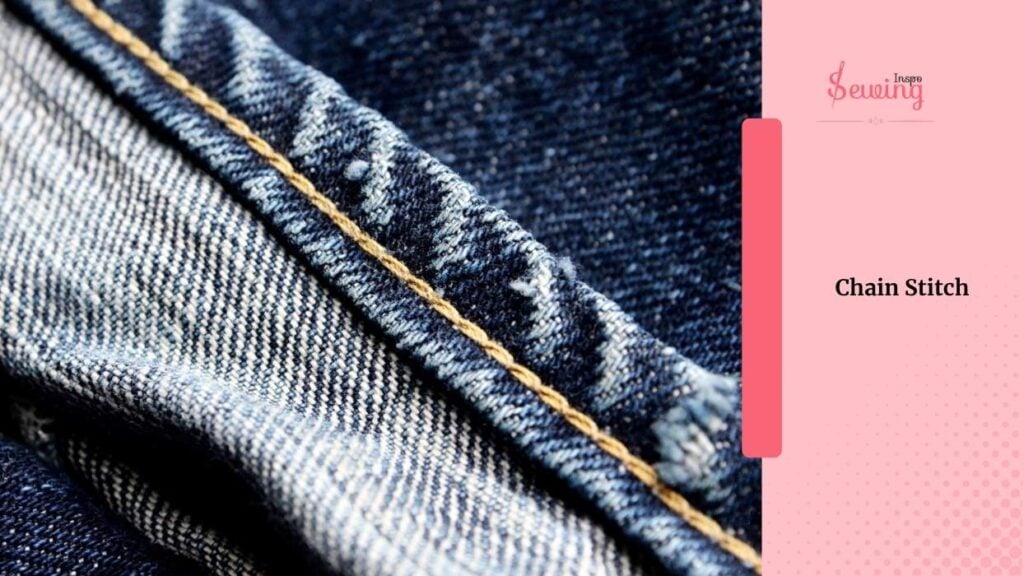
You can achieve a similar look with specific embroidery stitches or by using a chain stitch foot attachment, but it’s not quite the same.
So, if your machine doesn’t have it built-in, no worries, you’ve still got other great stitches to play with. However, if you do manage to get your hands on a machine that performs real chain stitching, it opens up a whole new world of fun and flexibility.
Ladder Stitch Sewing Machine
The ladder stitch is one of those stitches that’s when you want to close something up invisibly, like the final seam on a pillow, plush toy, or hand-finished hem.

But,
Not all machine stitch, and it’s named “ladder” because when you’re sewing, it looks like little horizontal bars between the fabric edges, like a ladder lying on its side. You need a special ladder stitch sewing machine.
What’s notable is that once you pull the thread tight, the stitches disappear into the seam, resulting in a remarkably clean finish with no visible stitching on the outside. I use it a lot for closing up openings after turning something right side out.
So if you’re working on softies, home décor, or hand-finishing details, the ladder stitch is definitely one to keep in your sewing toolkit.
Fill Machine Stitch
The fill stitch is creates a solid block of stitching, kind of like colouring in a shape with thread, and it gives your designs a rich, dimensional look.
The fill stitch is made up of rows of closely placed zigzags or straight stitches that run back and forth to completely “fill” in a space.
You’ll find different patterns within fill stitching,
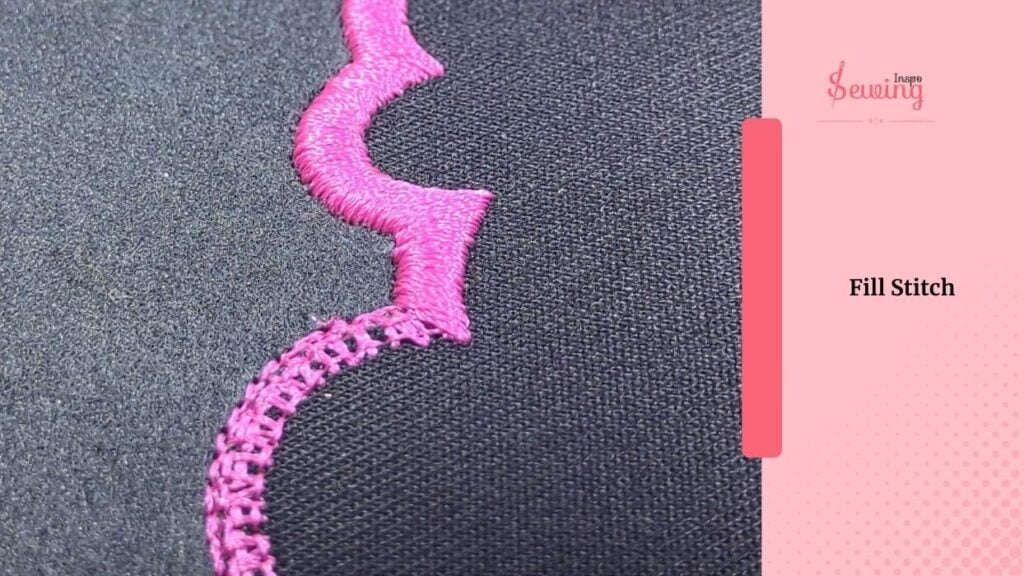
Some are super smooth, while others look more textured, depending on the density and direction of the stitches. I usually adjust the stitch angle and spacing according to the fabric I’m working with and the desired look.
Cutwork Machine Embroidery
Cutwork is a combination of embroidery and fabric cutting, yes, scissors are involved! This technique decorates fabric by stitching around a design and then carefully cutting out certain areas to create open spaces, much like lace
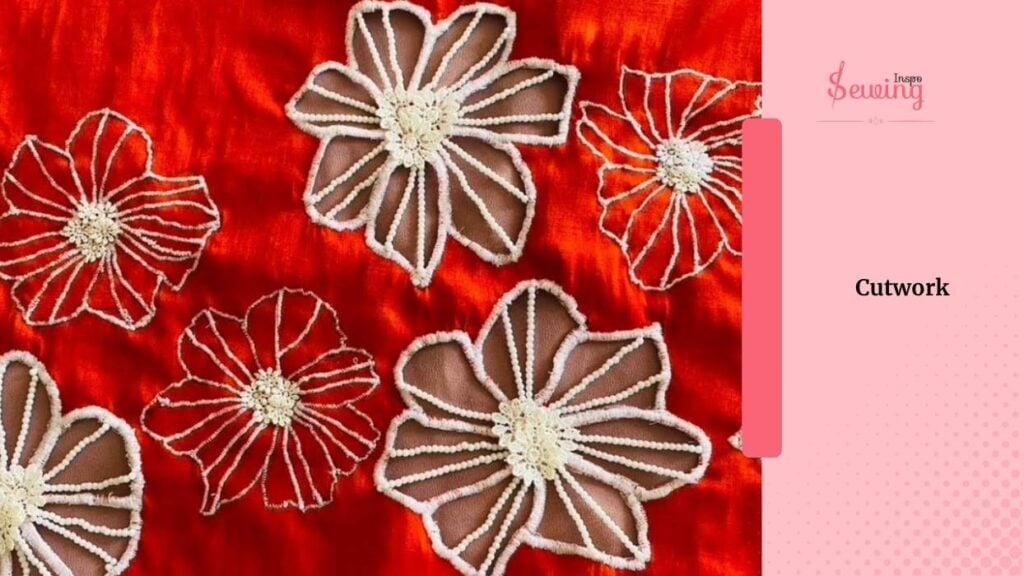
It’s been around forever, and it adds a really elegant, vintage look to things like table linens, collars, sleeves, or heirloom garments.
You typically start with a stabiliser behind your fabric. Then your machine stitches an outline (usually a satin stitch or dense zigzag), and after that, you carefully snip out the inner fabric sections.
Just make sure you’re using sharp cutwork embroidery scissors. And take your time with the cutting! The stitch stabilises the edges, so your fabric won’t fray after it’s trimmed.
Surface Machine Embroidery
Surface embroidery is a broad term that encompasses any type of embroidery where the stitches are worked on the top surface of the fabric, rather than pulled through to both sides, as in counted cross-stitch. It includes stitches like
- Backstitch,
- Satin Stitch
- French Knots,
- Lazy Daisies
It’s incredibly versatile and perfect for freestyle designs, such as detailed patterns like flowers, names, or abstract motifs. I love using it to embellish garments, bags, hoops, even patches.
You just draw or trace your design on the fabric, and then stitch over it using any number of embroidery techniques.
Tatami Machine Stitch
The tatami stitch (also called celtic fill or celtic stitch) is a type of fill stitch used in machine embroidery. It’s akin to a fancy cousin of the basic fill stitch.
Still, instead of smooth, uniform rows, tatami stitching employs alternating stitch directions to create a woven or textured effect, much like a traditional Japanese tatami mat—hence the name.
It’s ideal for larger embroidered areas where you want to prevent puckering or enhance the design’s visual appeal. Tatami stitching also helps thread lie flatter and smoother, especially over big spaces.
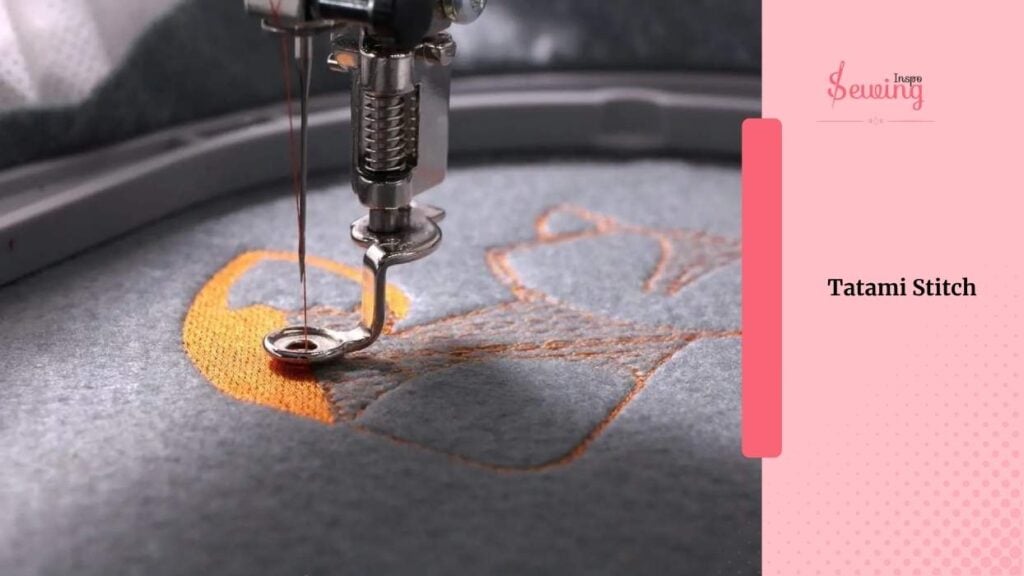
And since the stitch paths change angles, it reflects light in different directions, which adds depth and dimension.
Underlay Machine Stitches
Underlay stitches are kind of the behind-the-scenes heroes in embroidery. You don’t usually see them when the design is finished. But they play a huge role in how it turns out.
They are the foundation for your embroidery stitches that go down first to stabilize the fabric, reduce puckering, and help the top stitches sit nice and flat. There are different types, like
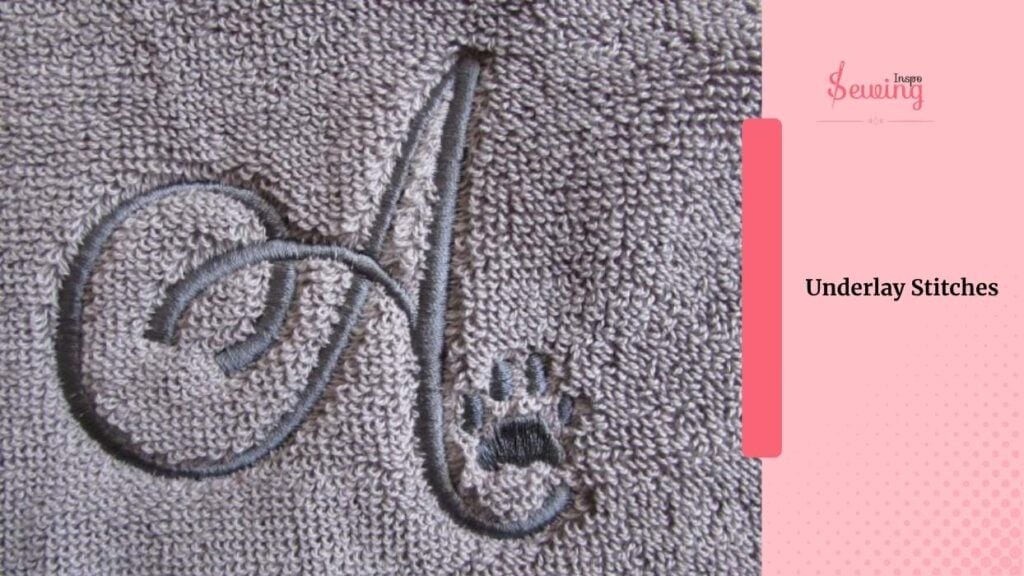
- Center Walk
- Edge Walk
- Zigzag Underlay
They all work depending on the shape and size of the area you’re stitching. For example, if you’re working with a lightweight fabric, underlay stitches can keep it from shifting or stretching when the dense satin stitches go on top.
Now, most embroidery machines automatically add underlay stitches, but you can usually adjust the type or density in your design software. If you’re digitising your own design, don’t skip this step. It makes a huge difference in the final look.
Outline Quilting Machine Stitches
Outline quilting (or stitch-in-the-ditch) is one of the main stitches in quilting techniques when I want to keep things simple and clean. It’s essentially when you stitch around the shapes or seams in your quilt, such as tracing the edges of your blocks or appliqué pieces to make the design stand out without overpowering it.
It’s great for beginners because you’re following existing lines, and it works with almost any quilt style. I usually use a walking foot for straight lines or a free-motion foot for curved outlines.
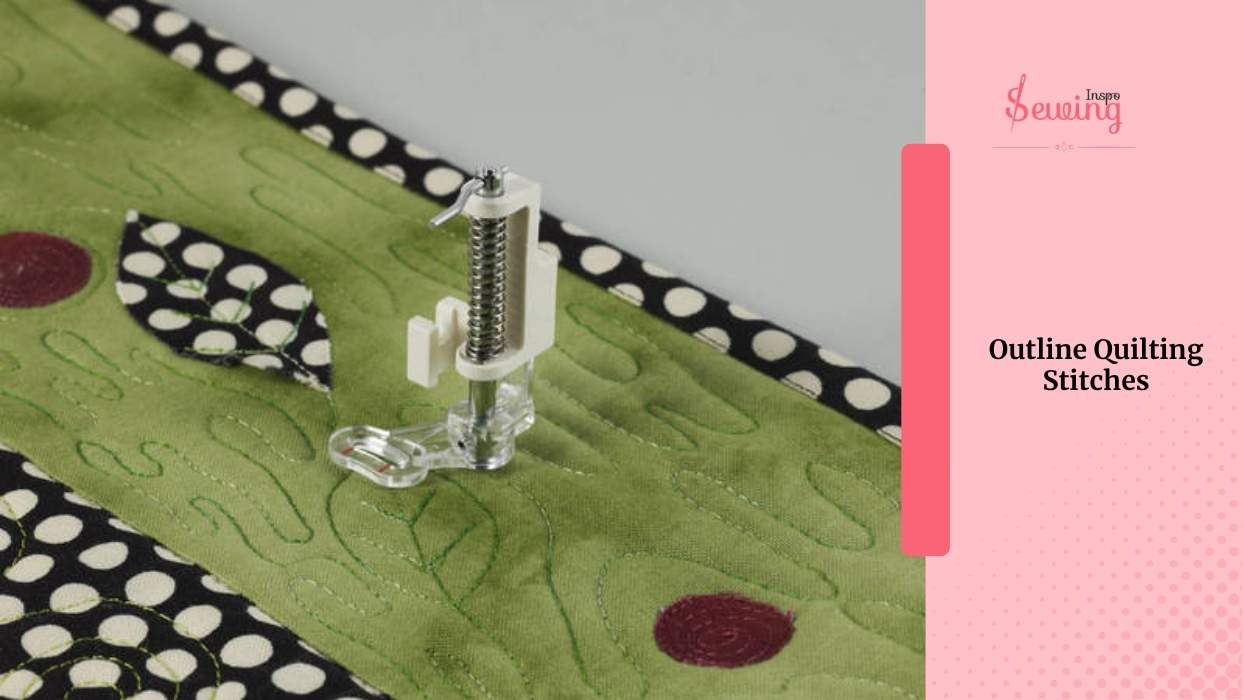
And I like to keep the stitch length around 2.5mm—long enough to show up but still subtle. That’s it!
Stipple Machine Quilting
Stippling is like doodling with your sewing machine and I love it! It’s a type of free-motion quilting where you stitch a meandering, random pattern of curves and loops that never cross over themselves.
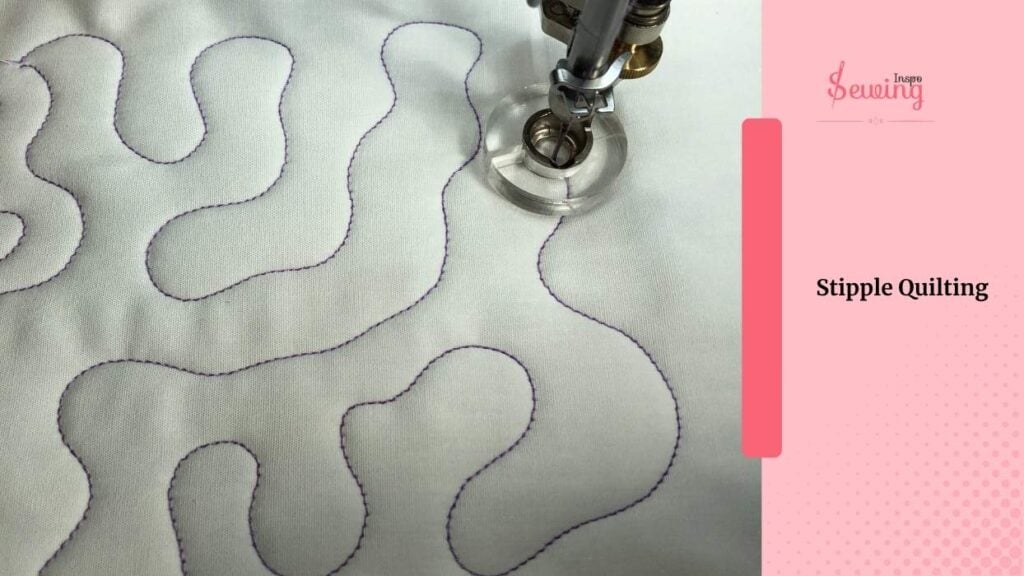
The goal is to fill in space without creating any hard lines or shapes, which gives your quilt a nice crinkly texture.
I use stippling in large background areas to make the main design stand out, or to add movement and softness to the quilt. You’ll need a free-motion foot, and you’ll want to drop your feed dogs so you can move the fabric freely in all directions.
So if you’re looking to add some soft, all-over texture to your quilt without worrying about perfect patterns, stippling is your best friend!
Scallop Sewing Machine
The scallop stitch is one of those stitches that instantly makes your sewing look fancy without too much effort. The scallop sewing machine creates a row of semi-circular “waves” or scallops, which can be used for decorative edges on hems, sleeves, collars, table linens—you name it.
You’ll usually find the scallop stitch on computerised sewing machines, though not every basic machine will have it. If you’re unsure, simply refer to your machine’s stitch chart or manual for confirmation.
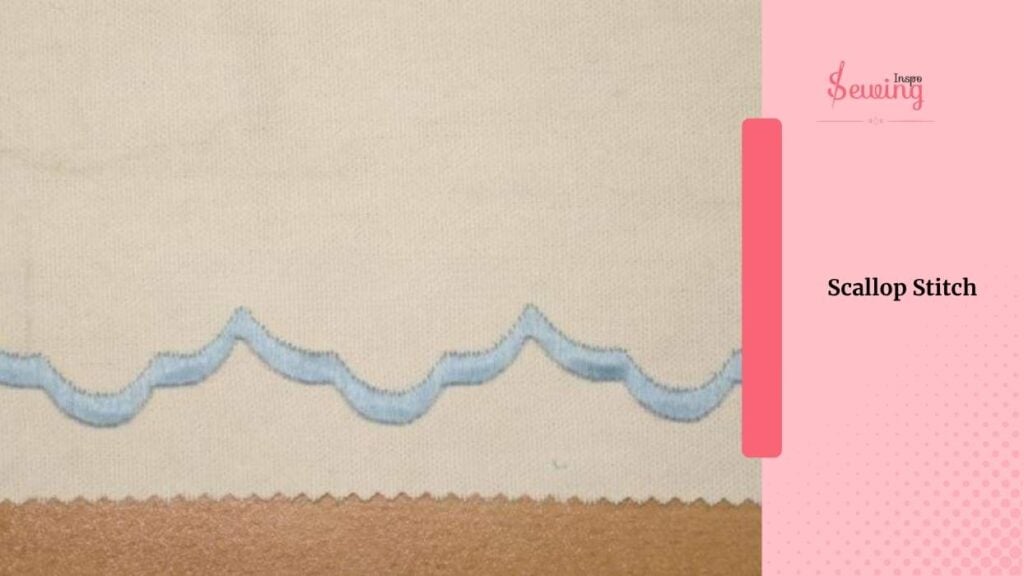
There are a few versions of it, too, as in,
Some machines even allow you to adjust the width and length of the scallops. I like to experiment with the settings on scrap fabric first to achieve the perfect look for whatever I’m working on.
Pintuck Stitch
A pintuck in sewing is a small, narrow fold of fabric that’s stitched in place to create a raised, decorative line. You’ll often see them in heirloom sewing, blouses, dresses, or even on home decor like pillow covers.
But not all sewing machines are built to handle pintuck stitching perfectly.
While many modern machines offer decorative stitches. But it isn’t perfect. Case creating pintucks requires a bit more precision and the right setup. Here is how it works-
- Turn off the machine and remove the regular presser foot.
- Attach the pintuck foot, making sure it’s flat, secure, and aligned.
- Add extra width and height to your fabric before stitching (about 1.5″–2.5″ wider than pattern).
- Select straight stitch, shorten stitch length to 2.0–2.5mm.
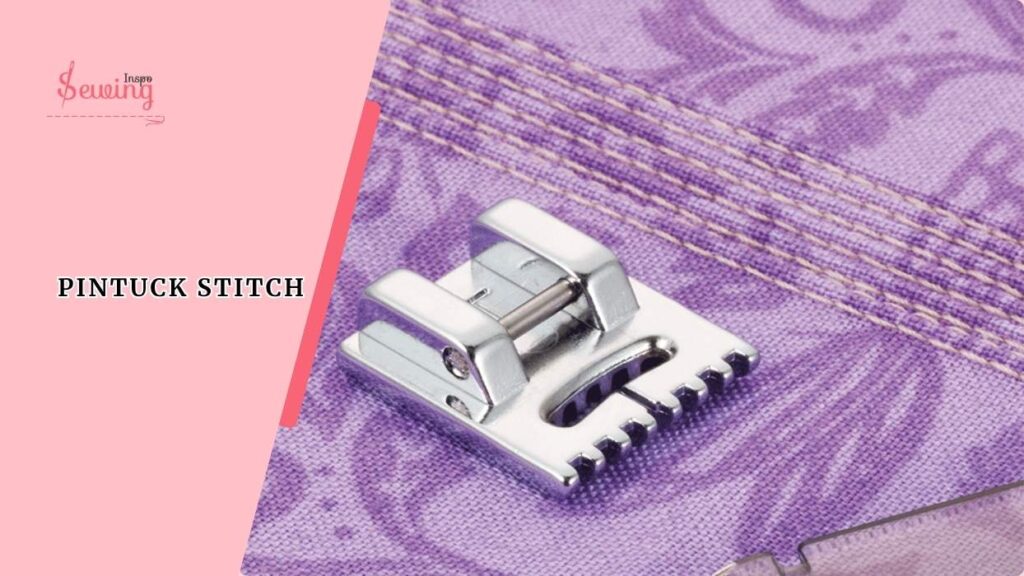
- Slightly increase upper thread tension for better fabric lift.
- Stitch along the marked lines using the pintuck foot grooves as guides.
- The bobbin tension will lift the fabric, creating a raised tuck.
- Continue evenly spaced rows for a neat, decorative effect.
This is crisp, raised pintucks that add elegant texture and structure. It is perfect for blouses, cuffs, dresses, or home décor projects.
Stem Stitch By Machine
The stem stitch is a classic embroidery stitch used to create smooth, curved lines that resemble plant stems or outlines in designs. It gives a slightly twisted, rope-like look and is perfect for outlining shapes, lettering, or floral vines.
Here is how it works-
- Attach the embroidery foot – Use an open-toe embroidery foot for visibility and select a decorative stitch that mimics the hand stem stitch (like Bernina’s #713).
- Adjust stitch settings – Set stitch width to around 1.0–5.0 mm and keep tension at 6–7 for smooth lines.
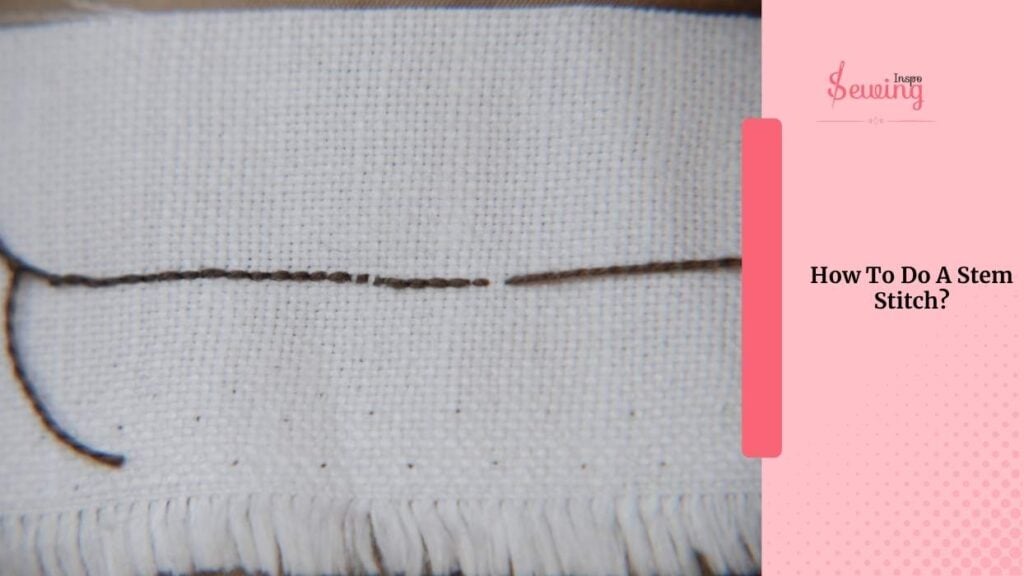
- Prepare the fabric – Place stabilizer underneath if using light fabric; baste layers well to prevent puckering.
- Guide the fabric – Slowly feed the fabric while letting the machine form its 7-part stem stitch cycle for a thick, hand-like effect.
- Use pattern repeat – Select Pattern Repeat: 1 to stop automatically after one full cycle for better control on curves.
- Pivot as you stitch – After each repeat, stitch → pivot → stitch → pivot to maintain a smooth flow around corners or curves.
Finish and secure – Continue the process along the design, and backstitch at the end to secure the thread neatly.
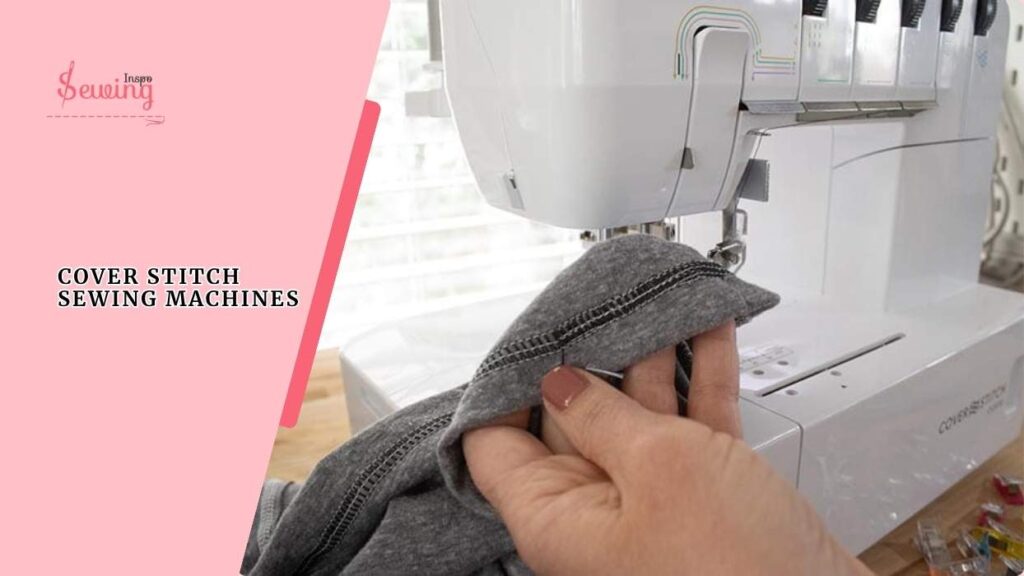
Cover Stitch Sewing Machines
A cover stitch creates two straight lines on the top and a wide zigzag stitch on the bottom with a twin needle. This stitch helps the fabric stretch without breaking or gathering.
Not all machine can do it. You need special cover stitch machine to do it. Here is how things work-
- Thread the needles and looper.
- Select your stitch type (2-needle or 3-needle).
- Set the stitch length.
- Fold and press your fabric hem.
- Position fabric under the presser foot.
- Sew along the edge evenly.
- Snip the threads and press the hem.
Types Of Sewing Machine Stitches Pdf Free Download
Types of Machine Stitches for Stretch Fabrics
There are many types of stitches sewing machine, but not all are suitable for stretchy fabrics. Cause you need stitches with enough elasticity to move with the fabric and avoid snapping. Good options include
- The Zigzag Stitch,
- Lightning Stitch
- Three-Step Zigzag
- Twin Needle Stitch
- Overlock/Overedge Stitch.
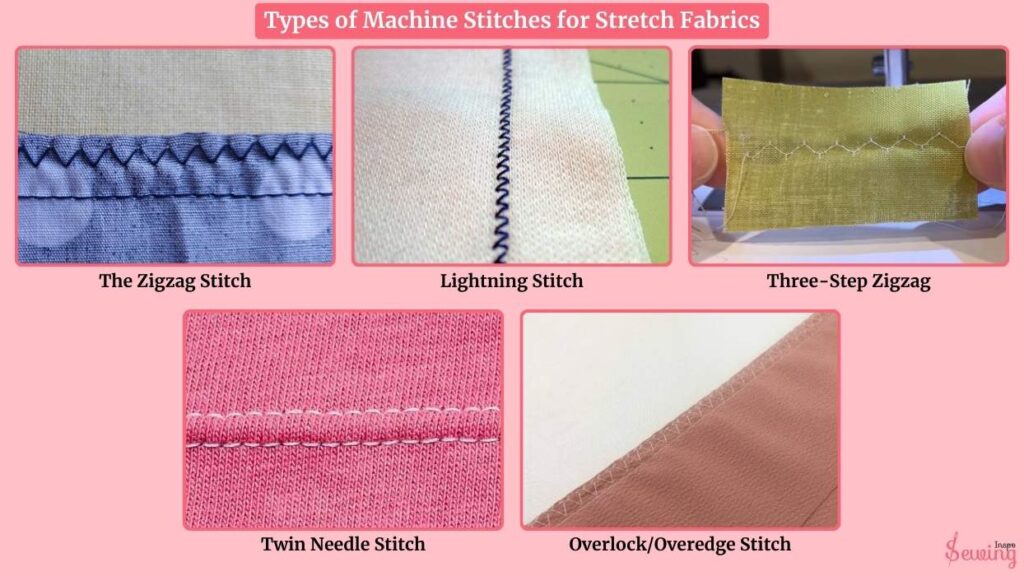
A regular straight stitch will likely break on knits, so it’s best to choose one of these flexible stitches. Pair it with a ballpoint needle, along with the right tension and stitch length, for smooth, durable results when working with stretchy materials. You still can do experiment with different sewing machine stitches.
Different Stitches on a Sewing Machine for Strong Seams
For strong, durable seams, choose stitches that can handle stress and keep fabrics securely together. Reliable options include the
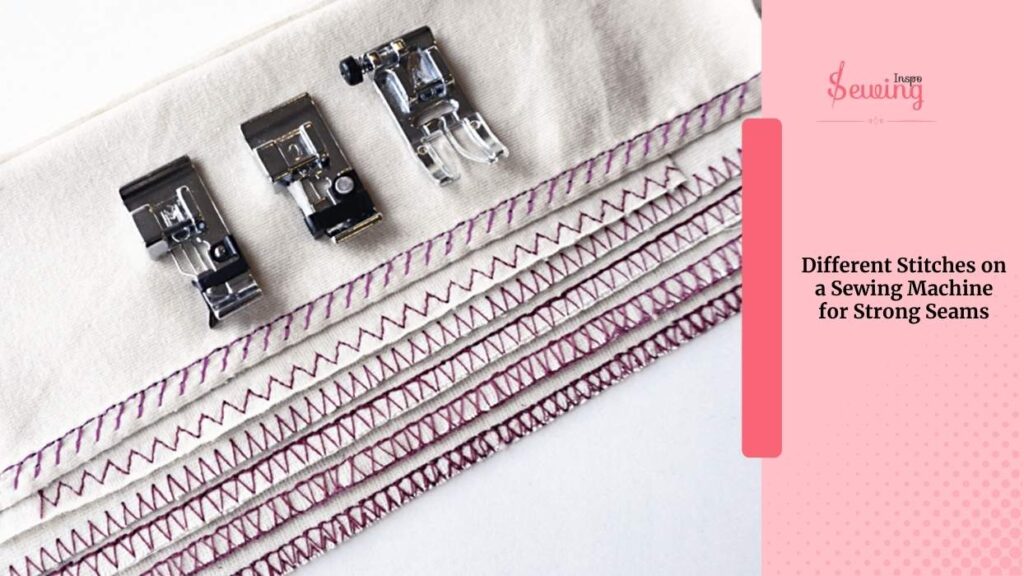
- Straight stitch (with a short stitch length for extra strength)
- triple straight stitch, zigzag stitch, and reinforced stretch stitch
- The overlock/serger stitch is also excellent for strong seams.
Especially on fabrics prone to fraying. Using quality thread, the correct needle type, and proper tension will further boost seam durability, ensuring your projects hold up over time.
What’s your favorite sewing machine stitch types? Choose your favorite one from the types of sewing machine stitches pdf.
Frequently asked questions
How many types of stitching are there on a sewing machine?
There are usually 30+ stitch types, depending on your sewing machine. Basic models include straight stitch, zigzag, blind hem, and buttonhole stitches.
Which sewing machine stitch is the strongest?
The backstitch is often considered the strongest. It doubles back on itself, making the seam super secure. It is perfect for stress points like armholes or crotch seams. If your machine doesn’t have a dedicated backstitch button, you can simulate it by manually reversing your straight stitch.
What’s the difference between a straight stitch and a running stitch?
A straight stitch is made with a sewing machine, perfectly even and tight. A running stitch is hand-sewn and has tiny gaps between stitches (think dashed line). Both look similar, but the machine’s version is much faster, stronger, and more consistent.
What’s the basic sewing machine stitch setting?
For everyday sewing, the go-to setting is usually a straight stitch with a length of 2.5mm. That works well for most medium-weight fabrics. If you’re working with something thicker or thinner, adjust the length up or down slightly.
Conclusion
No matter what project you’re working on, understanding your sewing machine stitches makes all the difference. From the basic straight stitch to decorative and specialty options, each one has its place.
Once you understand what each stitch does best, sewing becomes a lot more enjoyable and less frustrating. So, which type of stitching on a sewing machine is your favourite?


Leave a Reply