
I saw a darned hole in my clothes that day, so I had to think of something. That’s when the darning stitch popped up in my mind. Since I had never done it, I googled it, and it kind of looks like a running stitch! 😕 It confused the hell out of me.
So, I ran to Grandma and asked her to teach me how to sew darning stitches by hand.
She said-

Sew Darning Stitch By Hand
To do the darning stitch, weave your thread through stitches to form a net and cover up the damaged part.
Still confused? Okay, then, let’s explain more clearly how to sew darning stitches by hand and fix torn clothes. with a darning.
Summary Of hand darning Article:
- Needle Size 14 for beginners.
- Stitch across the hole in one direction with the according shape.
- Thread tight securely and trim excess.
Table of Contents
What Is Darning Stitch?
The darning stitch is a sewing technique used to repair holes or worn fabric by stitching rows of running stitches closely together.
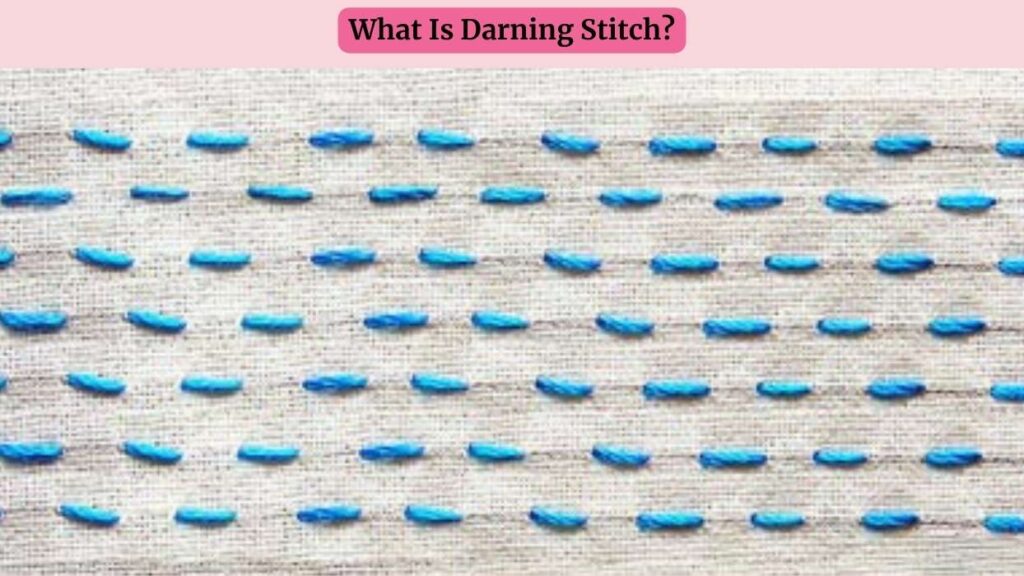
It’s a traditional method ideal for fixing darning a hole that isn’t along a seam or where adding a patch would be impractical or uncomfortable.
New stitchers mix this up with slip stitch definition cause they both are invisible. But they are very different from each other.
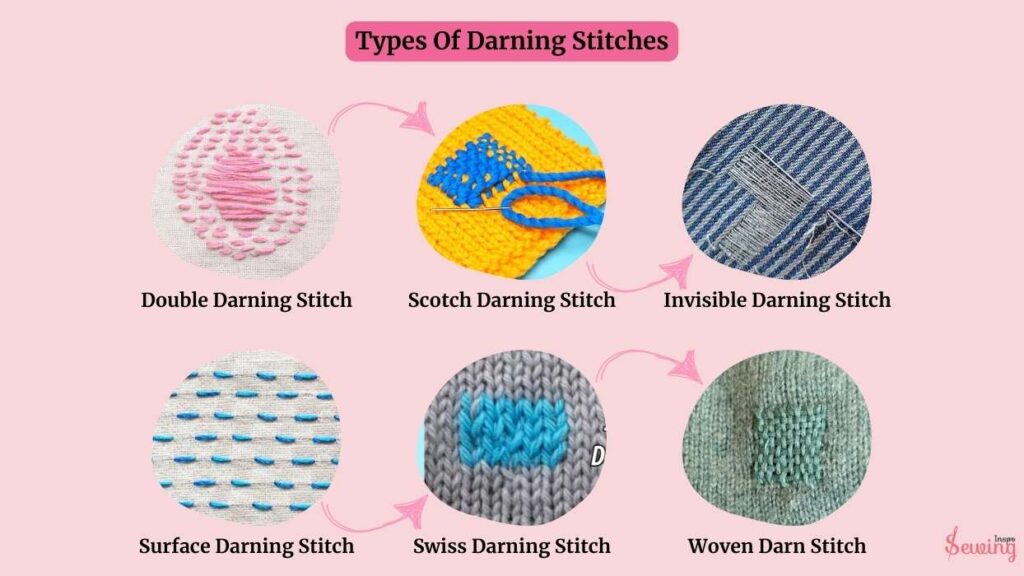
Types Of Darning Stitches
There are many types of darning techniques too you can choose from. Here is a few famous ones-
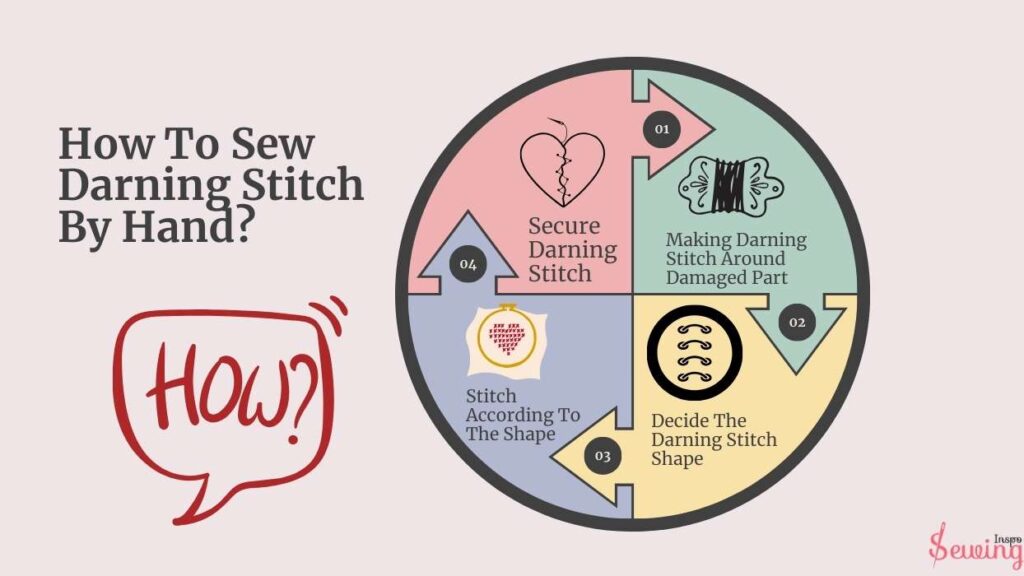
How To Sew Darning Stitch By Hand? Easy Darning Stitch Step By Step
To sew a darning stitch, you need to follow 4 steps. Those 4 steps are enough to darning stitch repair by hand.
- Making Darning Stitch Around Damaged Part
- Decide The Darning Stitch Shape
- Stitch According To The Shape
- Secure Darning Stitch
Now let’s learn how to do darning by hand in detail.
Kit Need For Darning Stitch
To get started with the darning stitch, you’ll need a basic kit such as:
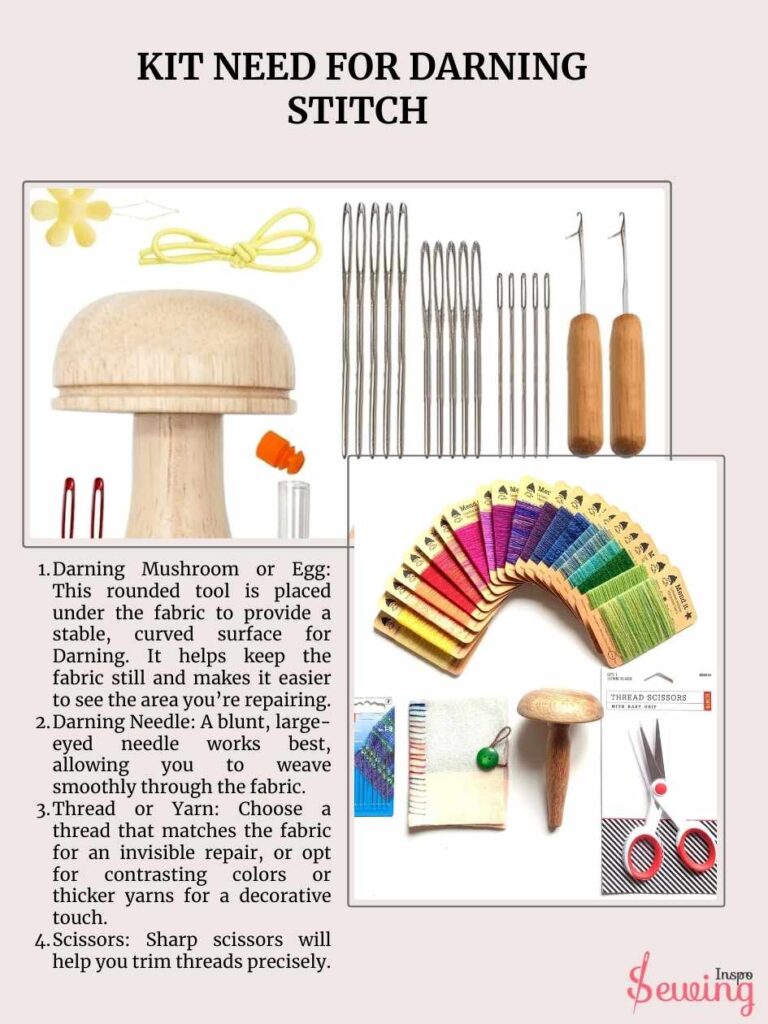
- Darning Mushroom or Egg: This rounded tool is placed under the fabric to provide a stable, curved surface for Darning. It helps keep the fabric still and makes it easier to see the area you’re repairing.
- Darning Needle: A blunt, large-eyed needle works best, allowing you to weave smoothly through the fabric. Choose whichever feels comfortable for you to do hand darning.
- Thread or Yarn: Choose a thread that matches the fabric for an invisible repair, or opt for contrasting colors or thicker yarns for a decorative touch. That’s even perfect for scotch darning stitch.
- Scissors: Sharp scissors will help you trim threads precisely. You can use the one you used for hemming too.
- Embroidery Hoop (Optional): For beginners, an embroidery hoop can keep the fabric stretched and stable, making it easier to stitch evenly.
This kit will help you create strong, neat darning stitches for mending worn areas on clothing, socks, and other fabric items!
Now let’s get into how to do darning by hand and fix darning holes.
1.Making Darning Stitch Around Damaged Part
To make a darning stitch around the damaged part, you gotta stitches through step around the damaged area or darning holes.
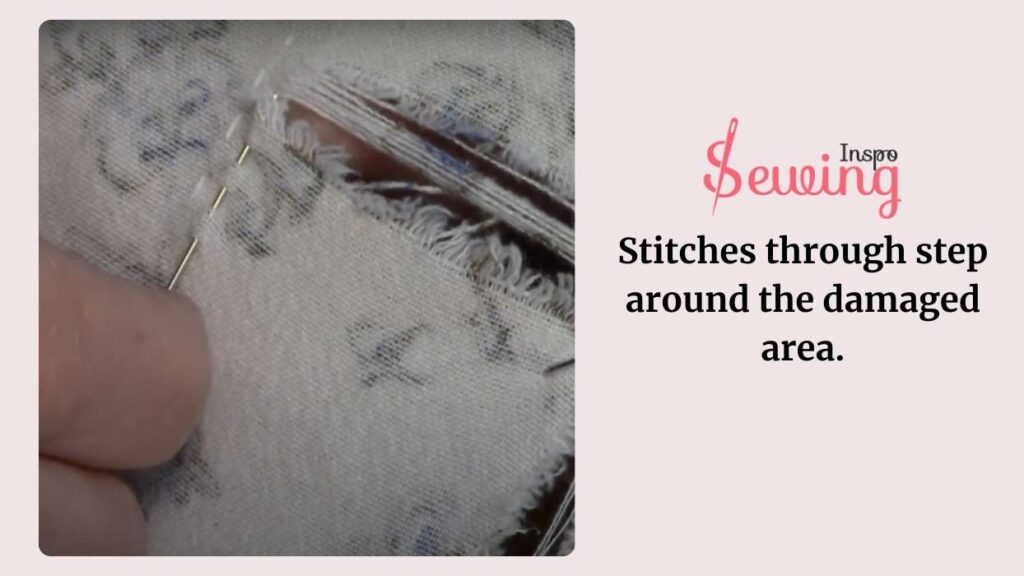
Embroidery stitches across the hole in one direction. Star from 1cm away from the hole, then stitch all the way to 1\2 inch around the hole. This will help you to do darning stitch repair.
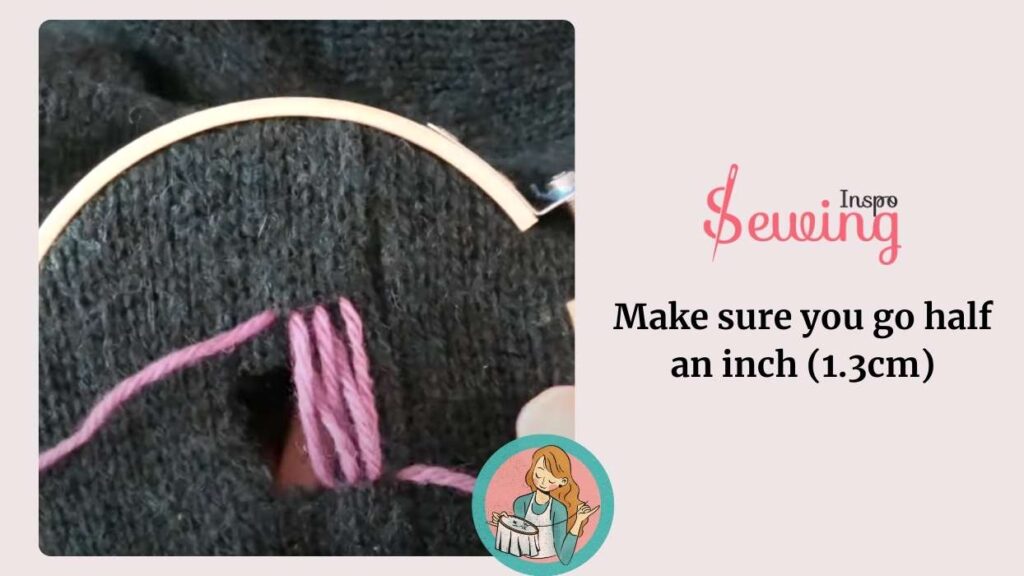
Now, do the same thing by going the other way. And remember, make sure you go half an inch (1.3cm) beyond the edges of the hole on both sides to cover it up real well. You can even use the tacking stitch method here. But today, I’m wanna do darn stitch.
Oh, and grandma, here’s a tip: don’t yank on the thread or yarn to tighten the straight stitches. That’ll just make the fabric bunch up. Instead, let your curved object or the tension of the darning mushroom. The main goal is to blend the darning seamlessly with the rest of the fabric.
2.Decide The Darning Stitch Shape
Now, you need to make a net around the damaged part with the stitch. Just like blanket stitch darning stitch also has a shape option for you. 😉 The question is which darning pattern you should use, a daring pattern. Well, there are 4 shapes of darning stitch. Such as:
- L-shape
- Triangle (perfect for small hole)
- Flat parallel
- T shape
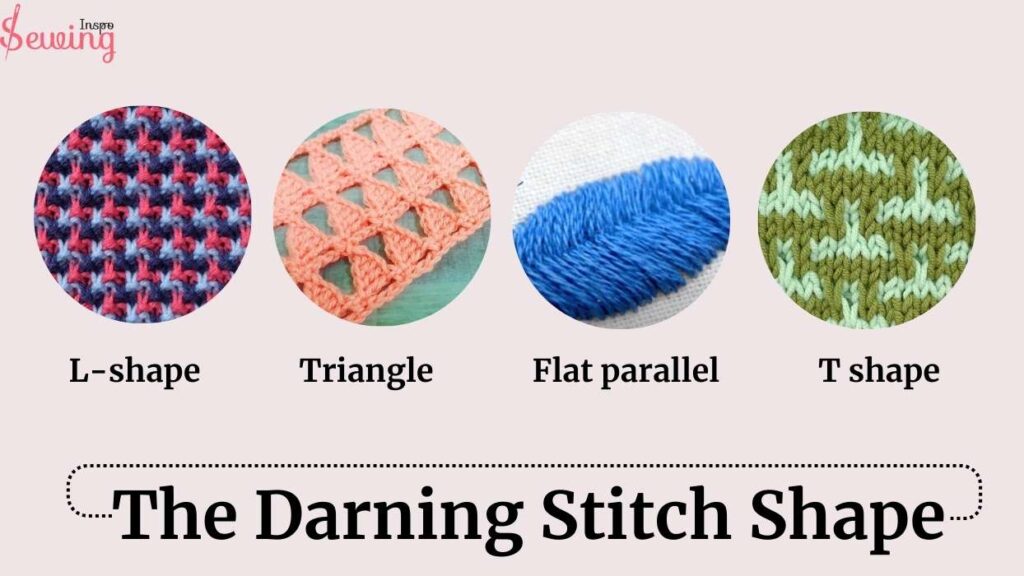
However, I like to shape T rows of darning stitches. Cause it is easy and effective to fix damaged parts, even in embroidery projects. You can choose the shape depending on your darn pattern.
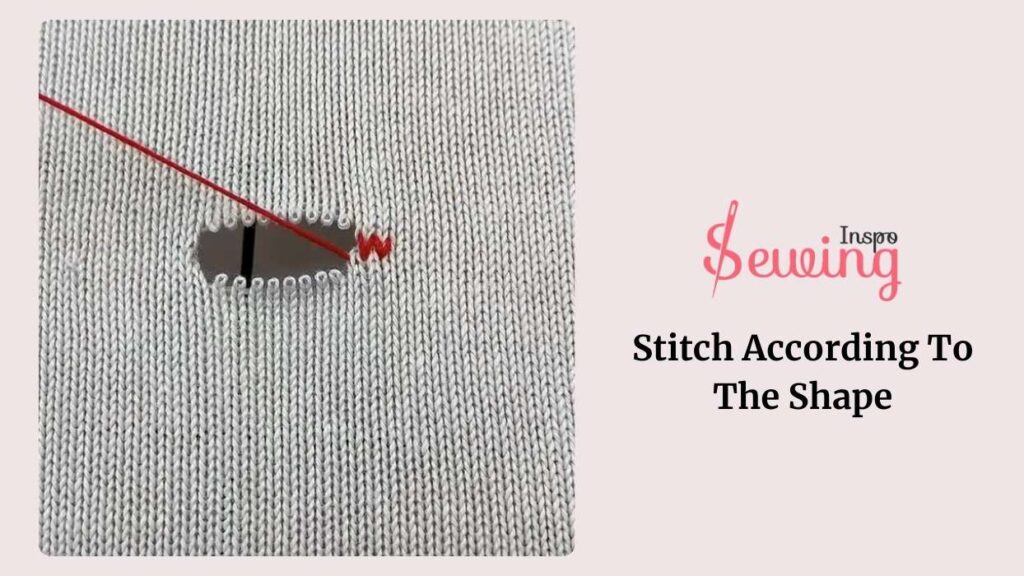
3.Stitch According To The Shape
Now, start stitching according to the shape. Start by sliding your darning needles under the first stitch on one end, like a “T” shape. Then, weave the matching thread 90 degrees over the next stitch and keep going until you reach the end of the row. After that, weave back in the opposite directions on darning.
And remember, don’t tug on those woven stitches, either. Doing so will just mess up your work. Keep using your trusty mushroom for darning or embroidery hoops as your guide. You can use embroidery hoops like you used to catch stitch.
Try to match the tightness of your weave to the garment you’re drawing. If it’s a loose knit, keep the stitches somewhat spaced out. But if it’s tight knit, make sure those stitches are nice and snug. The process is kinda like back stitching.
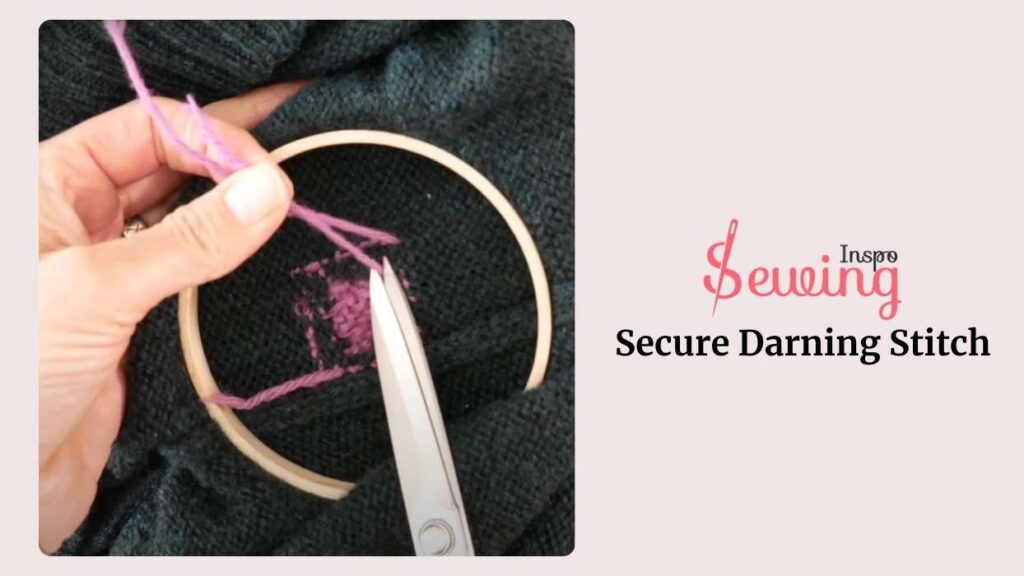
4. Secure Darning Stitch
To finish the darning stitch, you’ve woven through all the hand stitches and covered the hole. Simply tie off your thread or yarn. Just weave your embroidery needle under a few nearby stitches to secure it, then make a small knot. Like an overcast stitch. Trim off any excess thread or yarn, and you’re good to go.
That’s how to fix darning holes with darning stitches.
Here’s a neat trick to tidy up those loose ends: Leave an extra 1 or 2 inch thread at the beginning and end. Then, pull them to the inside or the wrong side of the fabric. Decorative stitch them back and forth across the darned area, hiding them from sight on the outside. This ensures they will keep your hard work intact Or you can use tacking stitch here to keep it together.
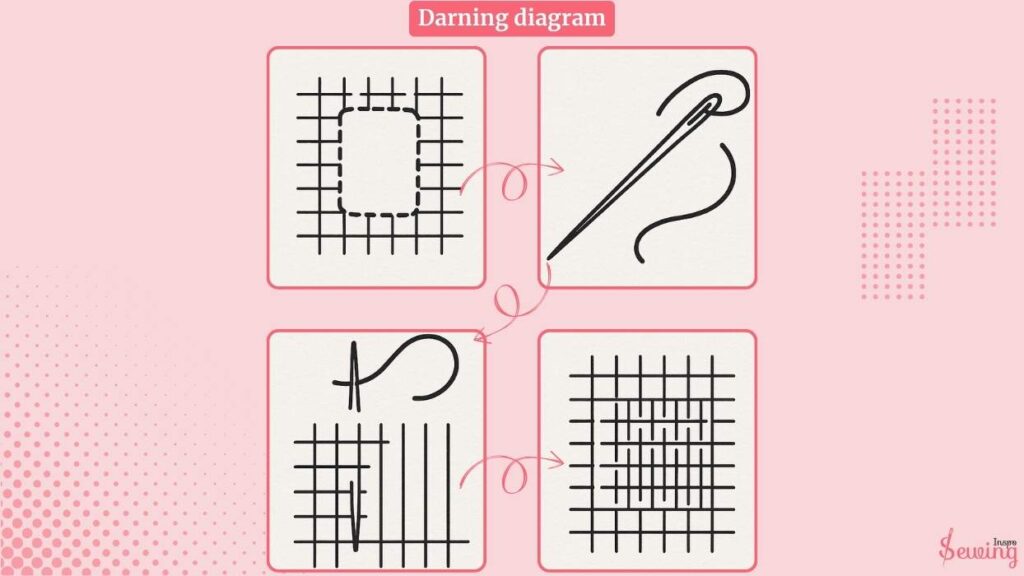
Darning Diagram
The process is kinda fun, but it’s easy to miss a step at 1st attempt. So I made this diagram for you,
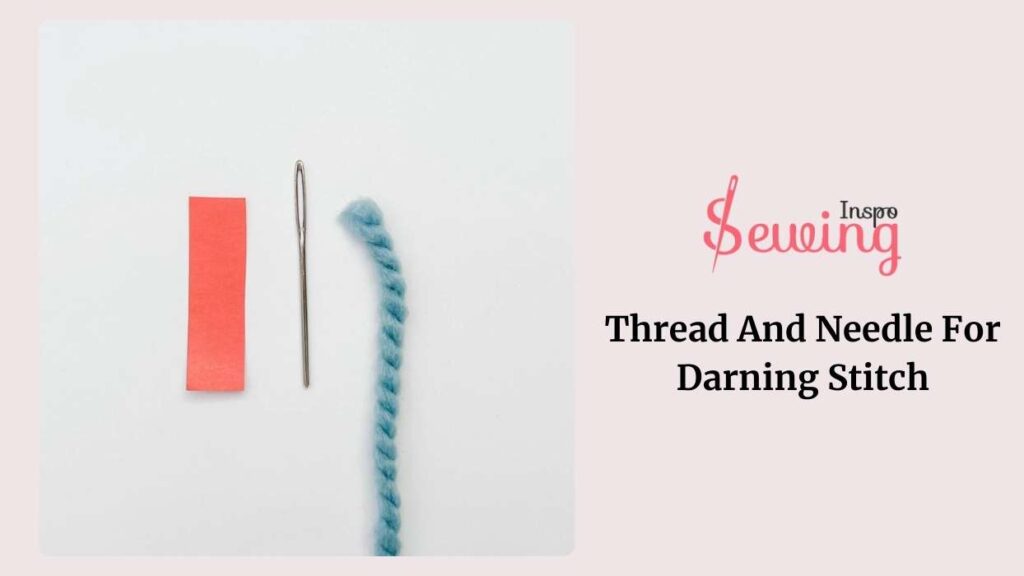
Thread And Needle For Darning Stitch
Yarn or embroidery thread that falls between sizes 0 and 3 is perfect for darning.
If you’re fixing a hand-knit sweater, try matching the embroidery floss you’re using for the fabric damage.

For instance, you can use a 2-ply yarn for a delicate knit jumper and a thicker 4-6-ply yarn for a chunkier knit sweater.

-What about the thread size?
If it’s a tiny hole, you might only need around 12 inches (30.5cm) of thread or yarn. But if it’s a big one, you might need double that, around 24 inches (61cm), to patch it up nicely. However, the size of the thread will depend on the pattern of invisible darning & required fields.
However I think 8 inch is perfect for darning stitch repair by hand.
Now, What size is a darning needle?
about the needle, you’ve got tiny ones, like 5/0, all the way up to size 9, which is the biggest. The 5/0 is great for thicker fabric threads or wool because it has a big eye.

Then you’ve got sizes 14 to 18, which are called yarn or wool darners. They’re thicker and have larger eyes than cotton darners.

-Which needle should I go for Grandma?
-As a beginner, a size 14 needle is best for a darning stitch.
-Ok, so how to sew darning stitch by hand?
What Is The Darning Stitch In Needlepoint?
The darning stitch in needlepoint is an embroidery stitch used to cover large areas of the fabric with a woven pattern. It involves making parallel, evenly-spaced rows of long stitches that can vary in length and direction.
These stitches can be worked horizontally, vertically, or diagonally, and they are typically used to create textures or fill in a design’s sections.
What kind of yarn do you use for darning?
Use a durable yarn like wool or a wool blend for darning, matching the weight and texture to the fabric being repaired.
Best thread and needle for darning stitch
For darning, use a blunt-tipped tapestry needle and strong, fine thread like polyester or cotton darning thread.
An Alternative Way Of Darning Stitch
5 alternative ways of darning stitch. Such as:
- Swiss Darning (Duplicate Stitch)
- Boro Stitching
- Whip Stitch Darning
- Needle Felting
- Crochet Patch
1. Swiss Darning (Duplicate Stitch)
To do Swiss darning thread, use a needle with yarn or embroidery thread. Insert the needle at the base of the stitch you want to duplicate and bring it up through the fabric. Follow the path of the original stitch, going under each horizontal bar of the stitch. Continue this process, following the existing stitches, until the worn area is reinforced. This Darning By Hand adds an interesting touch to the cloth.
2. Boro Stitching
To do a boro stitch, cut a piece of fabric slightly larger than the hole you want to repair. Place the patch over the hole and pin it in place. Thread a needle with embroidery floss or strong thread. Use running stitches to sew the patch onto the fabric, creating a series of parallel stitches. You can add more rows of running stitches in different directions to create a decorative pattern. This technique can repair by hand easily.
3. Whip Stitch Darning
To do a whip stitch, thread a needle with yarn or thread that matches the fabric. Start at one edge of the hole and bring the needle up through the fabric. Insert the needle into the fabric close to where you started and bring it up on the opposite side of the hole, creating a diagonal stitch.
That’s how to darn a hole by hand. The easiest way to do it.
Continue this process, stitching around the edge of the hole in a spiral or circular fashion until the hole is closed.
4. Needle Felting
To do needle felting, place a foam pad or felting mat under the area to be repaired. Position a small amount of wool roving over the hole. Use a felting needle to poke the wool roving into the fabric repeatedly. The needle’s barbs will interlock the fibers, securing the patch. Continue felting until the hole is fully covered and the wool roving is firmly attached to the fabric.
5. Crochet Patch
To do a crochet patch, use a crochet hook and yarn to create a chain slightly longer than the width of the hole. Work rows of single crochet to create a patch that covers the hole. Sew the patch over the hole using a tapestry needle and matching yarn.
Grandma Tricks: Using Darning Mushroom Or Eggs
A mushroom for darning isn’t that much needed. You can use a flat surface to darn a stitch, but a darning kit is an old-school technique.
No! Not the real one. I am talking about darning mushrooms. 🍄 The tool egg mushroom is a blessing.
Darning mushrooms help you hold the damaged part of the cloth. This darning tool is easy to use. You stretch the fabric over the rounded top and gather it around the stalk to hold it steady. The mushroom’s shape and tension make it easier to darn simple stitch without the fabric getting all bunched up.
-Handy, right?
-Yes, it is grandma, but what size darning mushroom or eggs is most comfortable?
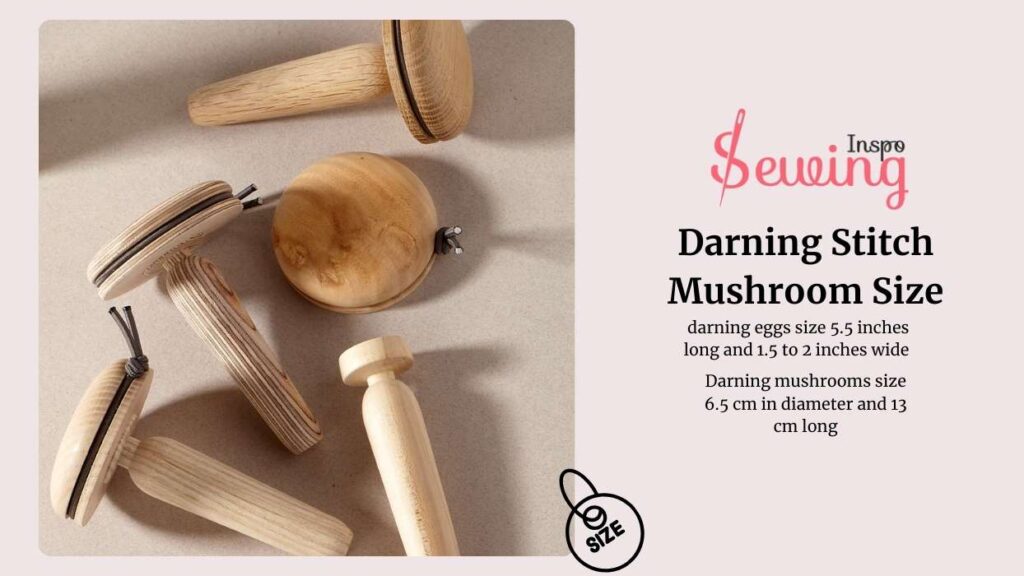
-So, darning eggs are usually about 5.5 inches long and 1.5 to 2 inches wide at their widest part and are comfortable to use. Darning mushrooms, on the other hand, are typically around 6.5 cm in diameter and 13 cm long. But the comfort size depends on you, actually.
Darning Stitch Repair By Hand
Every piece of cloth gets torn out over time. But that doesn’t need to throw it away. You can repair it by darning stitch and using it for some more years too. To darn stitch repair by hand, you need to follow this:
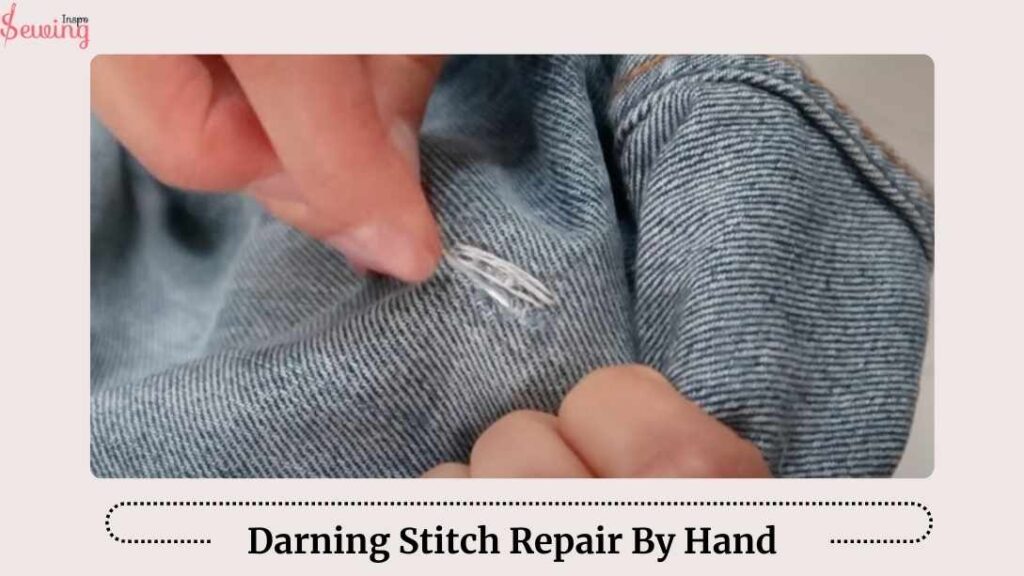
- Trim the patch: Cut a scrap of fabric slightly larger than the hole you’re patching.
- Position the patch: Place the patch on the inside of the garment, ensuring it completely covers the hole. Pin it in place.
- Thread the needle: Thread a needle with a thread loop and tie a knot at the end.
- Start stitching: Stitch from the inside, join the garment and patch with stitches running perpendicular to the seam. For a neater finish, tuck the raw edges of the patch inward before sewing.
- Secure the thread: Once done stitching, tie off the thread and trim the excess.
- Trim the patch: Turn the garment inside out and carefully trim the patch, leaving some allowance to fray without loosening.
- Patching a hem: For hem repairs, the patch covers damage and prevents further fabric unravelling.
But it isn’t the strongest stitch, so don’t expect it to hold the fabric for so long.
What Is The Difference Between Darning Stitch And Running Stitch?
Darning and running stitches look so similar. But there are not-
| Aspect | Darning Stitch | Running Stitch |
| Purpose | Used for repairing holes or worn areas in fabric | Used for basic seams, gathering, and outlining |
| Technique | Weaves threads over and under existing threads | Simple up-and-down stitch through the fabric |
| Appearance | Creates a woven patch that blends with fabric | Looks like a dashed line |
| Durability | Provides strong, reinforced repair | Less durable, not typically for repairs |
| Complexity | More complex involves creating a woven structure | Simple and easy to learn |
| Use | Ideal for mending pair of socks, sweaters, and linens | Suitable for basting, seams, and basic stitching |
| Tools | Often uses a darning mushroom or egg | No special tools needed |
Well, the basic difference between darning stitch and running stitch is-
A running stitch is a basic sewing stitch for joining fabric, while a darning stitch is primarily used for filling or repairing holes in fabric or knitting.
Darning Stitch Darn a Hole for Repairs & Embroidery
Watch my easy tutorial to learn how to darn a hole for repairs and embroidery!
Frequently Asked Questions (FAQ’s)
What Is The Basic Stitch Used In Darning?
Darning uses a basic stitch called the darning stitch, which is like a simple running stitch. You weave the thread back and forth along the fabric’s grain, changing direction at the end of each row. Then, you fill in the gaps to repair the fabric, kind of like weaving.
What Are The 4 Types Of Darning?
There are 4 types of darning embroidery stitches such as linen, twill, damask (or fancy), and invisible.
Final Thought
Now, I know how to sew darning stitch by hand.
I apply that! And it repaired the hole in my fabric perfectly.
Now, it’s your turn! And share your darning stitch.
What’s you technique on how to darn by hand?


Leave a Reply