
After learning what a buttonhole stitch is and how to do it, one question popped into my mind: Are there any different types of buttonhole stitch? 🤔 The answer is yes; there are 17 types of buttonhole stitch. I must admit that each of them is more beautiful than the others. But my personal favorites are-
- Knotted Buttonhole stitch
- Closed Buttonhole stitch
- Triple buttonhole stitch
- Crossed Buttonhole stitch
Doesn’t it sound interesting? It looks even more enjoyable. Let’s discuss it in detail below.
At A Glance:
- There are 13 types of buttonhole stitch.
- Each type of buttonhole stitch also can be used for embroidery.
- The closed buttonhole stitch resembles a triangle shape.
- The knotted buttonhole stitch has a knot in the stitch leg.
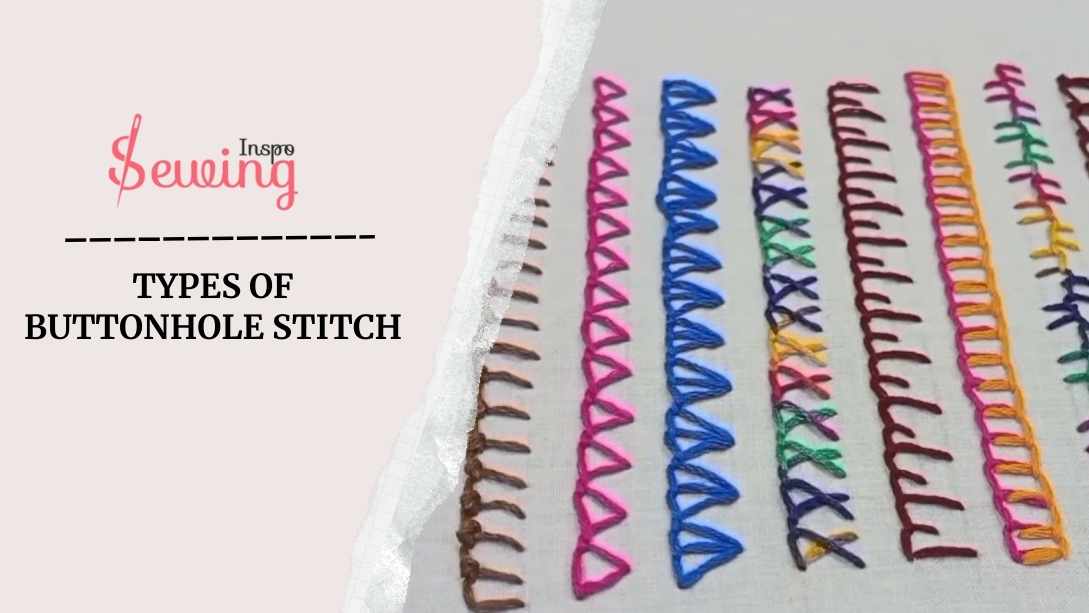
Table of Contents
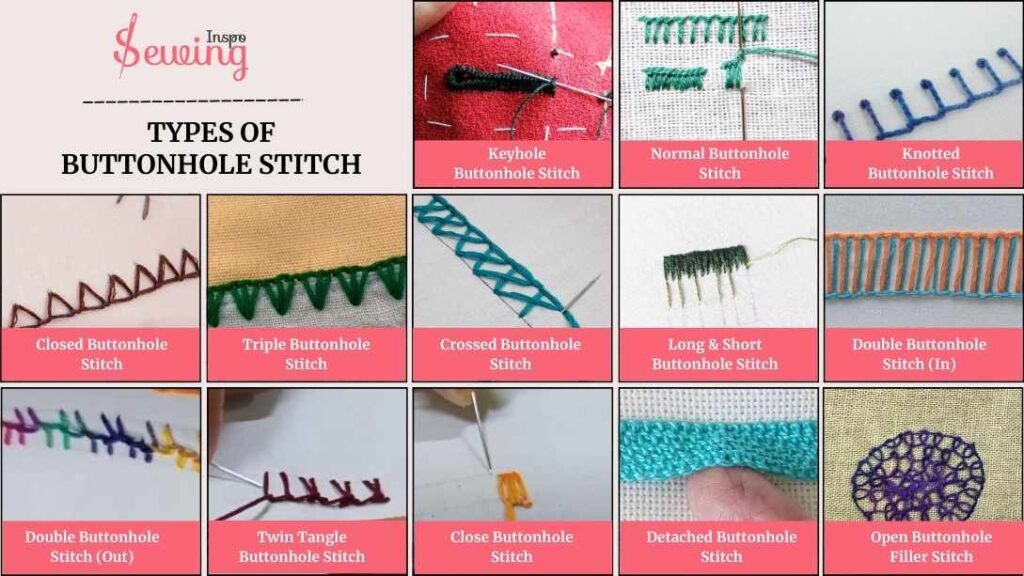
17 Types Of Buttonhole Stitch
Yes, there are 17 types of buttonhole stitch. Although buttonhole stitch may be simple, it has many varieties. So, let’s talk about it.
- Keyhole Buttonhole Stitch
- Normal Buttonhole Stitch
- Knotted Buttonhole Stitch
- Closed Buttonhole Stitch
- Triple Buttonhole Stitch
- Crossed Buttonhole Stitch
- Long & Short Buttonhole Stitch
- Double Buttonhole Stitch (In)
- Double Buttonhole Stitch (Out)
- Twin Tangle Buttonhole Stitch
- Close Buttonhole Stitch
- Detached Buttonhole Stitch
- Open Buttonhole Filler Stitch
- Buttonhole Wheel Stitch
- Tailor’s Buttonhole Stitch
- Buttonhole Scallop Stitch
- Buttonhole Bar Stitch
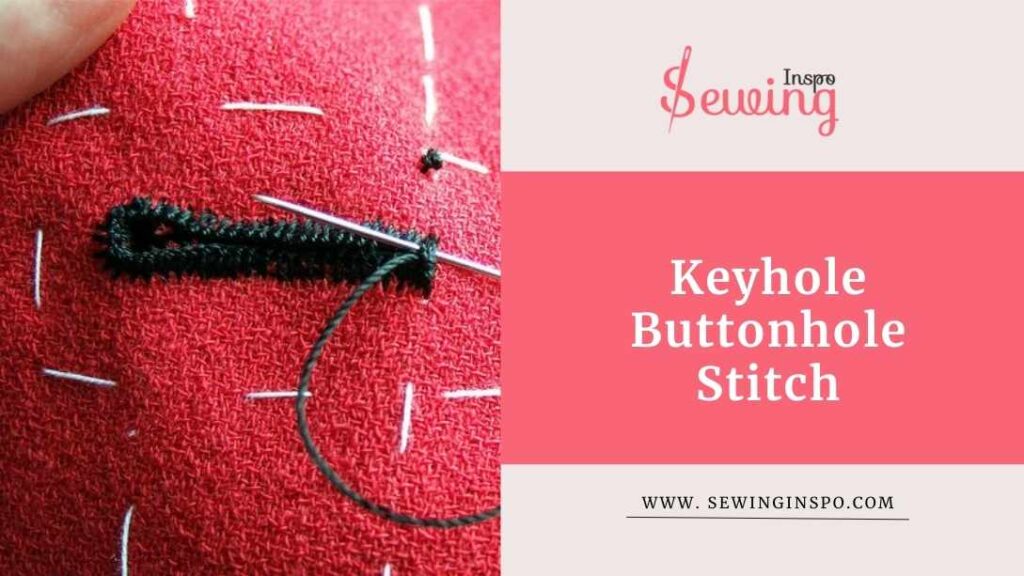
Keyhole Buttonhole Stitch
A keyhole buttonhole stitch is a wrap stitch around the keyhole. This stitch looks like a regular buttonhole but with a rounded or circular end. It is like the shape of an old-fashioned keyhole with hand-sewn buttonholes. If you see button hole stitch design then you would know.
If you are concerned about the size, then-
The size of this stitch depends on your buttonhole size. But in general, ⅛ inch is the perfect size for a keyhole buttonhole stitch.
The straight part of the stitch runs along the sides of the buttonhole opening, and the rounded end gives extra space for thicker or shank buttons to pass through. This strong stitch helps prevent the fabric from fraying or stretching, especially in places where the button is used.
Where is it most used?
You’ll often see this stitch on coats or jackets where the fabric is heavier, and the button needs more space.
Normal Buttonhole Stitch
A buttonhole stitch is a looped stitch that reinforces the edge of the fabric, helping to prevent it from fraying or coming apart. It is the most common buttonhole stitch. It is not just to hold the fabric or sew a button on your fabric. It is kind of like a vertical buttonhole.
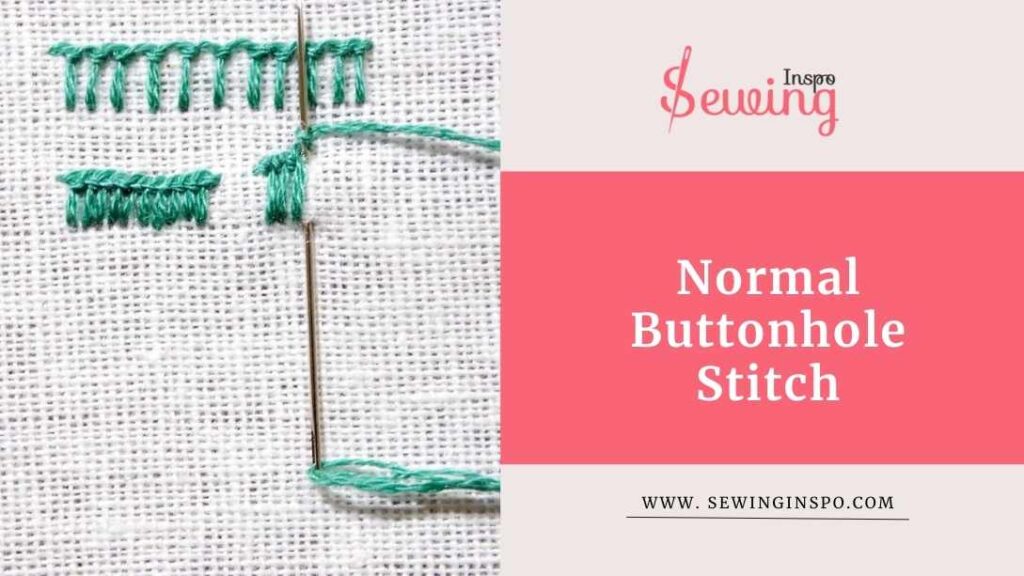
A regular buttonhole stitch usually is 0.5 in length. But you can adjust it according to your project.
This buttonhole stitch can also be used for embroidery. If done correctly, it can produce a pretty good design. It’s made up of small, uniform stitches that line the length of the slit, giving it a neat and polished look.
Looking at it may raise questions like, “Is buttonhole stitch the same as blanket stitch?” It looks the same at first glance, but the reality is different. You can see the difference if you look closely.
The ends of the buttonhole are square or slightly rounded, but without the wider, rounded section, you’d see in a keyhole buttonhole.
Where can you see it mostly?
This buttonhole stitch is common on shirts, blouses, and lighter fabrics.
Knotted Buttonhole Stitch
A knotted buttonhole stitch is a normal buttonhole stitch with a knot at the leg. Instead of wrapping the edges like a regular buttonhole stitch, this one includes knots at regular intervals.
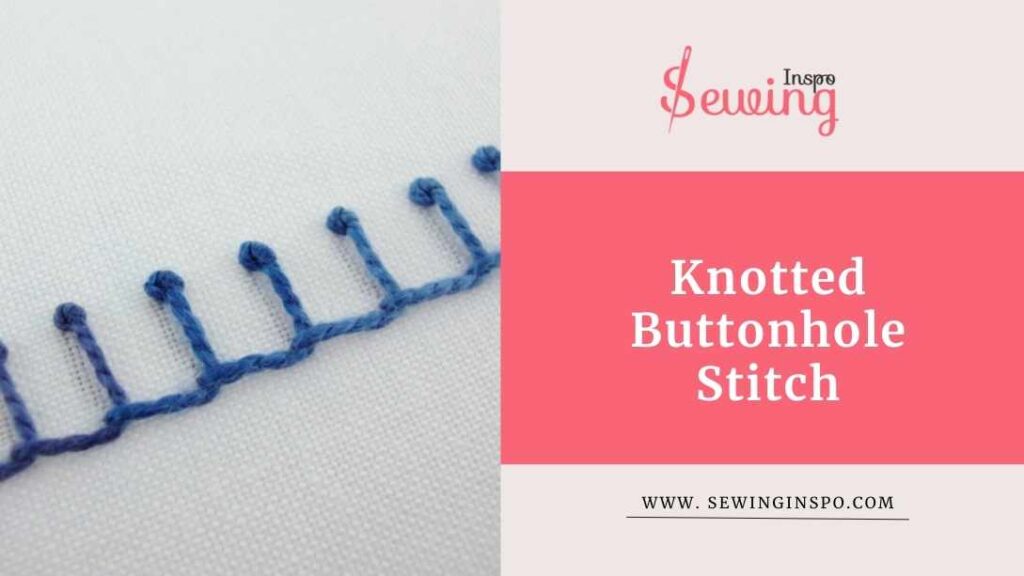
These knots make the buttonhole look unique and help keep the edges of buttonholes from fraying.
The knotted buttonhole stitch has a unique and textured look that sets it apart from regular buttonholes. Instead of a smooth edge, you’ll see small knots or bumps along the sides. It gives a raised effect that adds a bit of flair.
The buttonhole usually has a rectangular shape or slightly rounded ends, just like a traditional one. But what makes it special is those decorative knots, which look great and make the buttonhole super sturdy.
Uses of knotted buttonhole stitch-
Knotted buttonholes are mostly used in embroidery because they give a unique touch to the sewing project.
Closed Buttonhole Stitch
The closed buttonhole stitch is a triangular buttonhole stitch. In this shape, the stitch “legs” angle go forward or backward, meeting at the center to create a triangular shape. This design gives the buttonhole a decorative touch and makes it sturdy and secure.
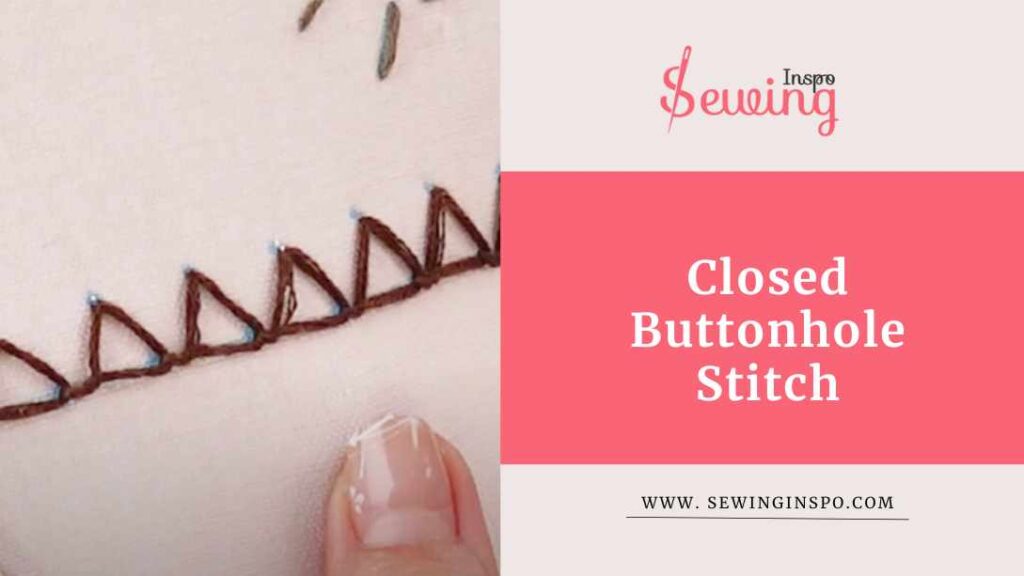
When you sew a closed buttonhole stitch, the spacing between each stitch is ⅕ inch wider than in a regular buttonhole stitch. That is why it is even called a widely spaced buttonhole stitch.
The space allows the fabric to lie flat and creates a neat finish. The triangle shape formed by the angled stitches adds a unique texture.
Where is the Closed Buttonhole Stitch?
Well, the closed buttonhole stitch is commonly used in decorative edging, such as on blankets, napkins, or embroidered pieces, where you want a neat, finished look.
Triple Buttonhole Stitch
The triple buttonhole stitch involves a series of small 3 part stitches. Each stitch is made up of one stitch moving forward, one going backward, and another moving forward again.
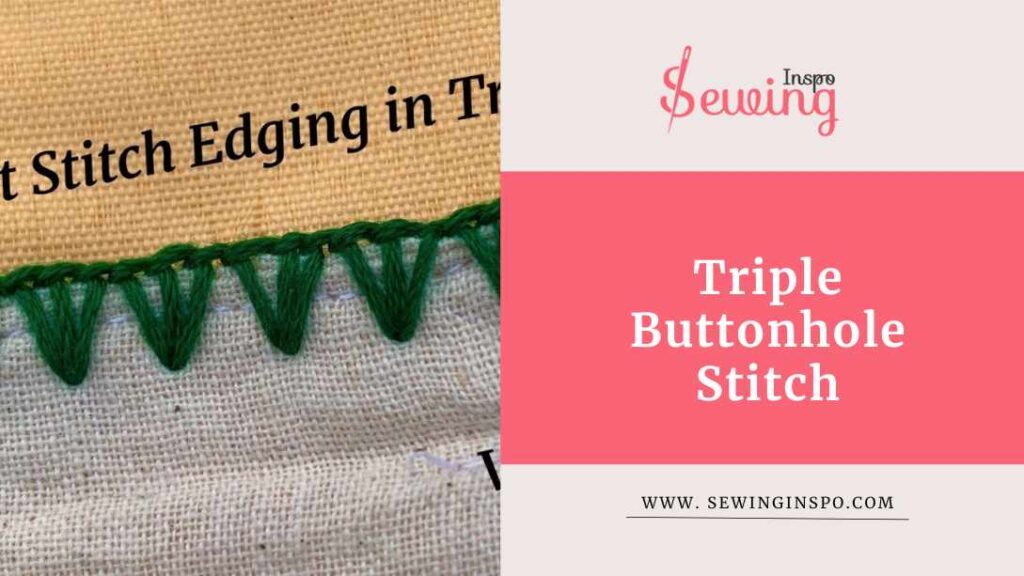
This creates a thicker, more reinforced edge, making the buttonhole extra strong and durable. The triple layers of stitches provide added support. The finished look is bulkier and sturdier, ensuring the fabric won’t fray or weaken around the buttonhole. All those criteria make it perfect for a button hole stitch design.
Uses of it? Well,
The triple buttonhole stitch is mainly used for areas that need extra durability and reinforcement. It’s perfect for heavy fabrics like denim, coats, or upholstery, where the buttonholes experience more wear and tear.
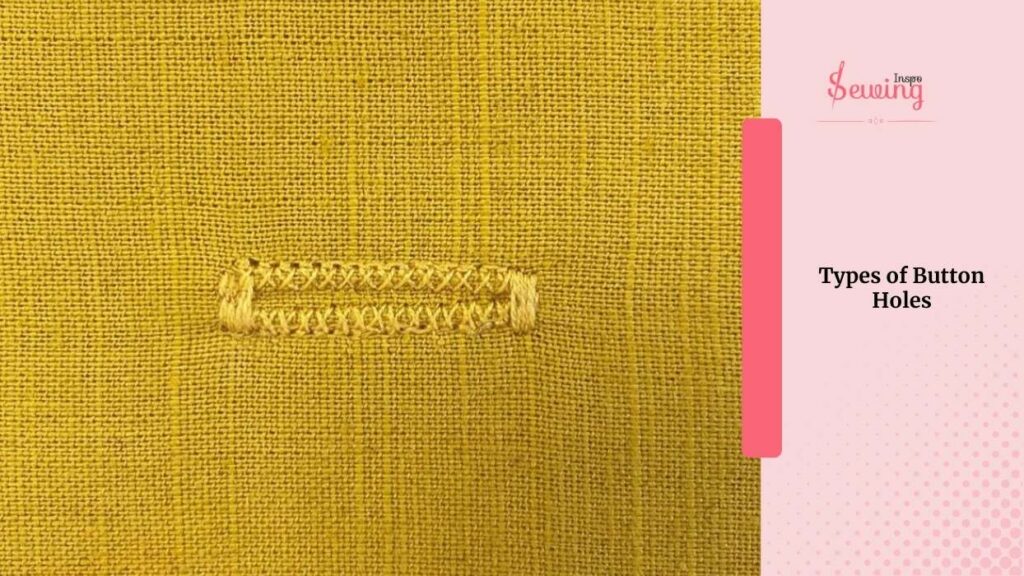
Crossed Buttonhole Stitch
The crossed buttonhole stitch is a decorative stitch in which each buttonhole stitch crosses over the previous one.

It forms a series of small “X or diamond” shapes along the edge of the buttonhole.

This crisscross pattern adds visual interest and texture while reinforcing the fabric to prevent fraying.
Use of crossed buttonhole stitch?
It’s often used in embroidery and decorative sewing projects to give buttonholes a unique look. The crossed buttonhole stitch can add flair to garments, accessories, or home décor items, combining function with style.
Here is how it works,
- Start by anchoring your thread securely at the back with 2-3 tiny loop knots.
- Hold your needle at a 45° angle, insert halfway into the fabric for a slanted entry.
- Create the cross by stitching diagonally across and under the first stitch.
- Leave ¼ to ½ inch gaps between stitches for neat, even X-shapes.
- Repeat the process to build a row of Xs—great for embellishment or reinforcement.
- Finish by securing the thread at the back with a loop and knot.
Long & Short Buttonhole Stitch
The long and short buttonhole stitch is made in different lengths—some long and some short—along the edge of the buttonhole.
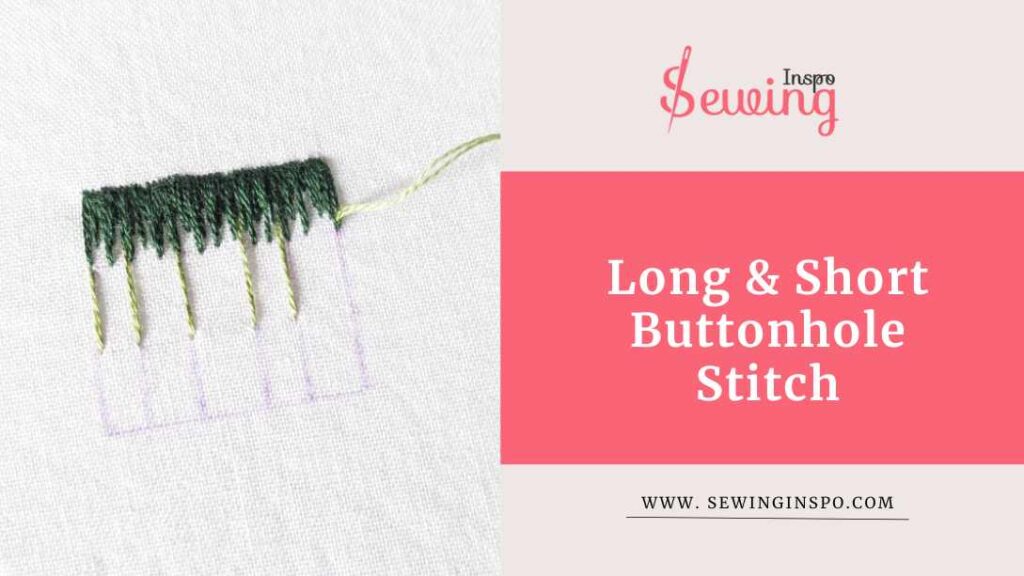
This creates a more textured, decorative effect while still strengthening the buttonhole.
Combining long and short stitches adds visual interest. It is perfect for decorative garments or projects where you want the buttonholes to stand out. The stitch lengths still help reinforce the edges to prevent fraying, giving both style and durability.
Where is it used mostly?
You might find this stitch on blouses, dresses, or even home décor items like cushions and table linens or in decorative areas.
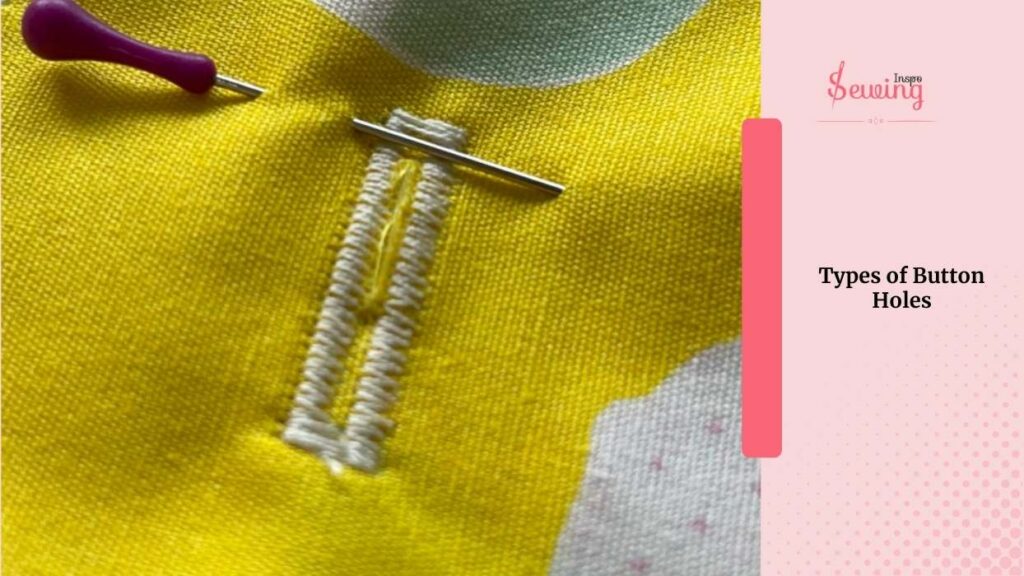
Double Buttonhole Stitch (In)
The double buttonhole stitch (in) is a technique for creating a strong buttonhole by sewing 2 rows of stitches side by side.
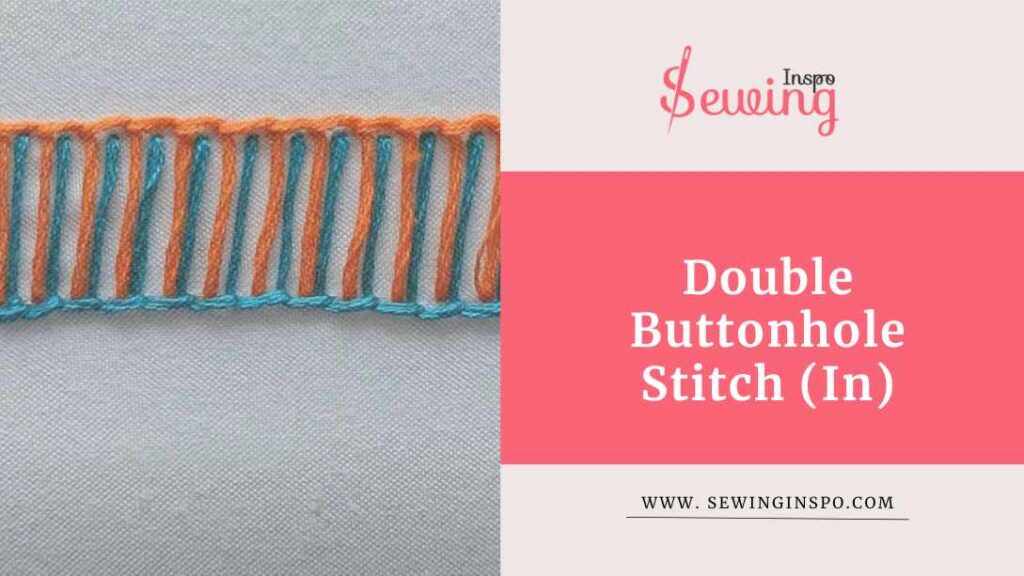
First, you make one row of buttonhole stitches and then add a second row close to the first.
This makes the edges thicker and more durable, which is great for heavy fabrics like jackets or coats. The extra row strengthens the buttonhole and gives it a neat, polished appearance.
Double Buttonhole Stitch (Out)
The double buttonhole stitch (out) is similar to the double buttonhole stitch (in) but is sewn on the outside of the fabric instead of the inside.
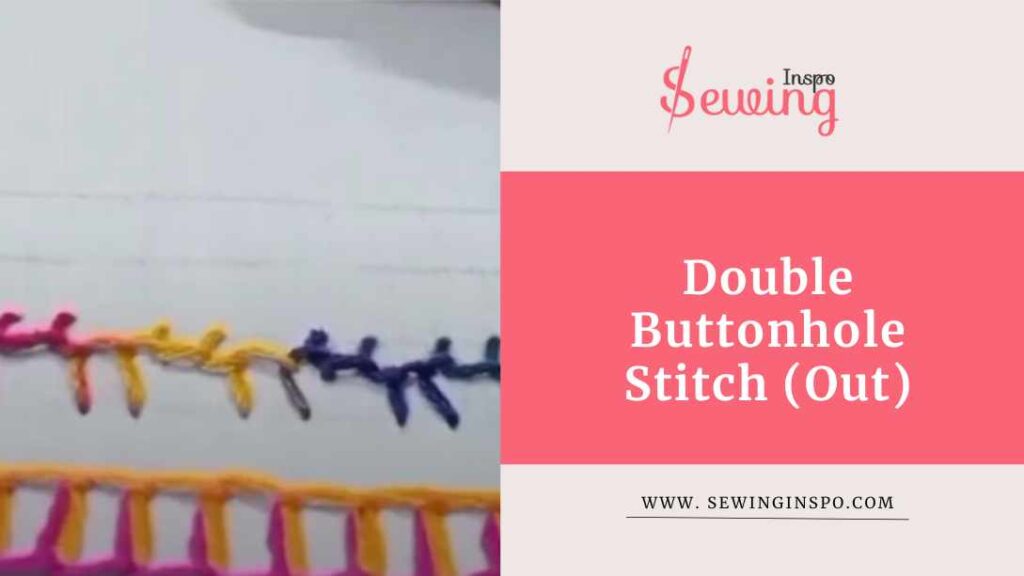
This technique also involves creating 2 parallel rows of stitches around the buttonhole, but it’s designed to be visible outside the cloth. The buttonhole becomes a decorative feature using this method, as the double rows create a strong and stylish edge.
Mostly used place?
This stitch is often used on items where the buttonhole must be functional and visually appealing, such as coats, jackets, or embroidered pieces. The added strength from the double rows ensures that the buttonhole can withstand regular use while enhancing the overall design.
Curious about how to do a Double Buttonhole Stitch? It is easy. Here is a glance at it,
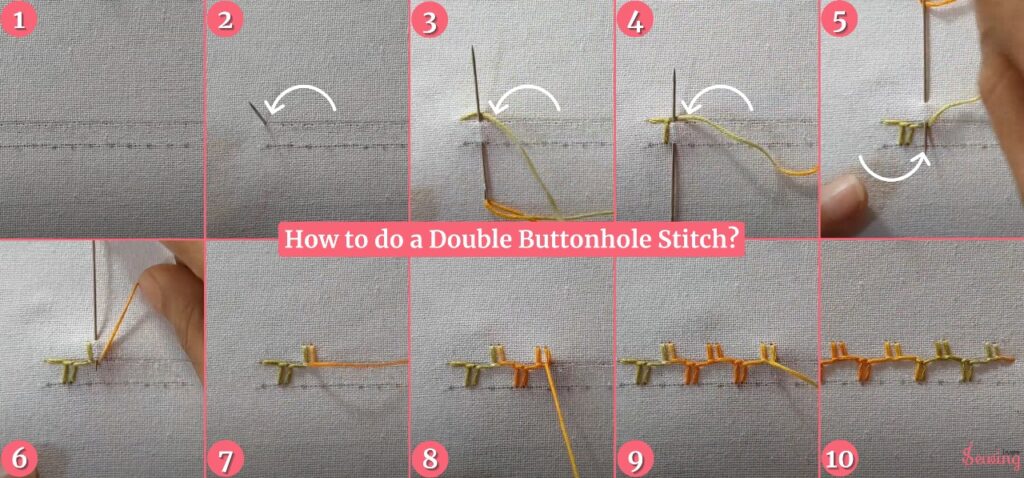
- Grab your needle and thread to get started.
- Create a simple row of buttonhole stitches along the fabric edge, spacing them evenly.
- Push your needle from the outside of the first row of stitches.
- Instead of staying on the same line, push back through the first-row line.
- Slide the thread under the needle and pull it to lock the stitch in place.
- Repeat by pushing the needle beside the first stitch, about ⅙ inch away.
- Keep your stitches straight and uniform—don’t angle them like crossed buttonhole stitches.
- Interlock each pair of stitches as you go, working your way across the fabric.
Twin Tangle Buttonhole Stitch
The twin tangle buttonhole stitch is between 2 parallel lines of stitching that create a tangled, intertwined look, almost like a braided effect. This gives the buttonhole a textured appearance. That’s the specialty buttonhole stitch.
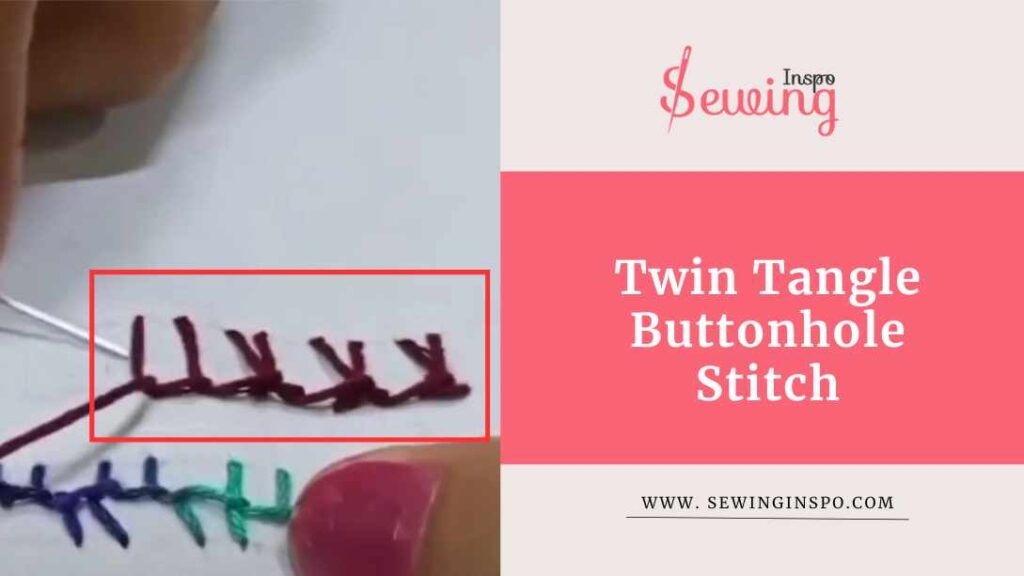
It’s often used in projects where you want to combine functionality with a bit of flair, like on garments or accessories. The twin tangle stitch looks great and reinforces the buttonhole.
It is strong enough to handle everyday wear. It’s a creative way to add personality to your sewing projects while ensuring they stay durable.
Close Buttonhole Stitch
The close buttonhole stitch is a neat, tightly packed stitch forming a solid edge around a buttonhole. It’s called “close” because the stitches are placed close together, leaving no gaps between them.
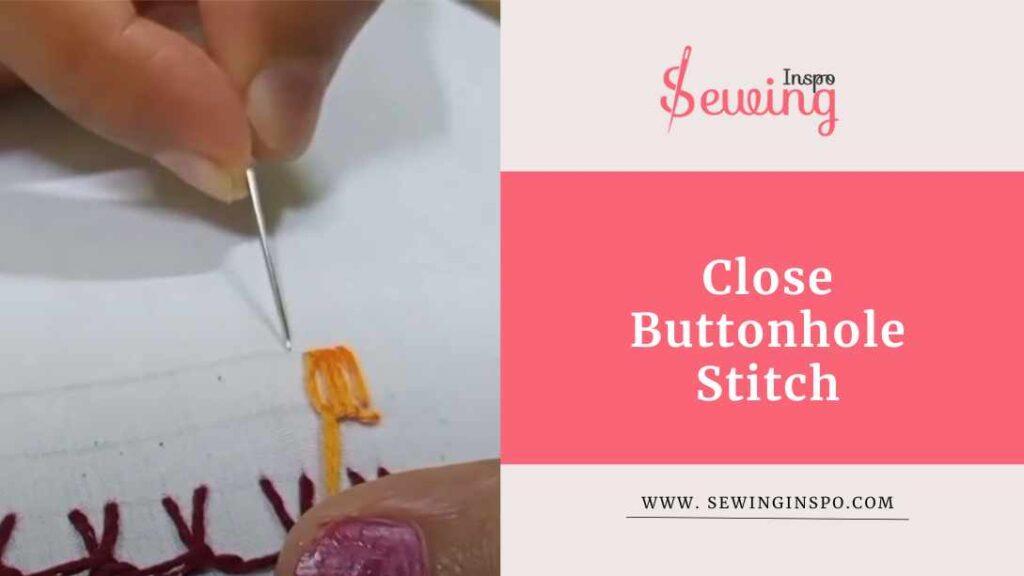
This gives the buttonhole a strong, clean finish and prevents the fabric from fraying. That’s the difference blanket stitch vs buttonhole stitch.
You often see this stitch on garments where you want a smooth, polished look, like on shirts or blouses. It’s functional and decorative, adding excellent detail while keeping the buttonhole sturdy.
Commonly used place?
It is commonly used for buttonholes, like shirts, blouses, or light jackets. It’s perfect for a lightweight fabric that need extra reinforcement.
Wanna know how you can do that? Here is a glance at it,
- After seeing its neat diamond shape, I tried the closed buttonhole stitch, but it looked too good to ignore.
- Sketched the shape on fabric first for guidance.
- Used a size 11 needle with 20″ thread.
- Stitched at a 45° angle from side to center to form loops.
Repeated the motion to complete the design—right, center, left.
Detached Buttonhole Stitch
The detached buttonhole stitch is distinct from the others. It is a filling stitch commonly used in needlelace and stumpwork to form a solid, 3 -dimensional area within an embroidered shape. It’s also called the detached corded blanket stitch or the single corded bristle stitch.
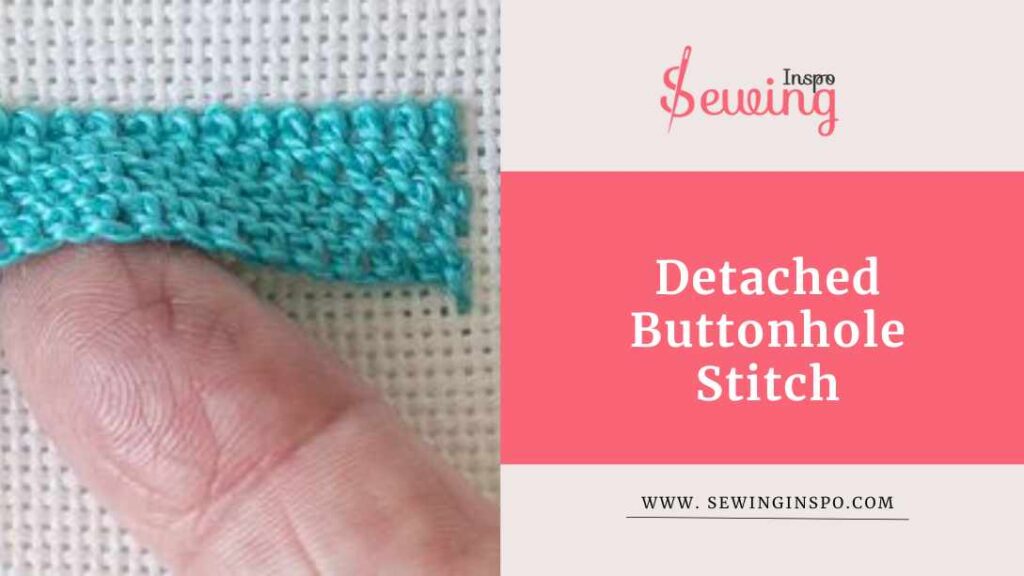
Unlike a regular buttonhole stitch, the detached version doesn’t connect directly to the fabric after each stitch, creating a lacy, open look.
This stitch is great for embroidery or filling in shapes where you want some texture, like leaves or petals, in a floral design. It’s simple and adds a unique.
Where you may have seen it?
The detached buttonhole stitch is ideal for decorative embroidery techniques like needlelace and stumpwork.
Open Buttonhole Filler Stitch
Open Buttonhole Filler Stitch is a simple open form of buttonhole stitch. It creates a beautiful and textured look while keeping the edges secure. If you see buttonhole stitch images, then you would know.
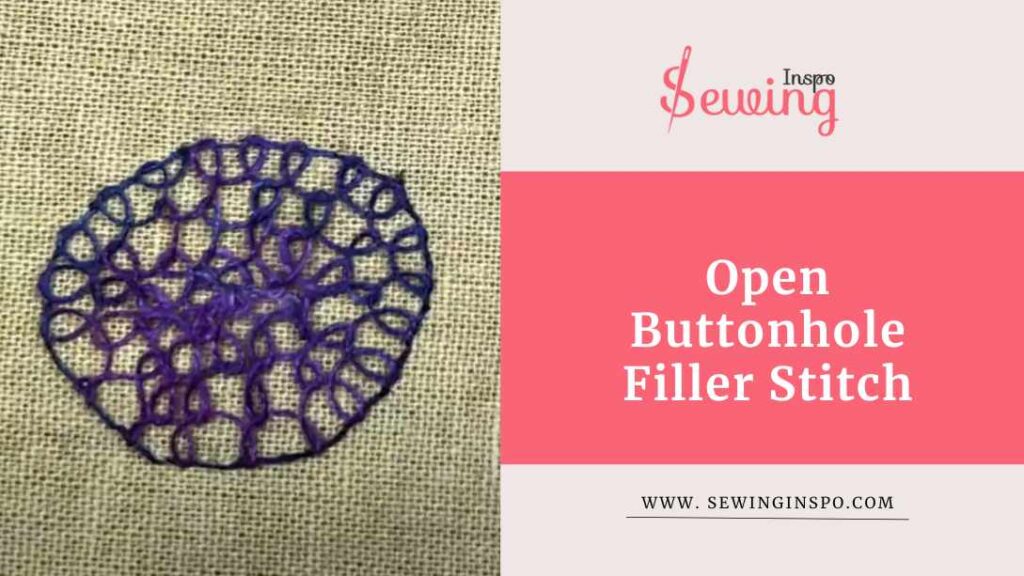
Instead of just a plain hole, this stitch adds visual interest by using a series of overlapping stitches that fill the area around the buttonhole, often in a zigzag or crisscross pattern.
It’s a great choice for adding flair to garments or projects where the buttonhole stands out. Plus, it helps prevent fraying and keeps everything looking neat.
So, if you want to elevate your buttonholes with some style, the open buttonhole filler stitch is a fantastic option.
Buttonhole Wheel Stitch
A buttonhole wheel stitch is a wheel stitch done by a buttonhole stitch to form a textured, round detail. The stitch starts with a central knot, and you work outward, creating a series of buttonhole stitches in a circular pattern. This gives it a lovely, layered look. It’s not just beautiful; it’s also functional.
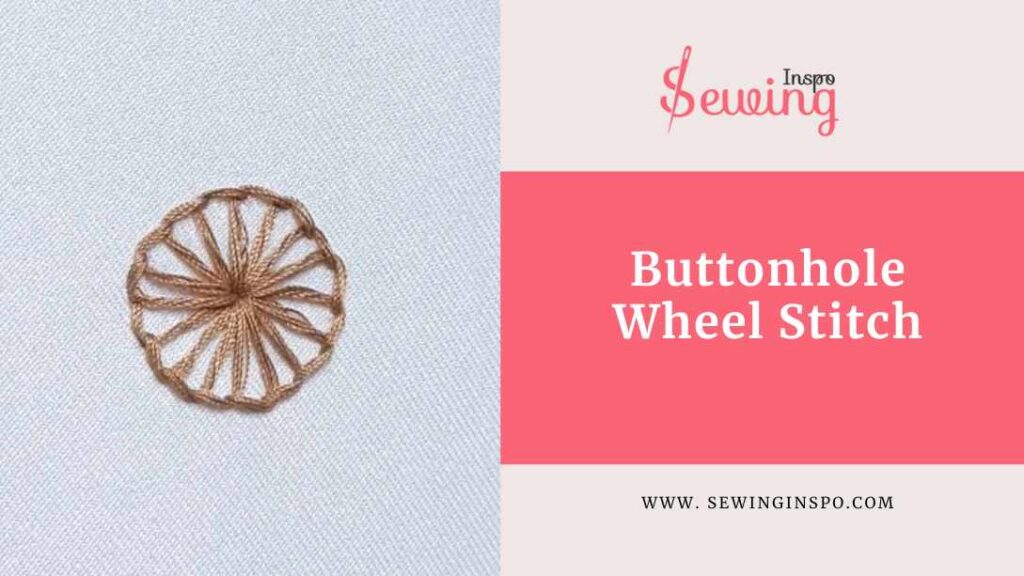
The more fun part is that there 5 different types of wheel buttonhole stitches, too. Such as:
- Whipped Buttonhole Wheel
- Barred Buttonhole Wheel
- Inside-Out Buttonhole Wheel Stitch
- Buttonhole Wheel Cup Stitch
- Half Buttonhole Wheel Stitch
Tailor’s Buttonhole Stitch
Tailor buttonhole stitch is basically a reverse buttonhole stitch. This version features an extra twist that secures the stitch more firmly, creating a braided effect along the fabric’s edge. Unlike other buttonhole stitches that may focus on decorative aspects.
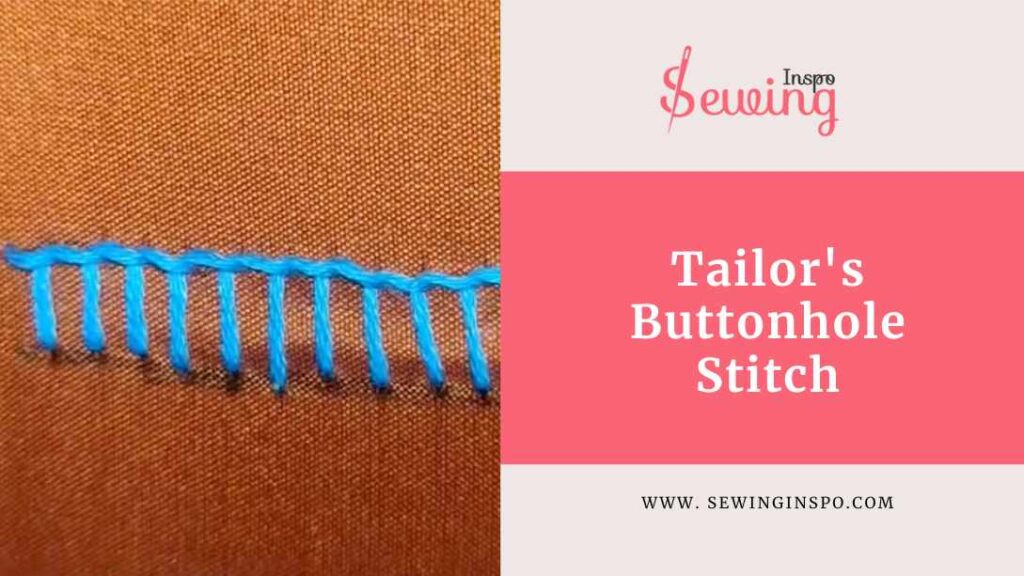
The Tailor’s Buttonhole Stitch has a neat, professional look, and its signature zigzag pattern outlines the buttonhole. This stitch is all about strength and durability.
It is perfect for tailored garments like jackets and coats. It holds up well on heavier fabrics, such as wool and denim, ensuring that buttonholes can withstand regular wear without fraying.
Buttonhole Scallop Stitch
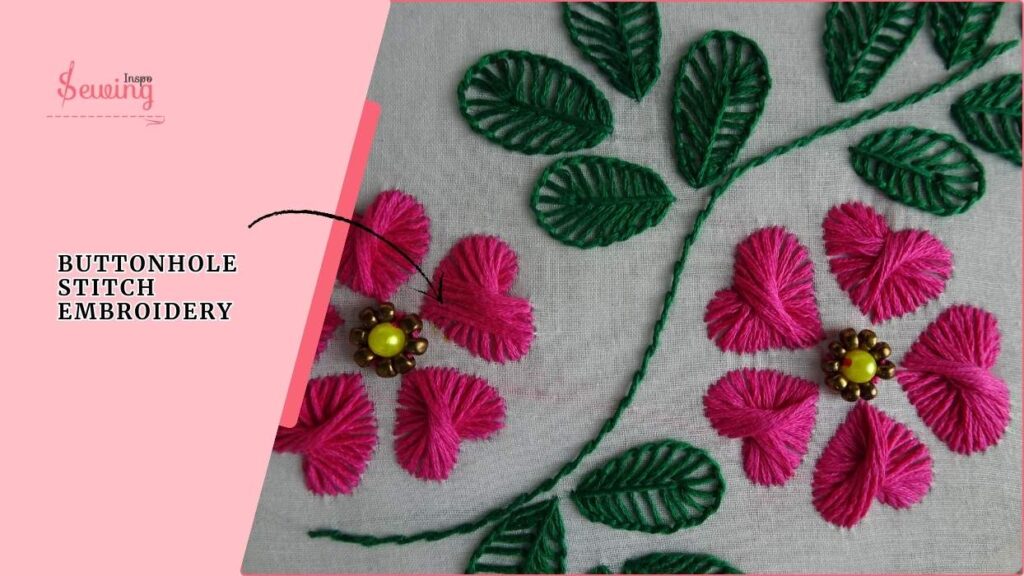
The buttonhole scallop stitch is a detached stitch with a wavy effect. It is a delightful embroidery technique that adds a decorative scalloped edge to buttonholes. You can create some stunning buttonhole stitch embroidery with it.
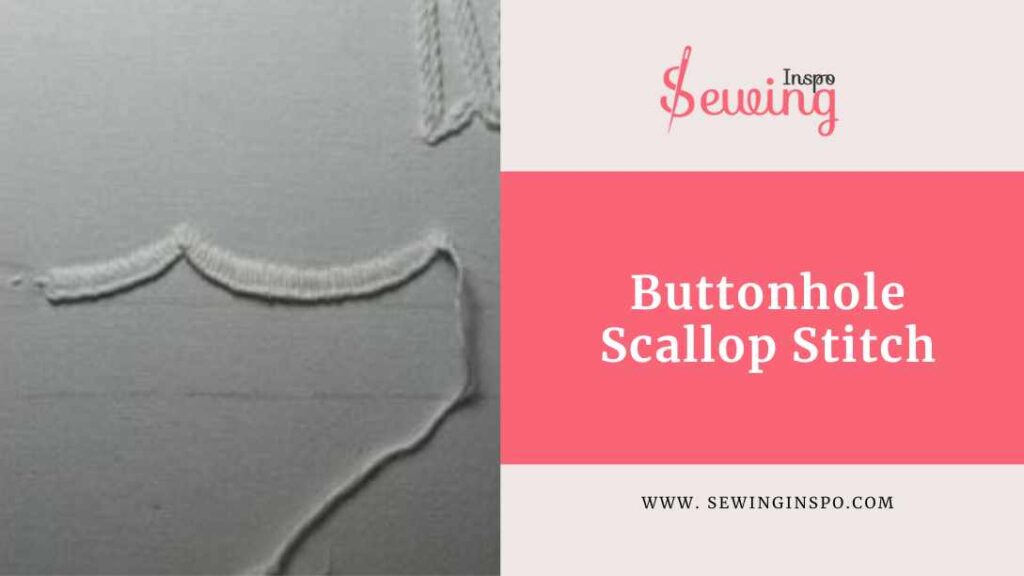
It gives them a charming and whimsical look. This stitch combines the strength of traditional buttonhole stitching with a unique, flowing design that mimics the shape of scallops.
So whenever you need to do some stunning design, do a buttonhole scallop stitch. If you wanna do embroidery, then this is the best choice.
I chose Buttonhole Scallop to buttonhole stitch embroidery cause it is what I need for embroidery. It is easier than other types of buttonhole stitch. You just have to tie a knot in each step. 😜 So,
To do buttonhole stitch embroidery with buttonhole scallop stitch, you need to follow 5 steps-
- Place an Anchoring Pin: Use a ½–2 ⅛” pin between tick marks to guide your scallop shape.
- Position the Needle: Insert it at the tick mark and pull it slightly away to create the base.
- Create the Line: Make uniform loops by guiding the needle under the working thread.
- Slide the Needle Under & Over: Keep looping to form neat, wavy scallops.
- Anchor the End: Finish with a final stitch to lock it all in.
Buttonhole Bar Stitch
Buttonhole bar stitch is a blanket stitch wrapped around with thread. From afar, it looks like a bug lying on fabric.
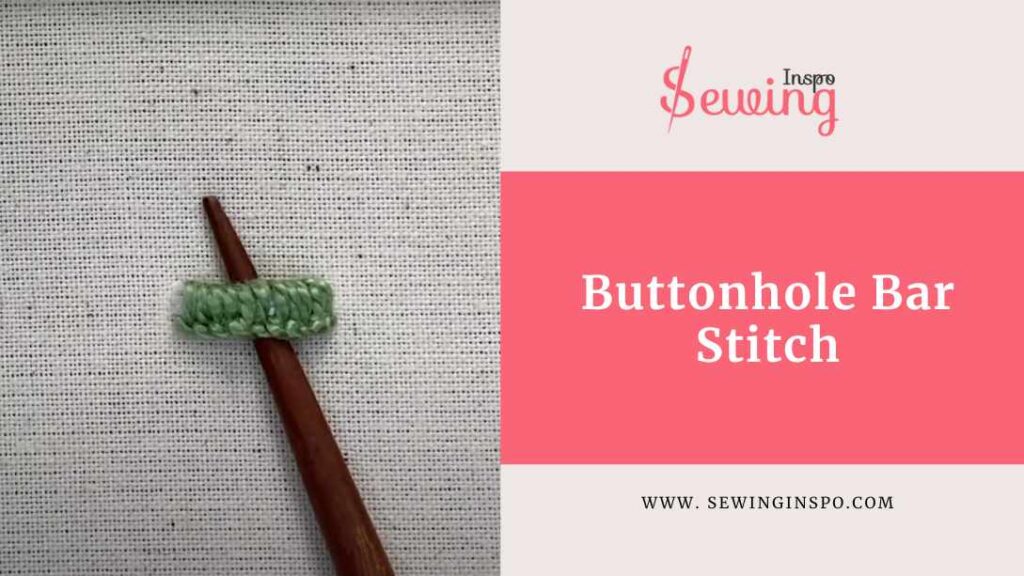
This technique makes looped buttonholes for garments and locker loops for hanging jackets. It adds functionality and a decorative touch, making it an excellent choice for various sewing projects. It also has some versions. Such as:
- Twisted Buttonhole Bar Stitch
- Detached Buttonhole Bars Stitch
- Reversed Buttonhole Bar Stitch
Buttonhole types with pictures
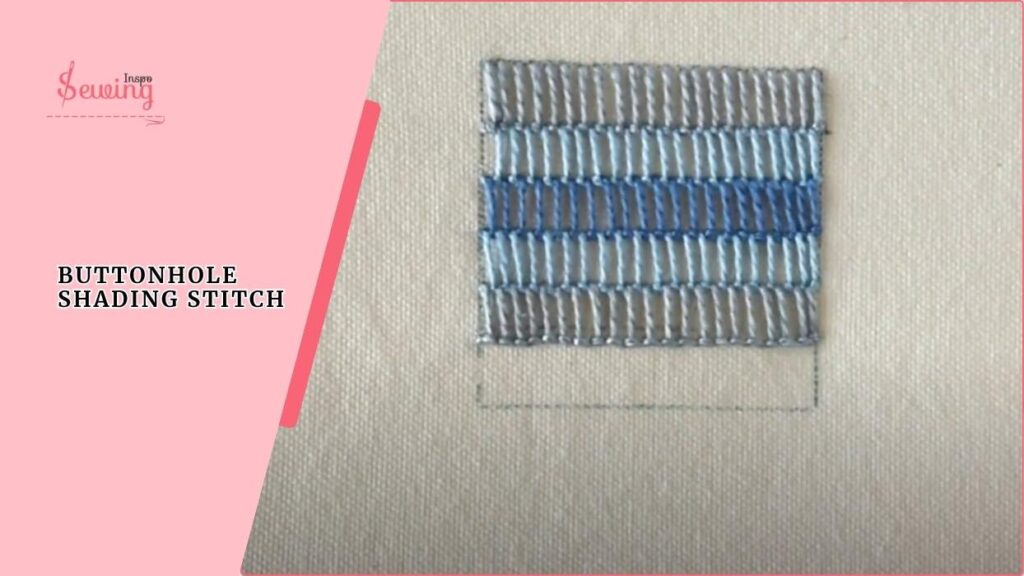
Buttonhole Shading Stitch
Buttonhole Shading Stitch is a beautiful embroidery technique that combines the structure of the buttonhole stitch with color gradation or density variation. It is actually rows of buttonhole stitches (often detached or open) worked side by side. The shading effect is achieved by:
The buttonhole structure is visible, but the color gradient adds dimension, almost like a watercolor fade using thread.
Types Of Buttonhole Stitch Pdf
That’s all the types of buttonhole stitches I have found so far. And digging out the types wasn’t easy! Not everyone talked about this clearly, so I decided to note it down. Since you can find it, I recommend downloading and saving the PDF. It’s easy to forget or mix it up.
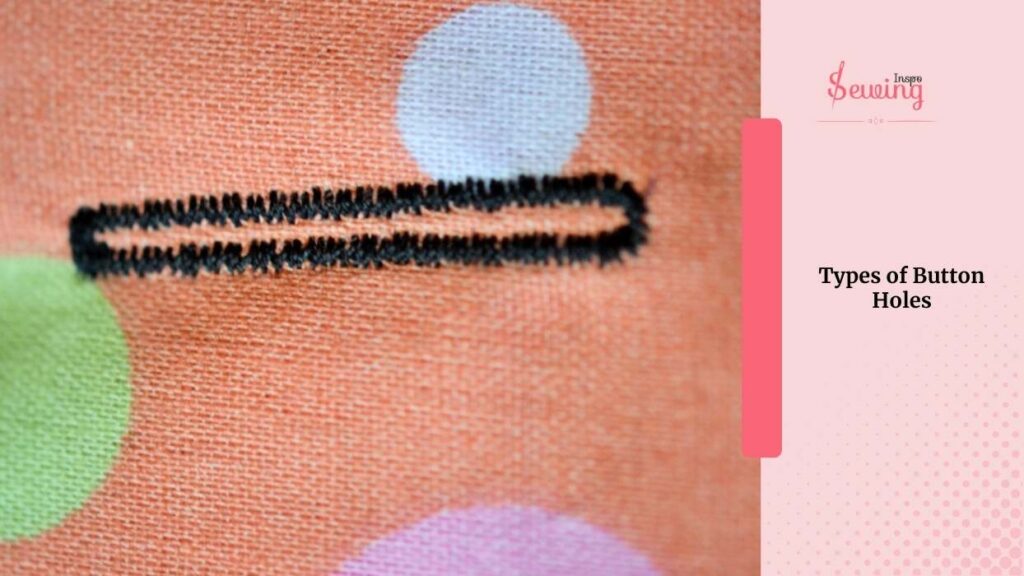
Types Of Button Holes
Just like stitches, there are versions of holes. The most common different types of button holes are Straight, keyhole, bound, handworked, machine-made, corded, and stretch buttonholes. Each serves different fabrics and garment types.
All Types Of Buttonhole stitch video tutorial
What if we combined all types of buttonhole stitch tutorials into one video? I know this will make it so much easier for you to understand each type. Don’t miss out—check out our video now!”
Frequently Asked Questions
What Is The Difference Between A Keyhole And A Regular Buttonhole Stitch?
A keyhole buttonhole stitch has a rounded end, allowing for thicker or shank buttons to fit through, while a regular buttonhole stitch is usually a straight slit without extra space.
What Are The Different Styles Of Buttonholes?
There are several styles of buttonholes, including the keyhole buttonhole, the closed buttonhole, which is wholly stitched around the opening for a neat finish, and the open buttonhole, which has the edges secured but the center remains exposed. You can easily do it with a buttonhole cutter.
What Are The Three Types Of Buttonholes?
The three main types of buttonholes are the standard buttonhole, keyhole buttonhole, and closed buttonhole. Each type serves different functions depending on the fabric and the garment’s design.
What Stitch Do You Use For Buttonholes?
Buttonholes are typically made using a buttonhole stitch, which can vary in style. This stitch reinforces the edges to prevent fraying. It can be executed in various ways, such as using a regular buttonhole stitch, a closed buttonhole stitch, or more decorative stitches like the knotted or crossed buttonhole stitches, depending on the desired look and functionality.
Warp Up
That’s all 13 types of buttonhole stitch. Each of them is more beautiful than the others, I must say. And each of them has unique features to look forward to. Each of them gives a fancy twist whenever and where you want.
So, which one has caught your attention so far? Comment down in sewinginspo your opinion.


Leave a Reply