
At first, I thought the backstitch was a simple stitch that couldn’t be used much in embroidery. However, my thought process changed when I found out that there are many types of back stitches. Yes, Backstitch is the strongest stitch among all stitche types, also with many versions.
That backstitch is one of my favorite stitches. Among 13 versions of Backstitch, my favourites are-
Back Stitch Key Type
- Double Threaded Backstitch
- Whipped Back Stitch
- Pekinese Stitch
- Open Back Stitch
But those are just 4 out of 13 types of backstitch. Don’t you wanna know What are the different types of Backstitch? If you do, then read on to understand back stitch definition and it’s type.
Main Info:
- There are 13 types of backstitch. From a simple back stitch design to a decorative one.
- The whipped backstitch is perfect for any rope effect. This is my favorite types of back stitch.
- Herringbone ladder backstitch adds a unique yet creative touch to embroidery.
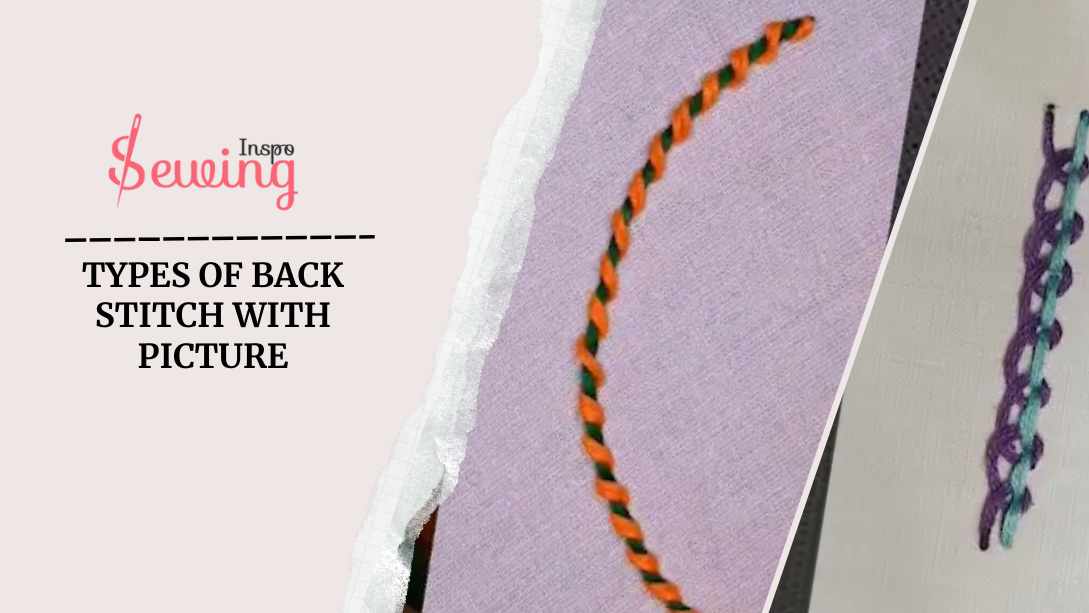
Table of Contents
13 Types Of Back Stitch With Picture
There are 13 Types of back stitch embroidery such as:
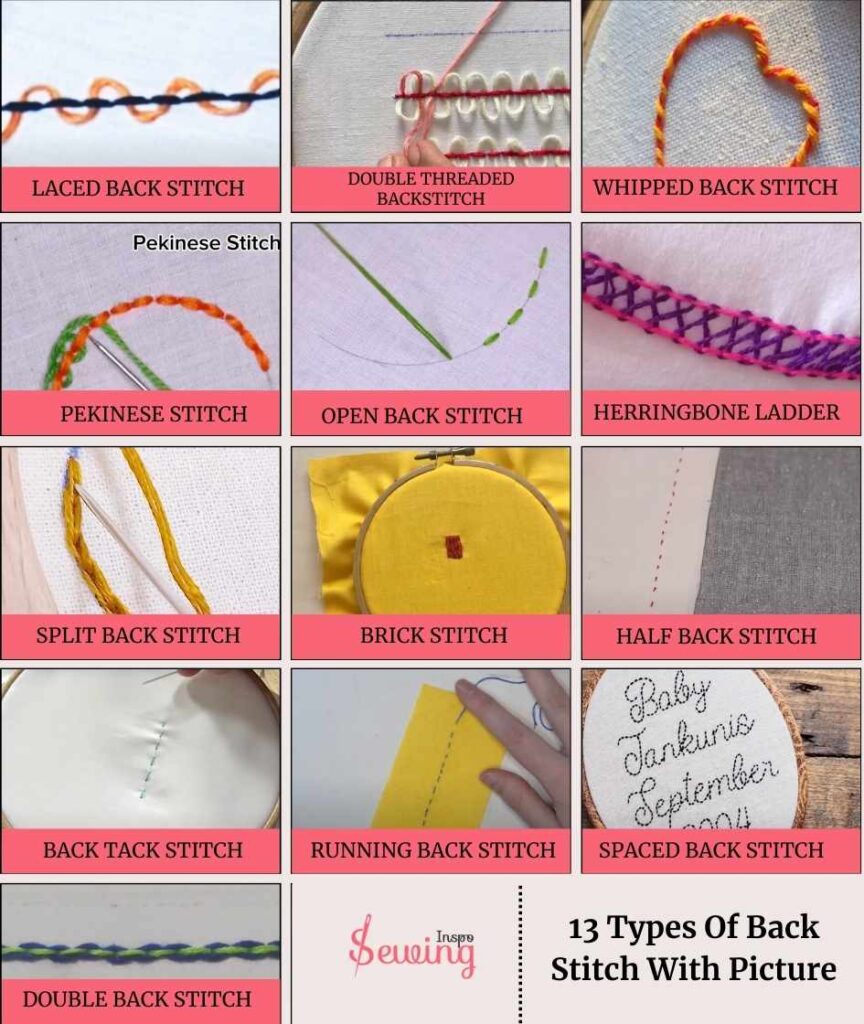
- Laced Back Stitch
- Double Threaded Backstitch
- Whipped Back Stitch
- Pekinese Stitch
- Open Back Stitch
- Herringbone Ladder
- Split Back Stitch
- Brick Stitch
- Double Back Stitch
- Half Back Stitch
- Back Tack Stitch
- Running Back Stitch
- Spaced Back Stitch
So yeah that’s all backstitch types. Now let’s learn about each backstitch variations.
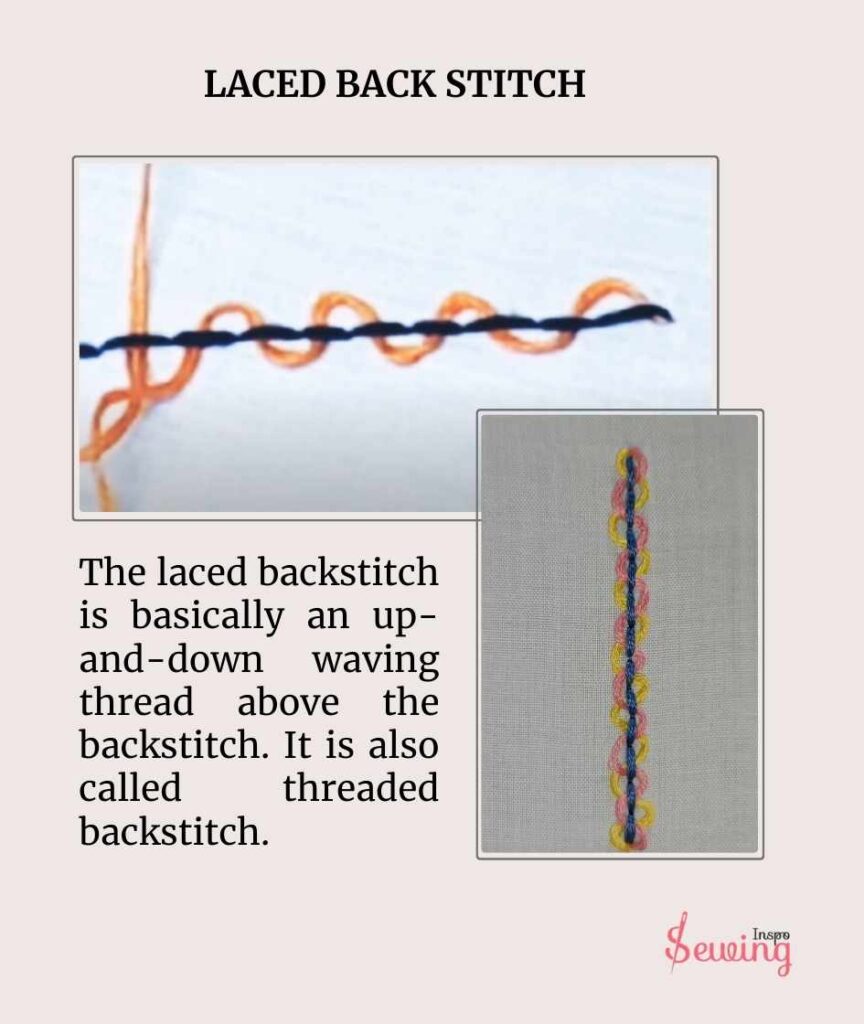
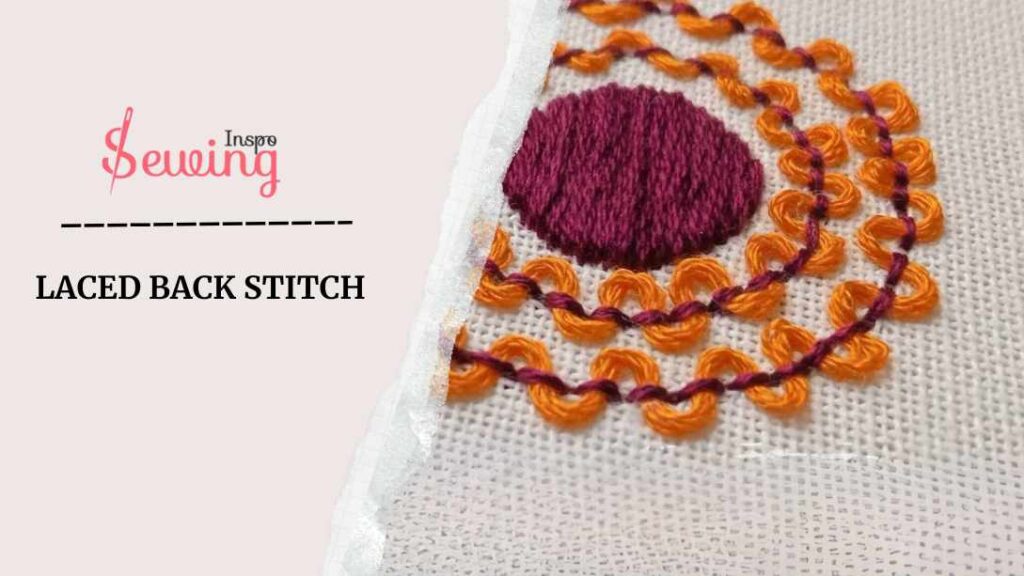
Laced Back Stitch
The laced backstitch is basically an up-and-down waving thread above the backstitch. It is also called threaded backstitch.
How does it look? Well, the stitch look like a thread lace.
This extra “lace” layer gives it a braided or almost twisted appearance. That makes the stitches stand out more vibrantly. In embroidery, you’ll often see this stitch used as a border on samplers or to outline elements like flowers, leaves, or lettering.
Here Is How Laced Back Stitch Works,
- Start by stitching a regular backstitch line along your design.
- Bring the needle up, go forward, then come up a stitch length behind.
- Continue to create a clean, even line (this is your base).
- Pick a contrasting thread for a bold effect, or a subtle shade for texture.
Use all 6 strands for fullness.
- Thread a tapestry needle (blunt tip works best for weaving).
- From the backside, bring the needle up at the beginning of the backstitch line.
- This hides the knot under the fabric and keeps the front neat.
- Gently weave the needle under each backstitch from one end to the other.
- Do not pierce the fabric—just slide under the stitches.
- Keep the thread tension even to avoid puckering or drooping.
Double Threaded Backstitch
The Double Threaded Backstitch is a stitch that starts with a simple backstitch line as the base.
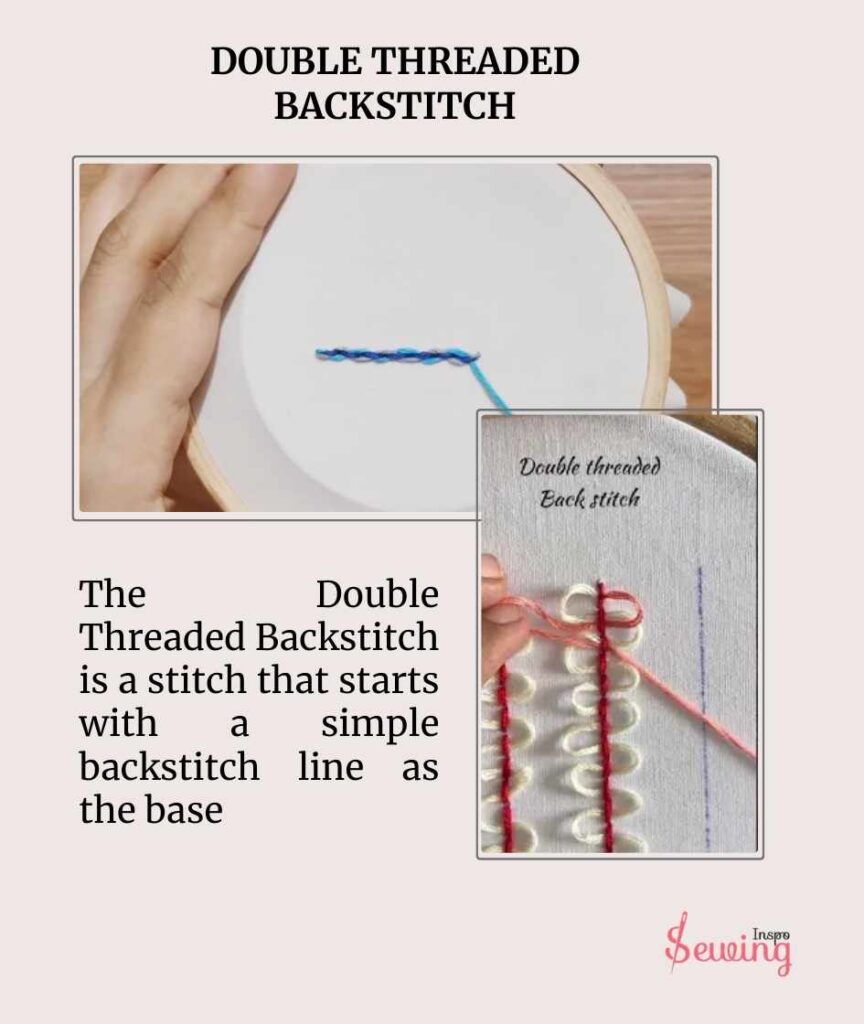
It is a solid backstitch line with 2 threads looping around each side. The result is a richly layered effect, almost like a decorative trim or rope. This back stitch uses in embroidery.
This is one of most uses among different types of back stitch.This stitch stands out well, especially where you want bold accents. Because of the double-threaded lacing, the line looks fuller, with a hint of dimension. And each color shows up vividly, creating a striking visual effect that gives extra personality to the design.
Whipped Back Stitch
A whipped backstitch is a backstitch with thread whipped around it. It may sound similar to a laced one but it’s slightly different. The extra thread has a wavy effect in a laced backstitch, but in a whipped version, it whips the backstitch.
It creates the extra thick backstitch effect. This process of whipped backstitch wraps the initial line, creating a beautifully raised, twisted effect that almost looks like a rope.
This stitch is popular for outlining shapes or accenting embroidered elements like flowers, leaves, or borders.

It’s also an excellent way to add texture to lettering. It makes the words stand out in embroidery designs.
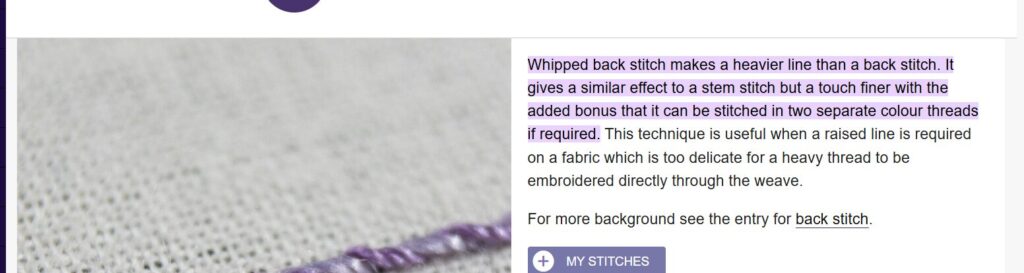
So, What Is A Whipped Back Stitch?
A whipped back stitch is a decorative embroidery stitch where you first make a regular back stitch, then “whip” a second thread around each stitch. This creates a raised, rope-like effect—perfect for outlines, curved lines, and lettering.

So, What Is A Whipped Back Stitch?
A whipped back stitch is a decorative embroidery stitch where you first make a regular back stitch, then “whip” a second thread around each stitch.
This creates a raised, rope-like effect—perfect for outlines, curved lines, and lettering.

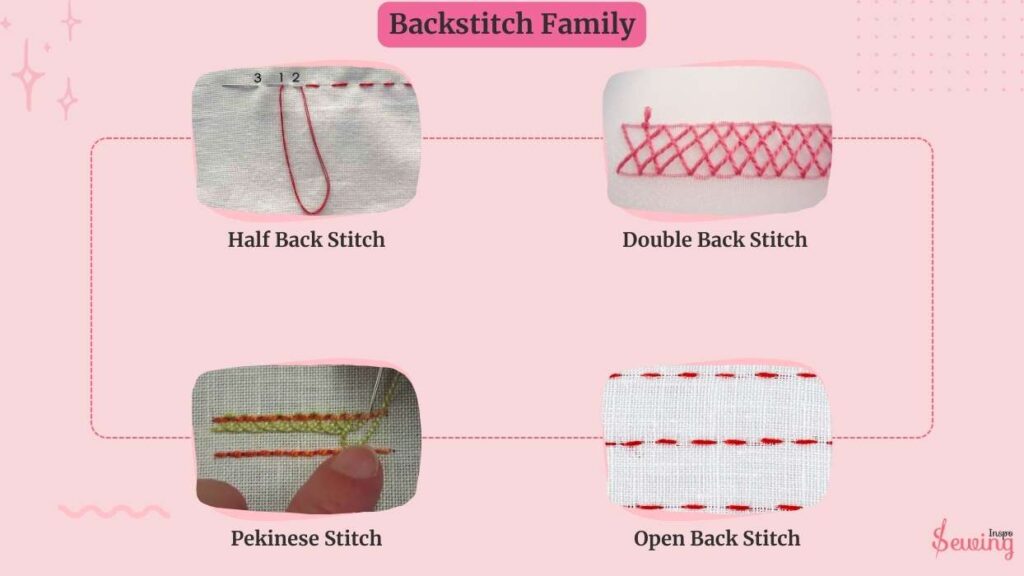
Pekinese Stitch
The Pekinese stitch combines a back stitch with a looping technique to create a textured, braided effect. It is also known as Chinese or Oriental Stitch.You can use this for any permanent stitch.
Here’s how it works:
First, you create a line of basic backstitches. Then, you loop through each back stitch using a different thread. And create little scalloped loops along the edge.

The final look of the Pekinese Stitch is unique and eye-catching, with a blend of structure from the back stitch and softness from the loops. Traditional embroidery styles often use this stitch to add a tactile border around shapes.
It’s especially great for adding a whimsical, decorative edge to fabrics or projects that need a bit of textural interest without being overly complex.
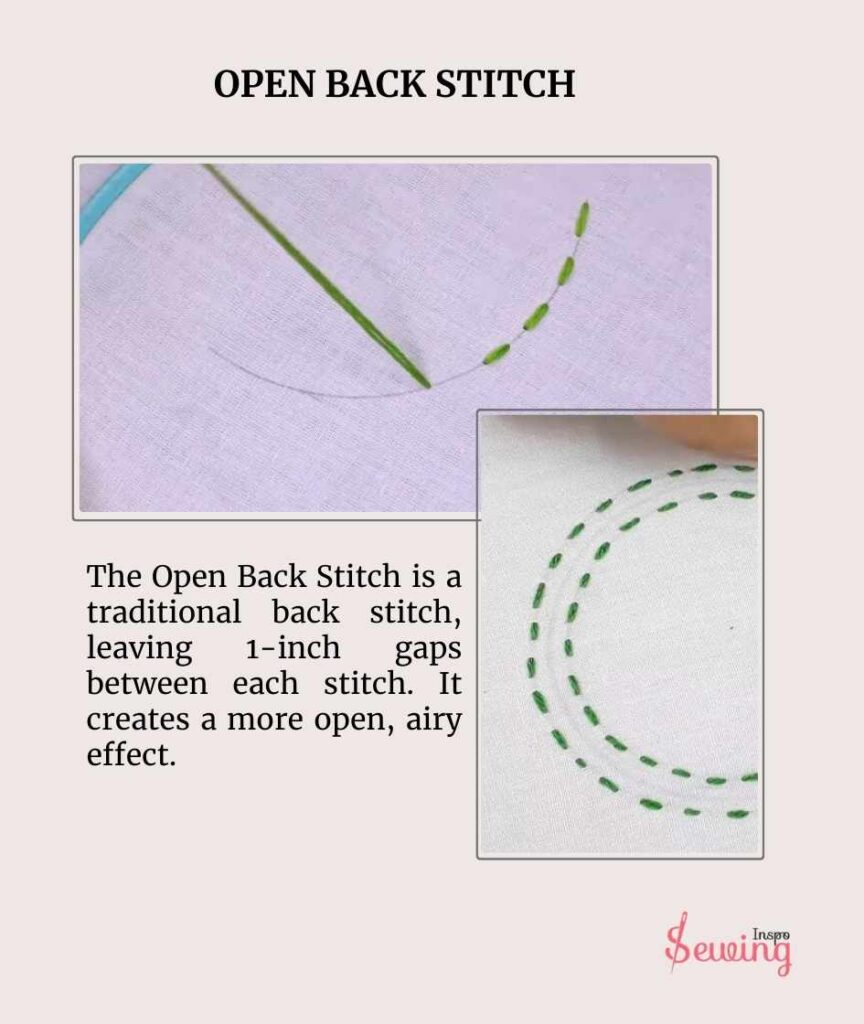
Open Back Stitch
The Open Back Stitch is a traditional back stitch, leaving 1-inch gaps between each stitch. It creates a more open, airy effect.
Unlike the continuous line of a regular back stitch, where each stitch connects seamlessly to the next, the Open Back Stitch has a small space between each stitch, which gives it a lighter, dotted appearance. This even works nicely if you want to do a cross stitch backstitch.
This stitch is commonly used to create a delicate outline that doesn’t overpower other elements in your embroidery. The Open Back Stitch is ideal for more casual or whimsical designs. It gives your work a relaxed look that still maintains its definition. I mostly use this type for secure topstiching.
Herringbone Ladder Stitch
The Herringbone Ladder is a decorative stitch that combines the look of the classic herringbone stitch with an added “ladder” effect down the middle.
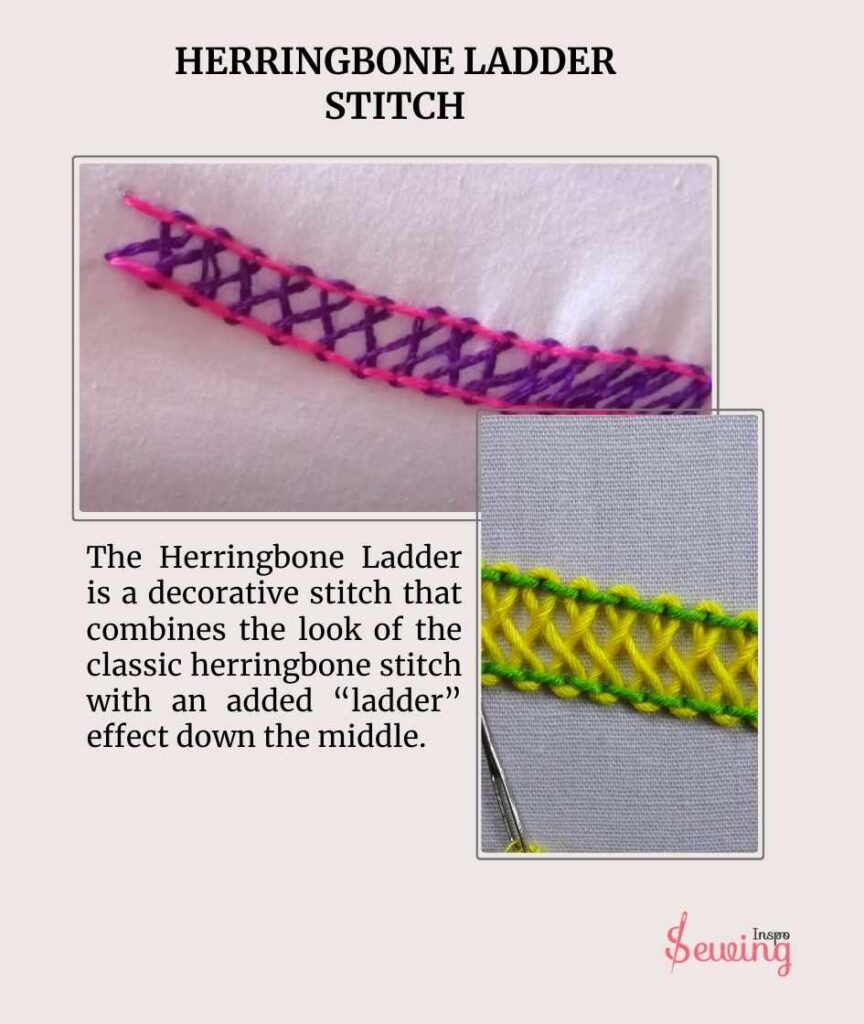
It’s worked by creating 2 parallel rows of herringbone stitches with an open space between them. Then, a third thread is woven or laced through this open space. It makes it look like a ladder rung connecting each side.
This stitch often fills larger spaces with an eye-catching, textured look. The Herringbone Ladder is especially remarkable when you use contrasting colors for the base stitch and the laced “ladder” thread.
It makes the centre detail pop beautifully against the crossed stitches on either side.
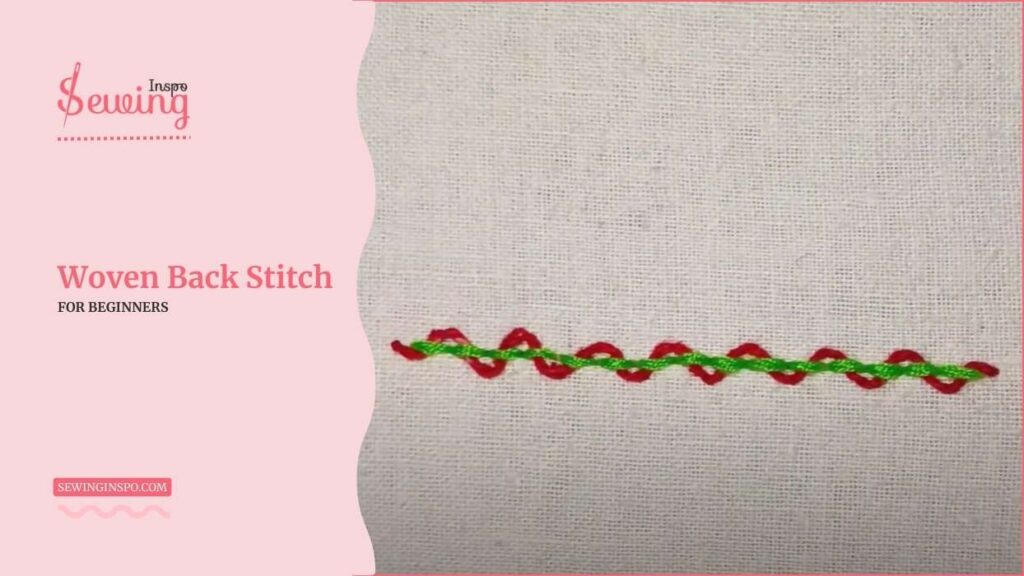
Woven Back Stitch
A woven back stitch is a normal backstitch but with thread sliding under it. This creates a cool, textured effect that stands out. It’s an easy way to add dimension and a bit of flair to your embroidery designs.
It kinda looks like whipped backstitch at 1st glance, but it’s totally not the same stitch. The whipped back stitch is when you take a regular back stitch and “whip” (or wrap) another thread around it.
The woven back stitch, however, is a bit more complex. Instead of just wrapping the thread around, you weave it over and under the existing back stitches. The stitching technique also differs.
Split Back Stitch
The Split Back Stitch is a variation of the back stitch that creates a thicker, slightly textured line by splitting the previous stitch as you go.
The Split Stitch has a slightly raised, braided appearance. Each stitch looks thicker and more textured than a regular backstitch.
This basic stitch is often used for Outline stitch or lettering because it adds a subtle dimension and looks more notable on the fabric. It’s also handy for detailed designs where you want lines to stand out with more depth.

How To Do Split Back Stitch?
Curious to know how it’s done? Well, it’s pretty simple. Just follow what i did,
- Cut thread (50–70 cm), use 2 strands.
- Tie 2 small knots at the end to anchor it.
- Bring the needle up from the back to begin.
- Insert the needle at Point 2 (a short distance from Point 1).
- This creates your first basic stitch (like a regular backstitch).

- Bring the needle up through the center of the previous stitch.
- This splits the thread, giving it a braided, textured look.
- Continue splitting each stitch until the end of your design.
- Secure the thread at the back with 2–3 small stitches or a knot.
Brick Stitch
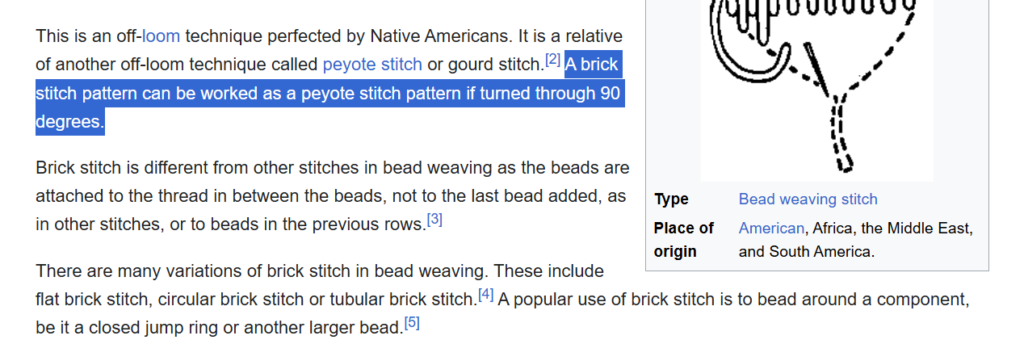
Brick stitch is a bead weaving technique with beads stacked horizontally in a pattern resembling a brick wall. A brick stitch pattern can be transformed into a peyote stitch pattern simply by rotating it 90 degrees.
The Brick Stitch creates a neat, grid-like texture resembling a brick or tiles wall. This offset arrangement gives a distinct, almost “woven” appearance.
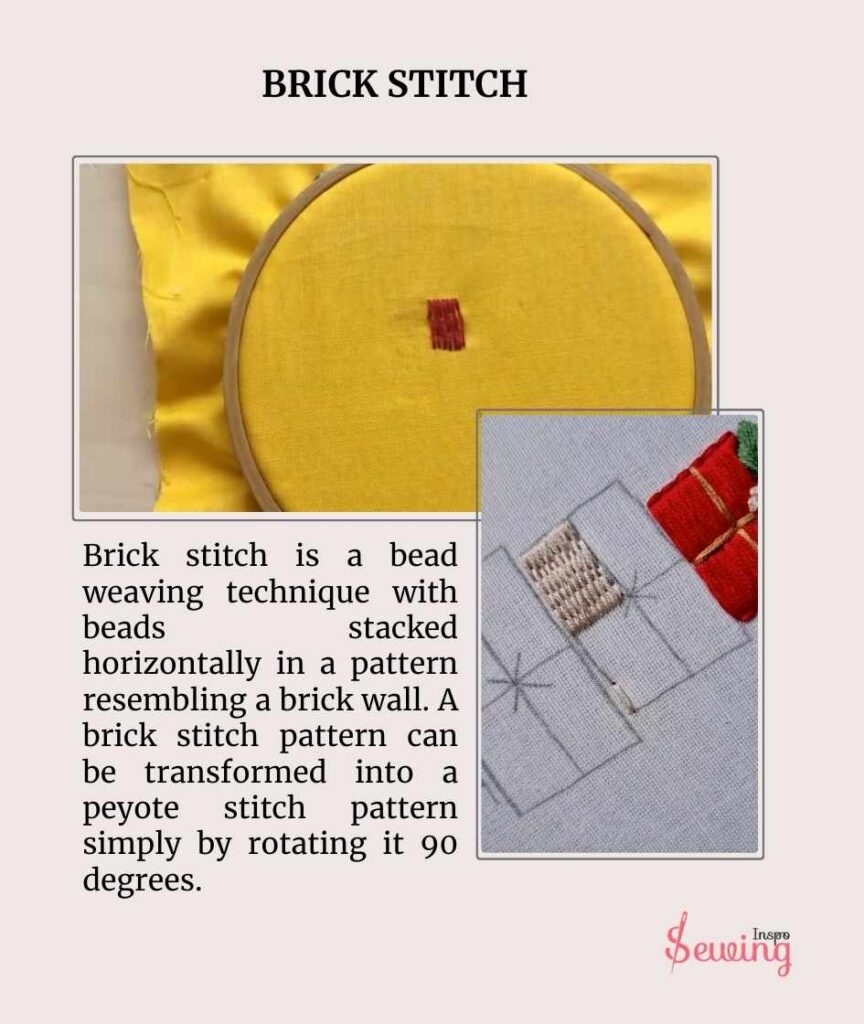
When worked closely together, the stitches create a solid, smooth fill that feels structured and tidy.
The look can vary based on thread thickness and spacing. Using thicker threads or tighter spacing makes the “bricks” appear solid and bold. But no matter what you choose, it will create a perfect embroidery.
Double Back Stitch
The Double Back Stitch is stitching 2 parallel rows of back stitches along a narrow shape, with each stitch crossing from one side to the other. This technique creates an overlapping herringbone effect on the reverse side.
The Double Back Stitch can be worked on a backstitch fabric’s front or back. When done on the front, it has 2 parallel rows of back stitches. It creates a closed herringbone effect on the reverse side.
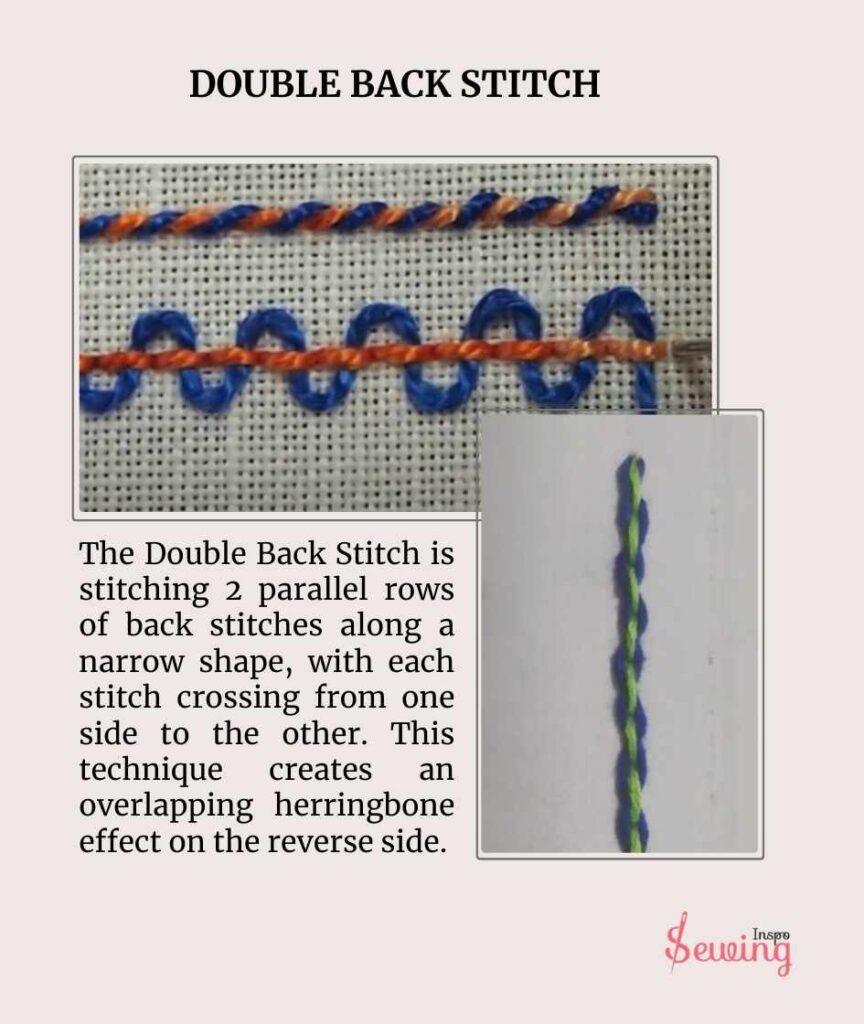

The result is a sturdy, eye-catching, thicker, and more defined stitch. It’s perfect for embroidery designs that need more emphasis, especially when working with patterns that require a bold outline or want to give a design extra visual weight. This can also be used as leather hand stitching patterns.
Half Back Stitch
A Half Back Stitch is a variation of the back stitch but with spaces left between the stitches on the front side of the fabric. It’s also known as an uneven back stitch or detached back stitch.
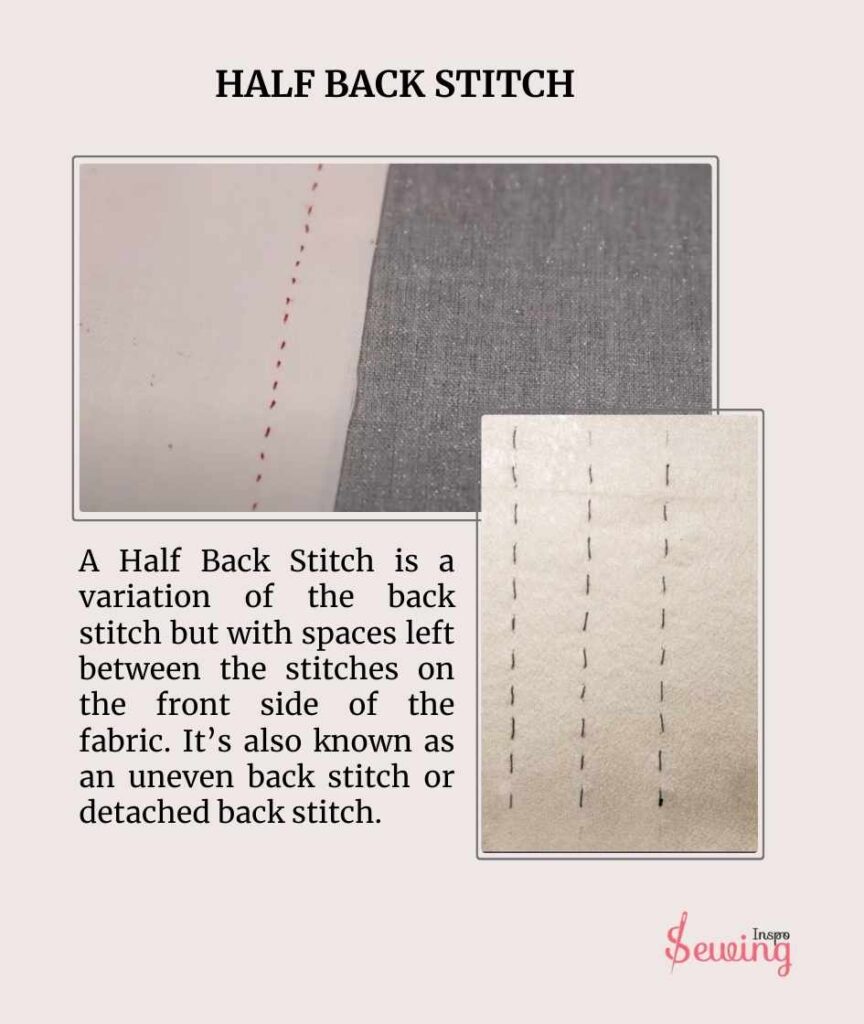
The Half Back Stitch has a unique look due to its “half” appearance. It resembles a regular back stitch, but instead of each stitch being connected to the next, there’s a slight gap between them.
In sewing and embroidery,
The Half Back Stitch is often used to stabilize seams, secure damaged areas, and mount or secure edges. It’s also helpful for reinforcing fabric in areas that experience wear and tear or need extra durability.
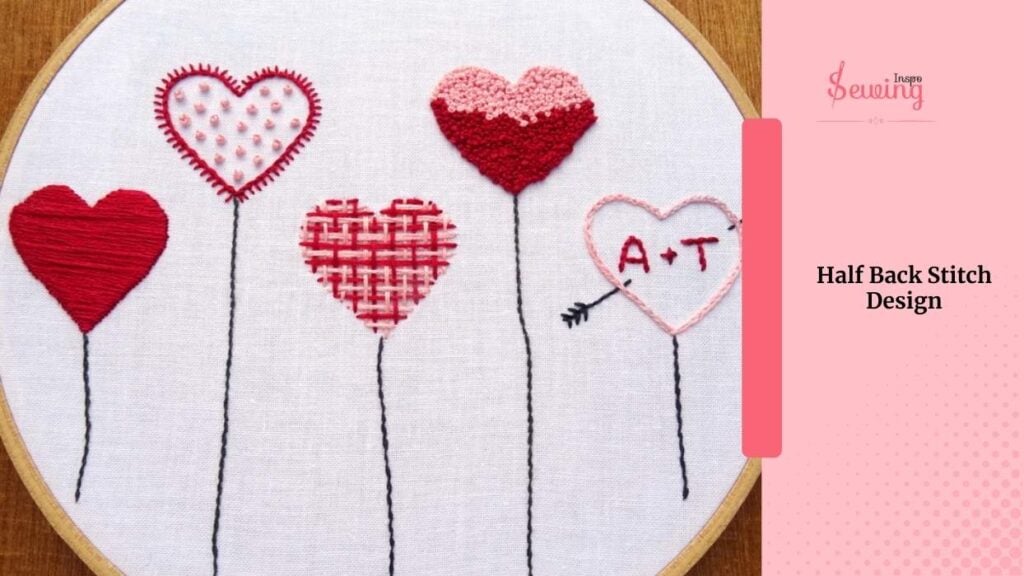
Half Back Stitch Design
I did some Half Back Stitch Design and here is how it turns out.
Back Chain Stitch
The back chain stitch is where each loop backwards into the previous stitch, creating a linked chain effect. People often confuse it with Reverse chain stitch, but it is quite different from that.
The stitching technique is also quite interesting. Here is how it’s done,
- Use 3 strands (or 4.0 thread ratio for sturdiness).
- Make a small straight stitch (~¼ inch) to anchor your thread.
- Bring needle up near the anchor.
- Loop the thread under the previous stitch to form each new chain.
- Insert needle between 2 chain loops from the back.
- Push it into the next loop from the front to create a backstitch effect.
- Use a contrasting thread for a fun, textured look.
- Make a small loop, pass the needle through, and pull to form a knot.
- Insert the needle near the last stitch and pull out further away for a second knot.
- Trim extra thread neatly.
It is like a fun twist on the regular chain stitch. Instead of moving forward like a normal chain stitch, you work backward to make these cute little loops look like a chain. Whenever you want something different do a back chainstitch.
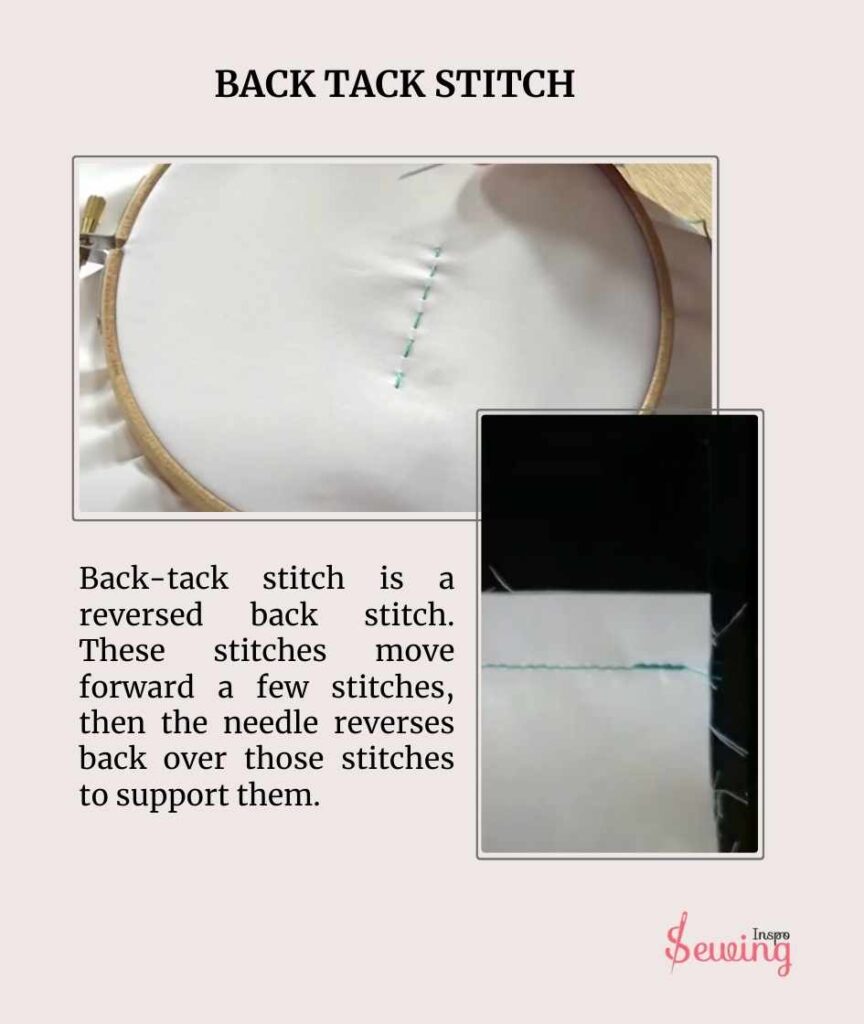
Back Tack Stitch
Back-tack stitch is a reversed back stitch. These stitches move forward a few stitches, then the needle reverses back over those stitches to support them.
This technique is ideal for securing seams, especially in areas that may experience stress, like the start and end of seams or corners.
The Back Tack Stitch looks like a small, tightly layered section of stitches at the start or end of a seam. On the surface, a few extra stitches overlap. It creates a thicker, slightly more noticeable spot.
If you’re working by hand, the back tacks look like compact stitches going back and forth over a short distance. Back tack is so simple yet so unique. That’s why it’s so favourite among all those.
Running Back Stitch
The Running Back Stitch combines the running stitch and the back stitch. It’s like a normal backstitch but leaving a ½ inch gap between each stitch. After completing a few running stitches, you work back over the gaps with a back stitch.
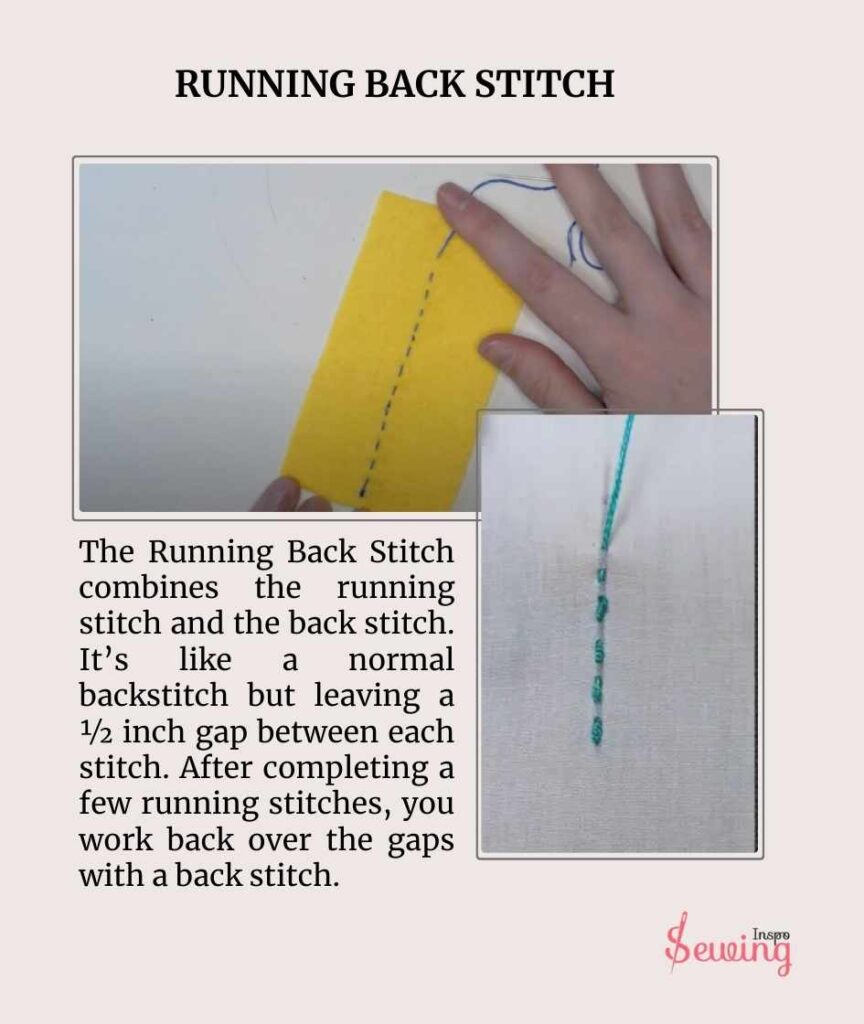
This gives the line a dashed appearance with alternating filled and open sections, making it stronger than a basic running stitch while still looking lighter than a solid back stitch.
The Running Back Stitch is great for outlining designs, adding subtle decorative lines, or even as a guide stitch for later work. It’s useful when you need a secure stitch with flexibility and a lighter look than a solid line.
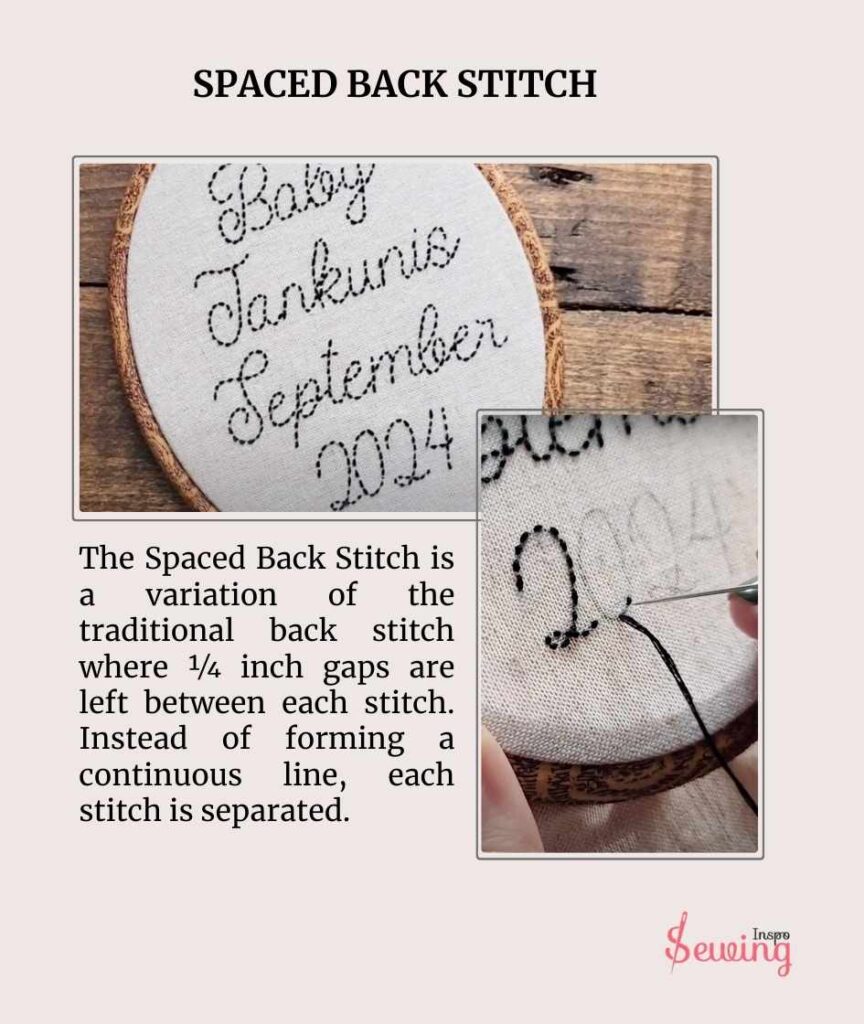
Spaced Back Stitch
The Spaced Back Stitch is a variation of the traditional back stitch where ¼ inch gaps are left between each stitch. Instead of forming a continuous line, each stitch is separated.
It gives a dotted or dashed appearance along the stitched path. This subtle break between stitches creates lighter, more straight lines that is perfect for adding understated detail or texture to a design without overpowering it.
The Spaced Back Stitch works well for outlining elements in embroidery. It’s also a great option for adding texture without the density of a full back stitch, giving designs a unique, airy quality.
So that’s all the whole backstitch family. All of them are perfect for embroidery work. But among all of them, my favourite ones are,
- Half Back Stitch
- Double Back Stitch
- Pekinese Stitch
- Open Back Stitch
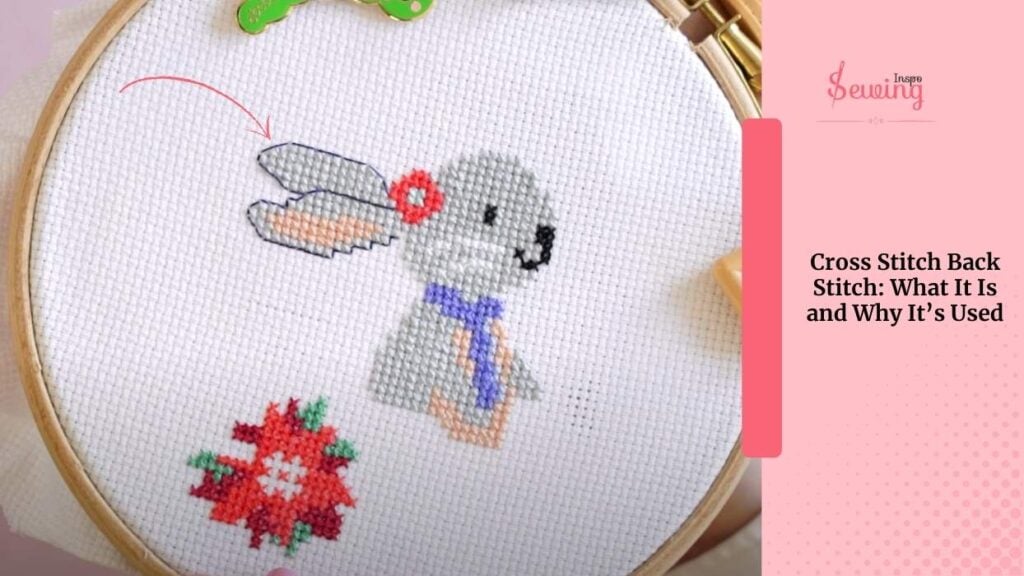
Cross Stitch Back Stitch: What It Is and Why It’s Used?
The back stitch is one of those small but mighty stitches in cross-stitching. Unlike your standard X-shaped stitches, the back stitch is a straight line stitch that traces outlines or adds fine details to your design. It sharpens edges, highlights shapes, and makes letters readable.
I love using it to outline motifs, add text, or simply make certain areas stand out. It’s simple to do. But makes a huge difference in how polished your finished piece looks.
Types Of Back Stitches Pdf
Memorizing all the versions of the backstitch is a tough job. So, instead of struggling, download this PDF and save it for later.
Frequently Asked Questions
What Are The Disadvantages Of Back Stitching?
One disadvantage is that it can create a dense line, which sometimes looks bulky on delicate fabrics or lighter designs. Additionally, back stitching can be time-consuming, as each stitch requires precision to align correctly, especially along curves.
What Is An Alternative To Back Stitching?
An alternative to back stitching is the stem stitch. The stem stitch creates a smooth, twisted line that works well for straight and curved lines, offering a more flowing, less bulky appearance.
That’s It
Exploring these different back stitch types really shows how a simple stitch can bring so much personality to a design! Whether you want a strong outline, a soft border, or a bit of extra flair, a back stitch technique is just right for the job. I hope this guide sparks some new ideas for your next project—happy stitching!
If you still feel lost, then reach out to Sewing Inspiration. We would love to guide you.


Leave a Reply