
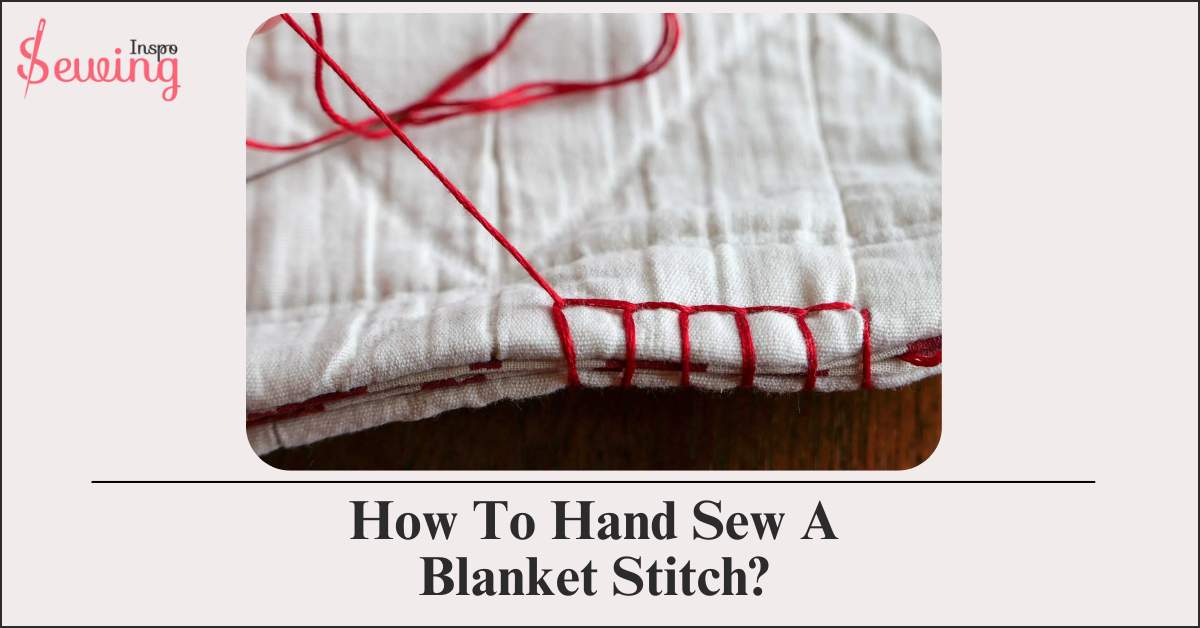
I just saw my blanket raw edge come off. I didn’t want to throw it away, as it is my favourite blanket. That’s when the sewing blanket stitches came to my mind.
So, I decided to learn how to hand sew a blanket stitch. So, I ran to Grandma’s house and asked her to teach me. This kinda looks like whip stitch, but it’s totally different!
She said-
Hand Sew A Blanket Stitch
To hand sew a blanket stitch Step By Step , bring the needle up through the fabric edge, loop the thread behind the needle, and pull through to create a series of evenly spaced loops along the edge.
-Just it, Grandma?
-No, There is more to the process. Stay with me to learn how to sew a blanket stitch?
In Short Blanket Stitch Process:
Decide your direction, thread your needle, stitch at a 45-degree angle 1/4 inch above the fabric edge, and wrap around. Then, move to the right for subsequent stitches, adjust the corners, and finish by hiding the thread end between layers of fabric for a perfect blanket stitch.
Table of Contents
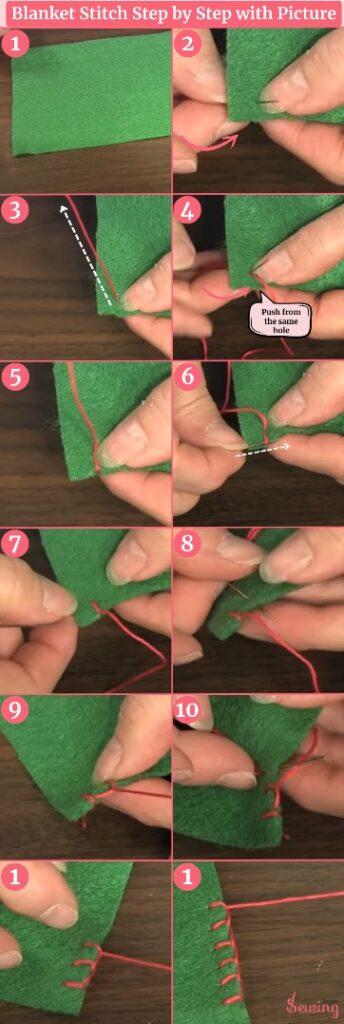
Blanket Stitch Step By Step With Pictures At A Glance
If you want to see the blanket stitch process in images then here you go.This will give you a glance at the definition of blanket stitch. Then you would understand the difference between whip stitch vs blanket stitch.

I have describe the whole process in the below. The blanket stitch picture may not be enough.
Get ready for a fun, engaging read—just like the joy of stitching each thread into place. So you won’t mix it up with whip stitch.
This is my update 2025 Step By Step Pictures!

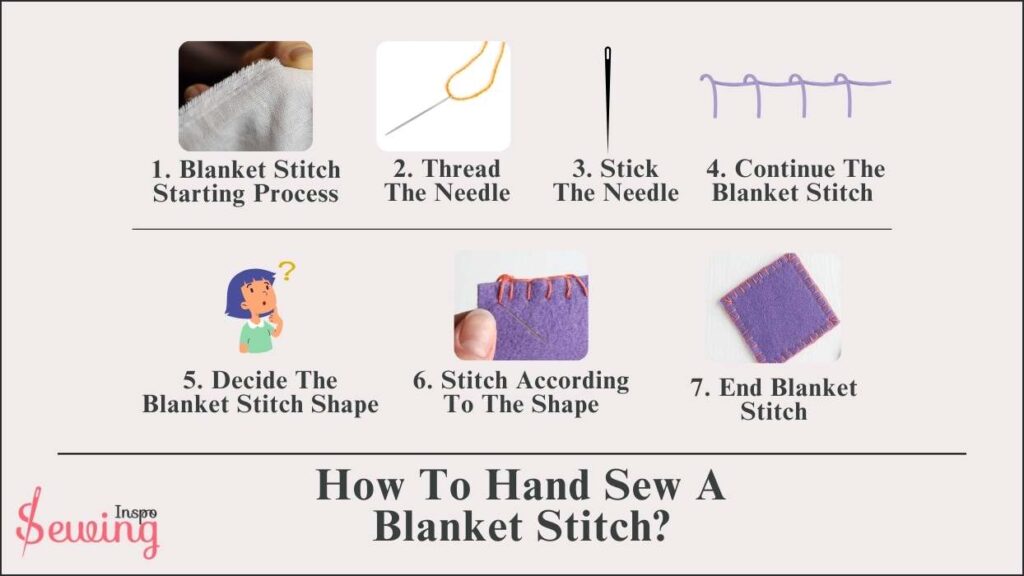
How To Hand Sew A Blanket Stitch?
To hand sew a blanket stitch, follow 7 steps.
-Let me show blanket sewing projects.
- Blanket Stitch Starting Process
- Thread The Needle
- Stick The Needle
- Continue The Blanket Stitch
- Decide The Blanket Stitch Shape
- Stitch According To The Shape &
- How to end a blanket stitch
Blanket Stitch Starting Process
First, decide if you want to make a blanket stitch by hand from left to right or right to left.
Most people stitch from left to right row of blanket stitches, but it totally depends on personal preference.

-Which way do you start, Grandma?
-I normally start from the left side. 🧵 This side is perfect to do any sewing project.
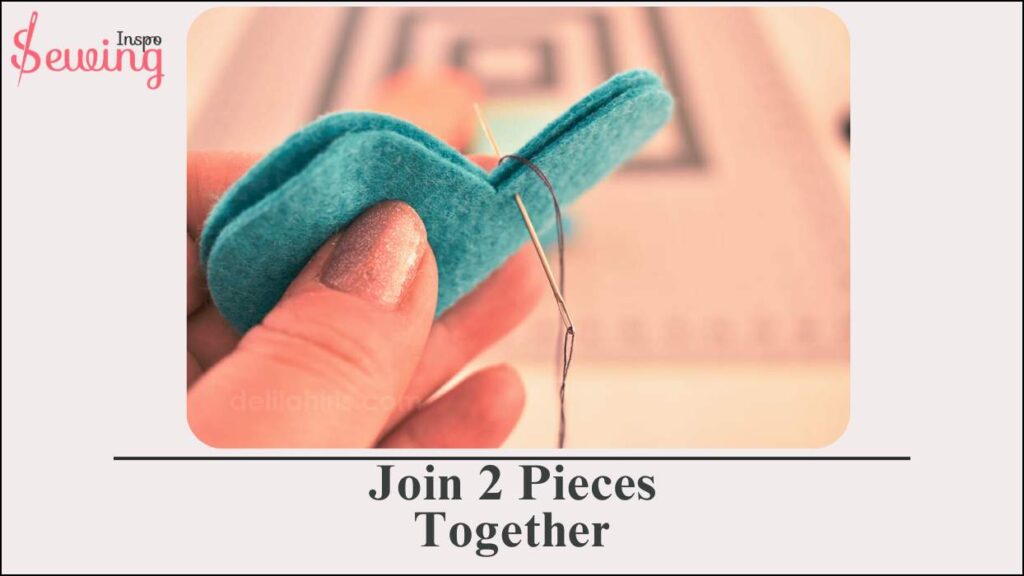
Either way, you can do a blanket decorative stitch to join 2 pieces together with embroidery hoops. This makes it easy to do blanket stitch to join two pieces together.
Thread The Needle
Thread your 12 size needle with Valdani Perle cotton thread and tie a knot at the end of your thread. Just like you would do it while doing an hand overcast stitch. Push the thread through the needle’s head to thread it.
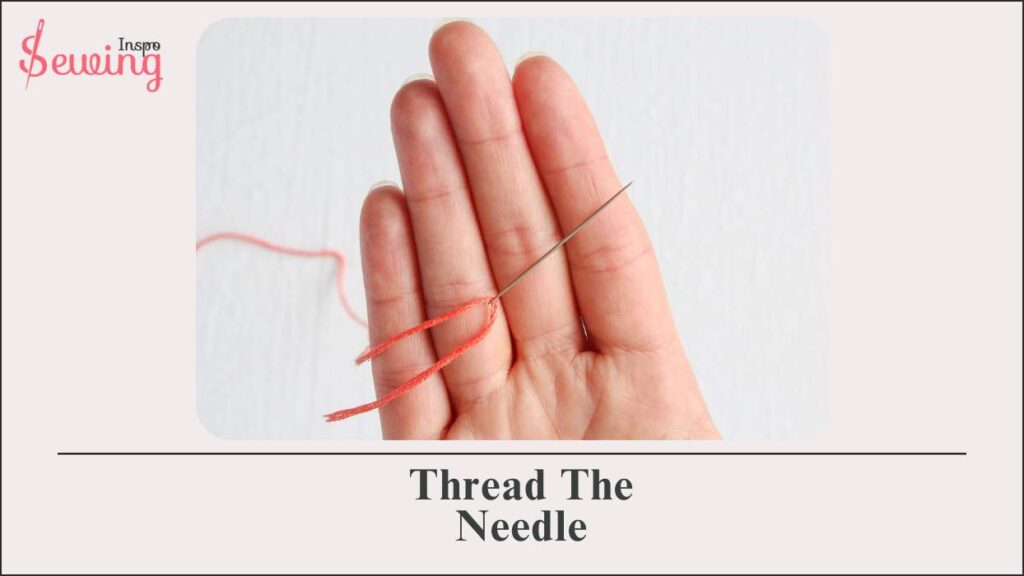
Leave one end nice and long, and trim the other to about 6 to 12 inches, depending on what you’re comfortable with.
– How do you thread a needle for blanket stitch, Grandma?
-Just thread your needle useal the way. Then grab other blanket stitch sewing tools.
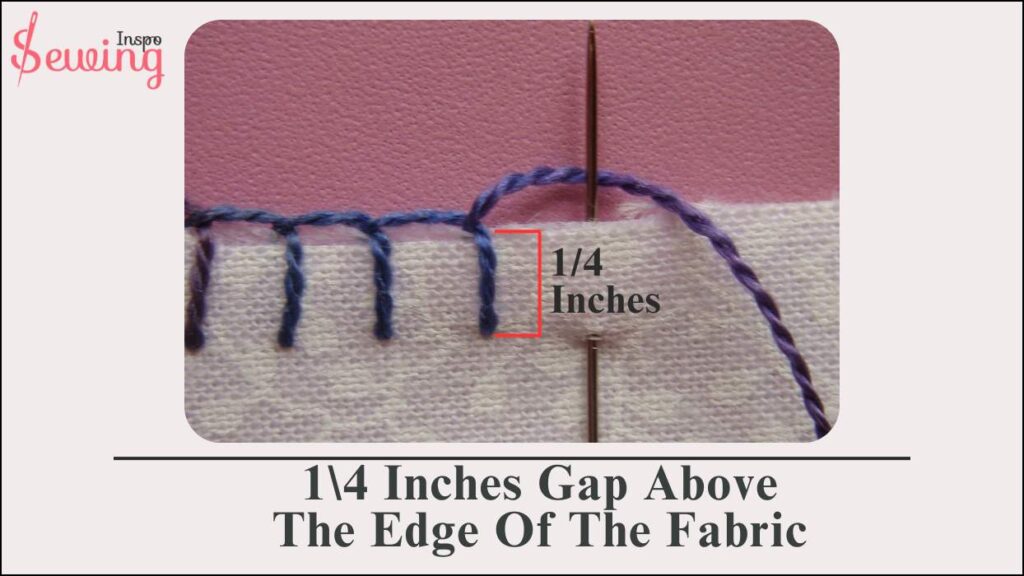
Stick The Needle
Then, stick the needle through the pieces of fabric at a 45-degree angle from the back to the front. This needle angle is also required in doing slip stitches.
And that should be a 1\4 inches gap above the straight edge of the fabric for basic blanket stitch. You can also apply this trick on back stitching.
That’s how to start blanket stitch!
If you’re worried about the thread slipping, hold down the thread with your left thumb. If you’ve tied both ends of the thread together, you can skip this part.
Continue The Blanket Stitch
If you’re sewing stitch 1 layer leave the knot on the back. If it’s 2 layers, hide the knot between them. This way, your stitches will look neat with the knot tucked inside. Just like the back stitch would look.
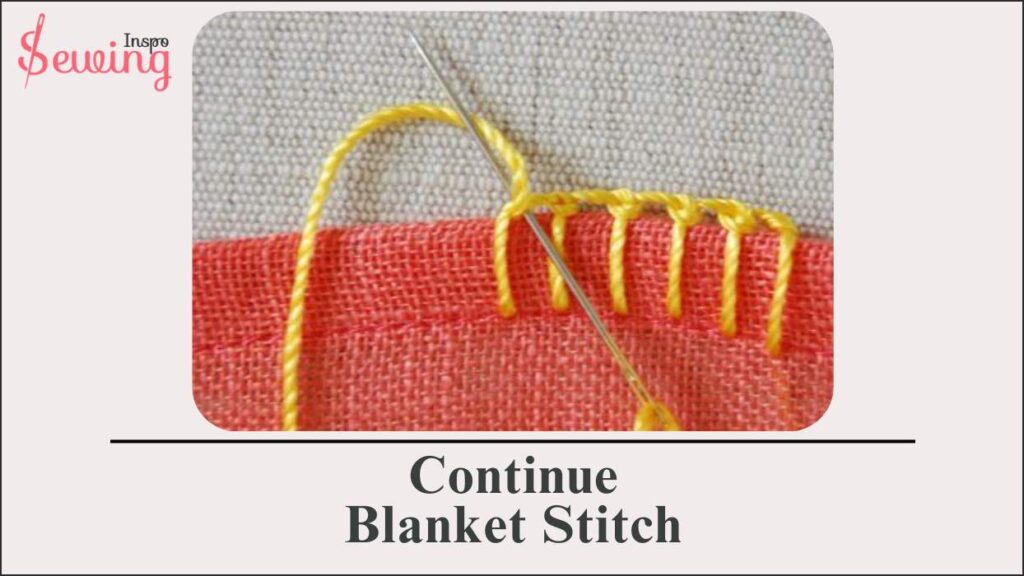
Then, wrap the thread around the fabric edge and bring it back through the same spot as the first stitch. Always make your first and last stitches in the same spot. This keeps them nice and straight, blending in with the rest. of the blanket stitch on edge.
After completing your first true blanket stitch, move a bit to the right (or left if you’re sewing stitches in the opposite direction).
If you insert the needle at 45 degrees in the upper end of the line, it will come out directly below the lower line. It won’t make a strong stitch, but it still holds the fabric edge strongly.

Pull the needle through the loose loop that’s formed at a depth of 1\4 inches raw. This step is kinda like darning.

The loop should be underneath, with your thread coming out over the top. That’s your first proper blanket stitch done.
That’s the starting point of hand stitched blanket, so make sure to do it the right way. A proper blanket stitch is also strong enough to hold stretchy fabric.
Decide The Blanket Stitch Shape
Keep going by moving to the right and inserting the needle at the upper end of the line again.
When you hit the corner, poke your needle diagonally across from it. You can stitch down through the same hole as before or make a new one as per your choice. You can do a cross and square or closed blanket stitch.
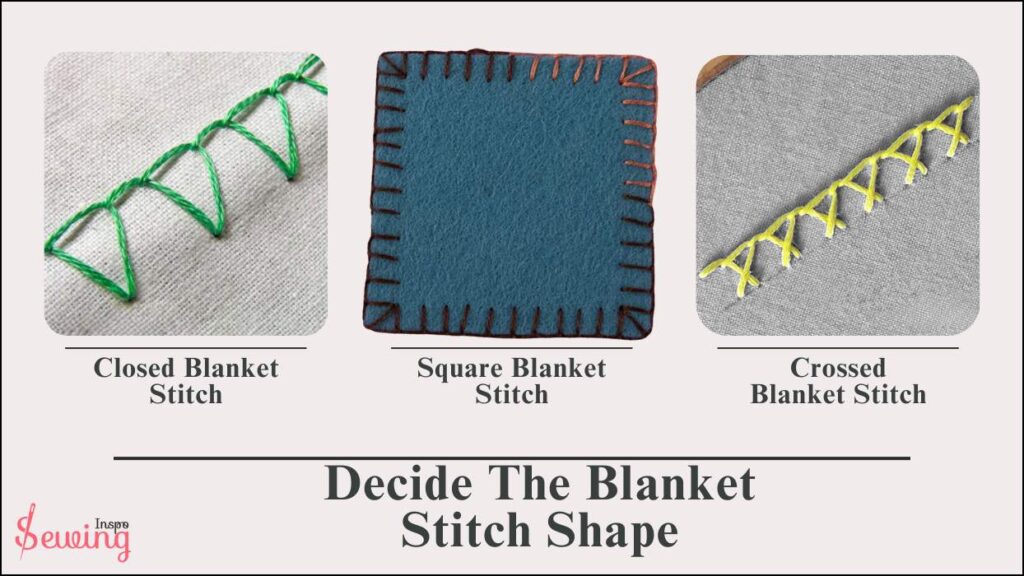
-Which shape do you normally use, Grandma?
-I normally use a square shape. 🥴 this creates a nice look of blanket stitch.
Stitch According To The Shape
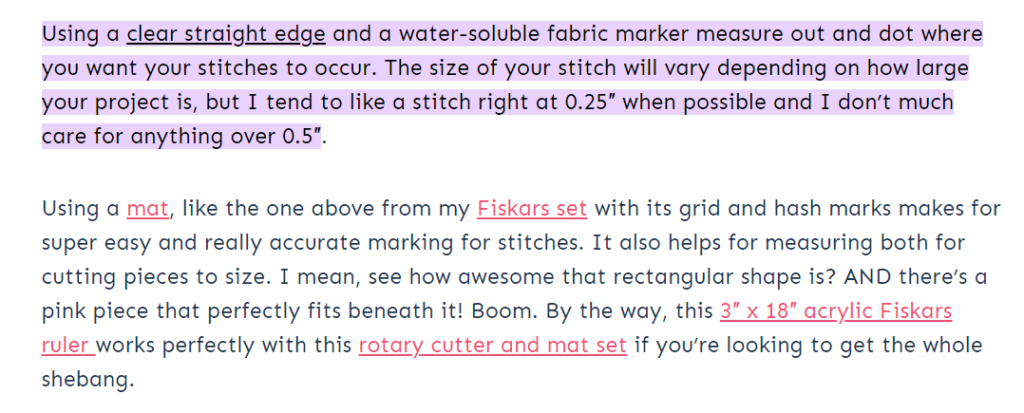
Then, keeping that shape in mind, pull your extra thread sthrough the loop. Just maintain a 5 mm distance between. After poking the needle down, draw it through the loop as usual. That’s your corner stitch complete. This will help you do sewing a straight line by hand.
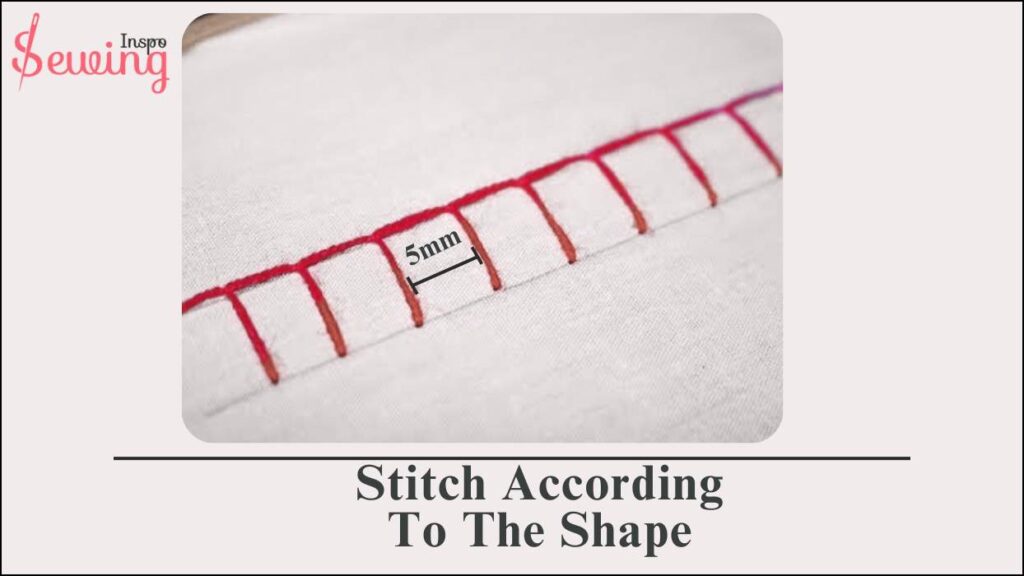
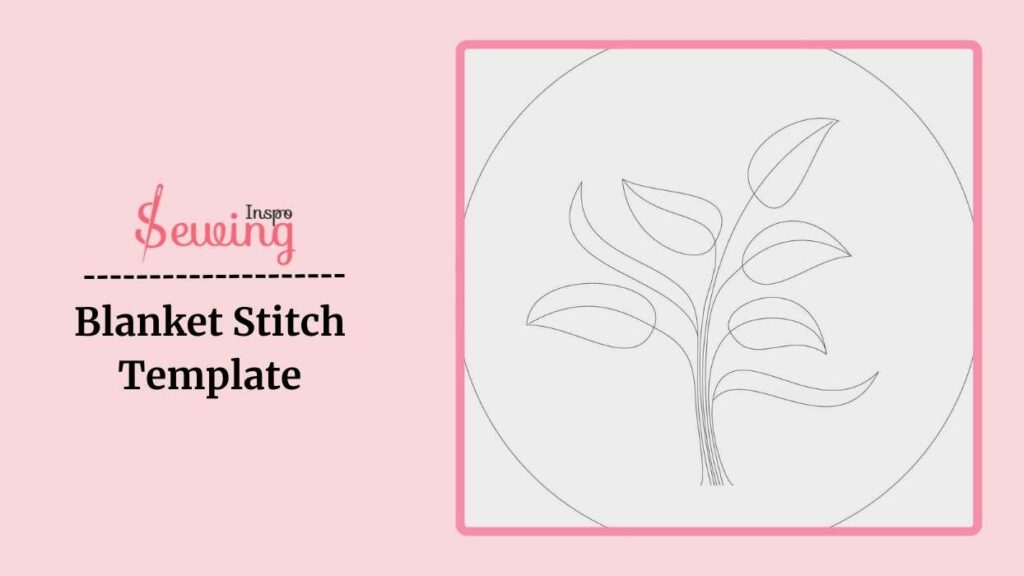
If maintaining the space is tricky, use a blanket stitch template.
Push the thread through vertically on the next edge. You can either use the same hole as the corner stitch and the last one on the previous edge or make a new one. It’s up to you. Continue it until you are done.
End A Blanket Stitch
Now, it’s time to end the blanket stitch perfectly. To finish the blanket hand stitch, first, go under the first stitch, and gently pull the floss. Then, go under the horizontal (360 degree) part of the stitch and tug the floss up.
Make a 0.25 knot by bringing the needle up through the horizontal part of the stitch and pulling it through the loop.
Tighten the knot gently. However, don’t make too much thread tight. To hide the floss end, run the needle down between the 2 fabric pieces.
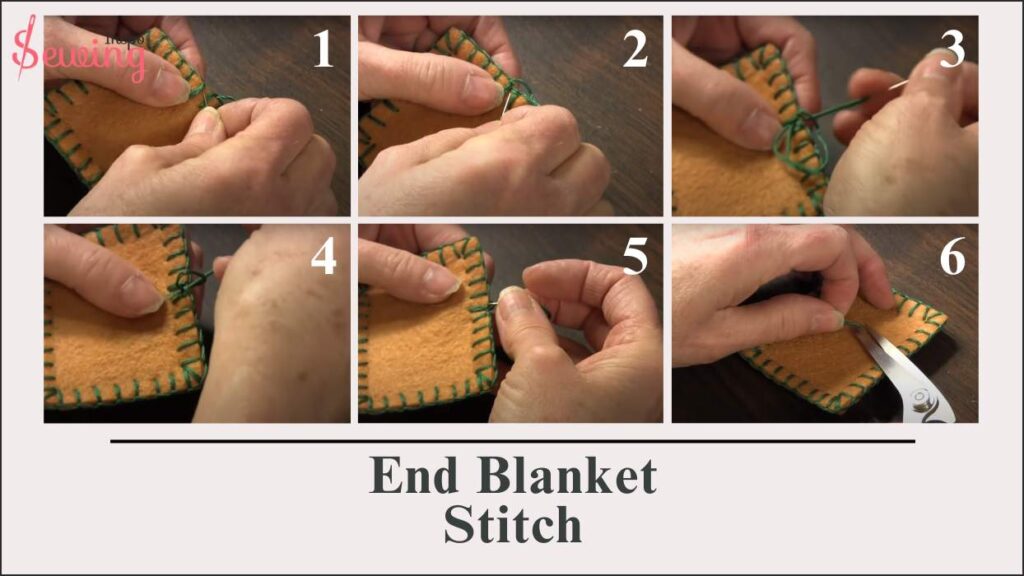
Then, bring it up through the top fabric, a little away from the stitching. Finally, cut the excess thread, and the end is hidden between the fabric layers. That’s how do you secure a blanket stitch. And that’s it! You have got a beautiful blanket stitch.
Blanket Stitch Alternative
Looking for a creative twist on the classic blanket stitch? Try the feather stitch. It is a decorative, looped embroidery stitch alternating sides, creating a soft, feathered look. It’s considered a variation of the blanket stitch but offers a fresh, flowing style ideal for both straight and wavy designs.
- Draw three parallel lines (center, left, right) or use a template.
- Use 12–14″ of 6-strand floss and bring your needle up through the center line.

- Stitch alternately:
- Down on the right, up in the center (needle inside loop)
- Down on the left, up in the center
- Repeat the motion to form the feather pattern.
- End with a small anchor stitch, like finishing a chain stitch.
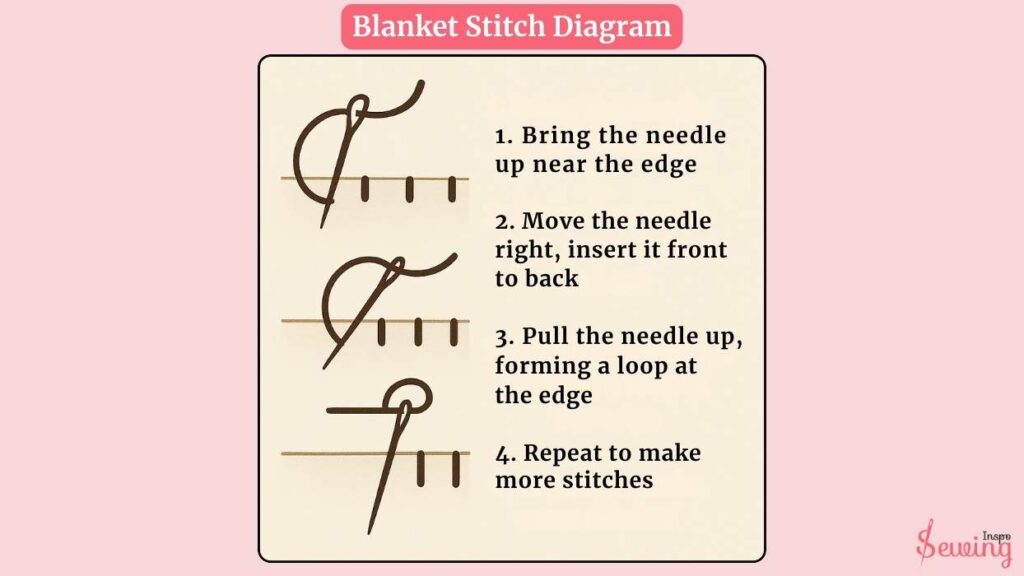
Blanket Stitch Diagram
Here are the blanket stitch steps in diagram form. I hope this will help clarify the steps.
Are you curious to learn more about stitching techniques? Then read out our sewing technique of how to sew a buttonhole by hand.
How To Continue Blanket Stitch With New Thread?
Honestly, no one can guess how much thread you need to finish the whole blanket stitch. So it’s natural to short thread halfway of the stitching. But wait! Don’t bang your head on the wall. There is a way out of it.
To continue blanket stitch with a new thread,
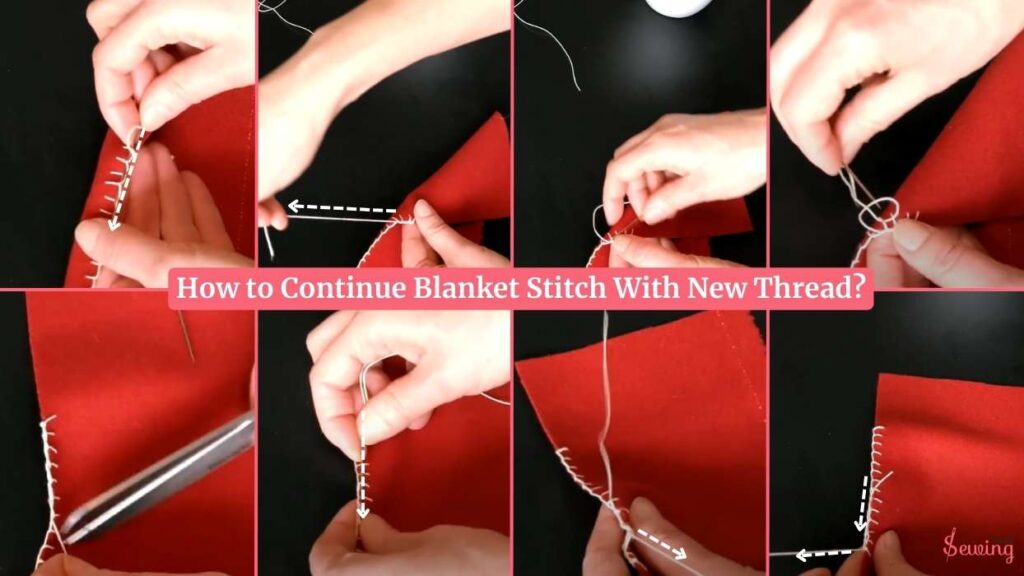
I tidy up with a small snip and push the needle back into the last stitch, just below my previous work. Then, I create a small loop or knot and insert the needle through it similar to tying off a blanket stitch.
If my thread is short, I ensure enough to complete the stitch. If it’s too short, I secure it with a 2-3 knot.
If I trim too soon, I can always rethread the needle, even if it’s tight.
Now, I’m threading my needle again. The thread choice depends on the project, but I’m using embroidery since it works well for all blanket stitch patterns.
Starting with the block stitch, I bring the needle up at the corner where the thread emerges, passing it through the knot I made earlier.
That’s how to do a blanket stitch in embroidery.
How To Tie Off A Blanket Stitch?
When you reach the end, it’s time to tie it off correctly so it stays with you forever. Here is how you can do it,
- Slide your thread under the vertical stitch
- Gently pull it through—snug, not too tight.
- Loop the thread over the stitch
- Make sure it lays neatly along the edge.
- Insert your needle through the horizontal stitch
- Pull it all the way through to form a clean stitch.
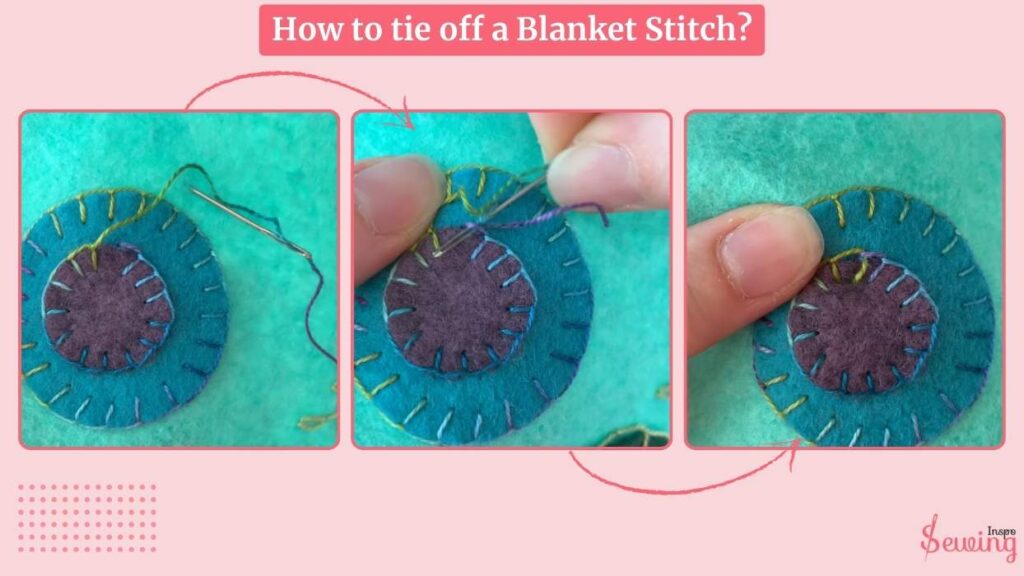
- Make a small knot at the top
- This helps secure the stitch and prevents fraying.
- Push the needle through both layers of fabric
- Go right between the two layers for a hidden finish.
- Pull snug and clip the thread
- Tighten gently, snip off the excess, and you’re done!
Blanket Stitch Step By Step With Pictures Pdf
I explained the process in detail but if you wanna see those steps virtually then here is a pdf of the step-by-step process.
If you are passionate about sewing and want to learn it more deeply, then read my sewing book. It will give you all the details.
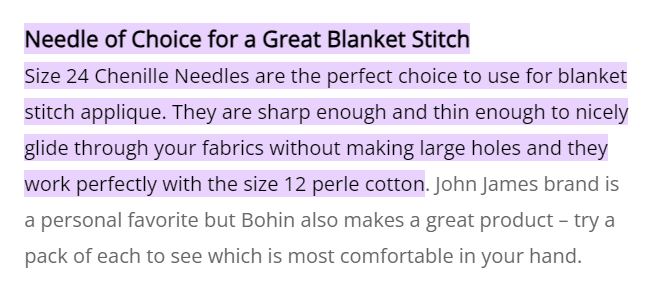
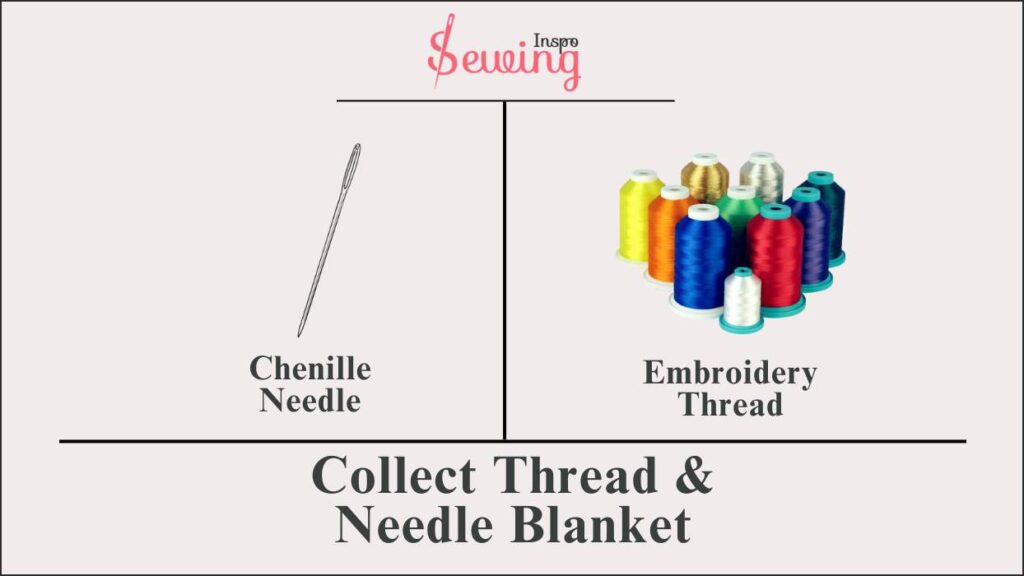
Thread & Needle For Blanket Stitch
For blanket stitch pick a size 24 chenille or embroidery needle, as they’re sharp and glide smoothly. But that also depends on the blanket stitch pattern.
Choose thicker embroidery thread, like yarn or embroidery floss. Only 2 strands of embroidery floss are enough for a blanket project.
-ok, Grandma, I got it. But what needle and thread do you use normally?
—Okay, I use Valdani Perle cotton thread for blanket stitching. I usually go for size 12 needles because they add a nice dimension without looking bulky on smaller pieces. Plus, they’re guaranteed 100% colourfast. I’ve tested and even used this for every previous stitch.
– How do you thread a needle for blanket stitch, Grandma?
-Just thread the needle in use in ways I have already taught you.
Blanket Stitch Thumb Guide
If you are new to stitching, then maintaining the right gap between them is tricky, right? No worries, the thump guide got you back. A blanket stitch thumb guide is a small, protective tool for hand-sewing projects. This will help you do the perfect blanket stitch by hand.
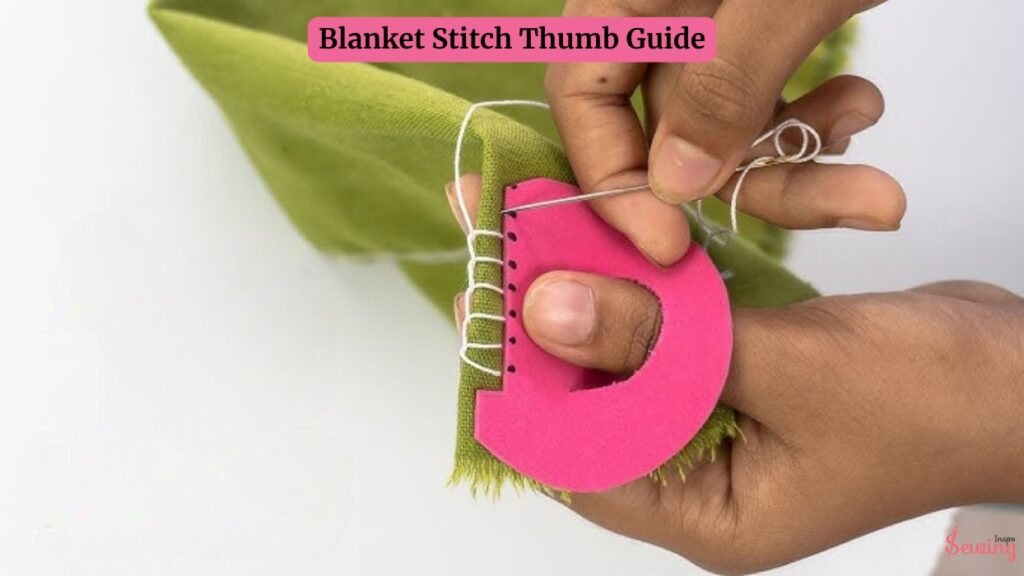
Blanket stitch spacer will make sure your stitch has a perfect gap.If you can’t make the tool, then take a pen and mark it on your thump according to the gap. This will also be helpful for blanket stitch by hand.But a blanket stitch thumb guide is sure helpful.
How To Sew A Blanket Stitch By Hand Video?
Another Way To Use A Blanket Stitch
How To Do Blanket Stitch Embroidery?
There aren’t a lot of options to do blanket stitch on embroidery. But still, there are few works on decorative blanket stitching.
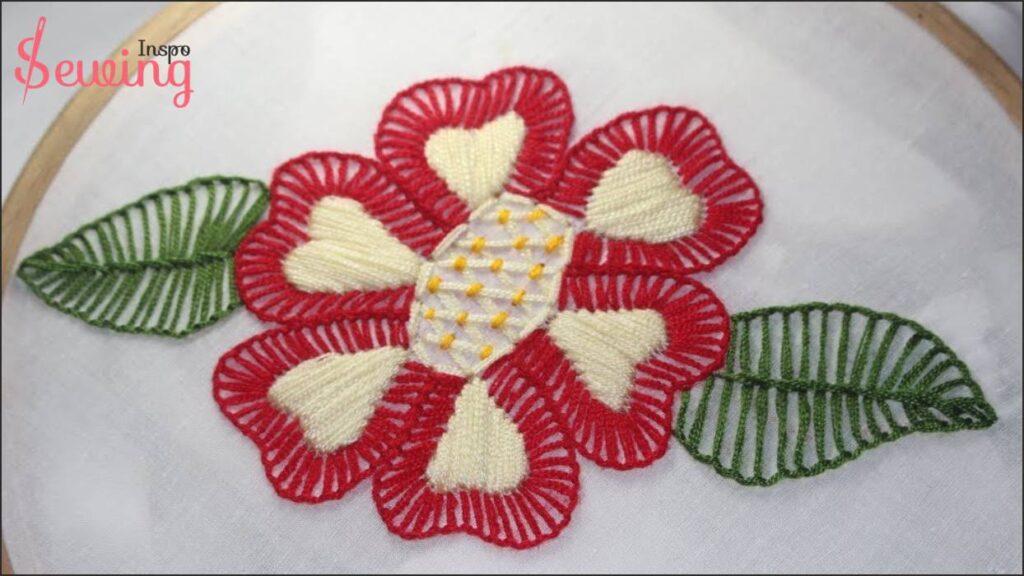
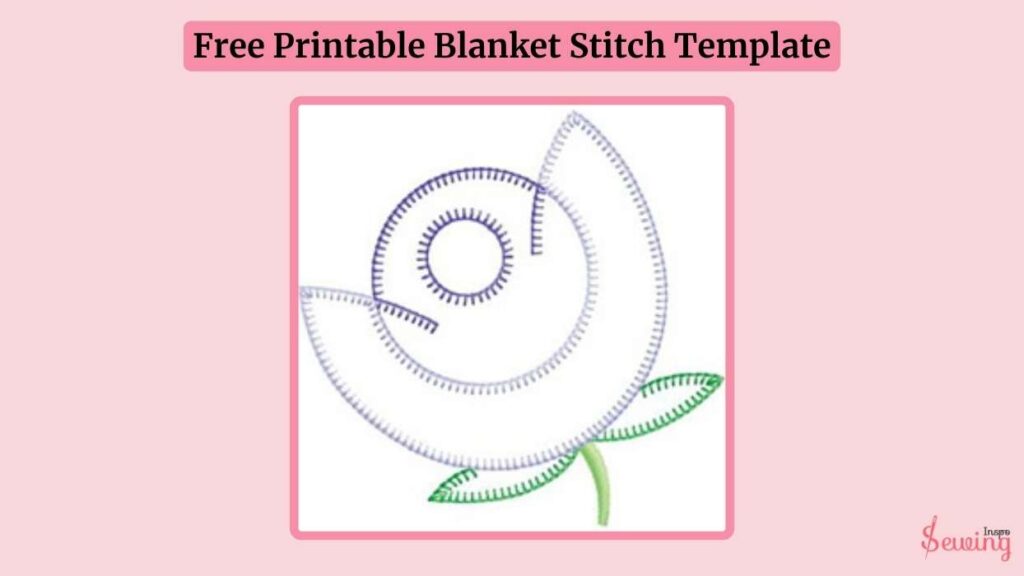
For example, flowers! I did flower embroidery with blanket stitch, and it turned out to be great. Here is how I did:

- Secure the fabric in the embroidery hoop so it’s tight but not overstretched.
- Lightly draw the flower outline with petals using a pencil or fabric marker.
- Cut about 18 inches of embroidery floss.
- Separate strands if you want a finer stitch (use 3 strands for medium thickness).
- Thread the needle and tie a small knot at the end to secure the floss.
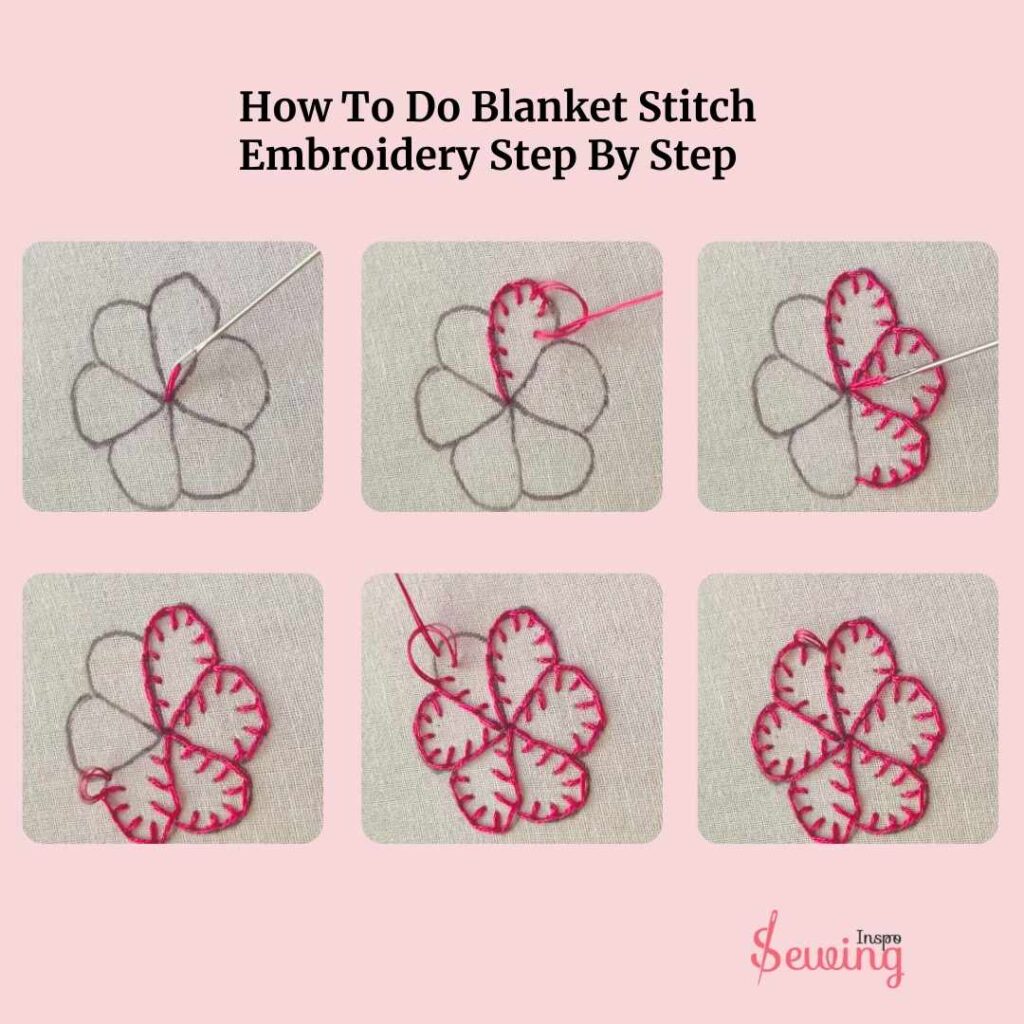
- Bring the needle up through the fabric at the base of a petal (Point A).
- Move a short distance along the petal’s edge and insert the needle down (Point B), making a small stitch.
- As you pull the needle through, keep the thread looped under the needle. This forms a neat edge.
- Repeat this process, spacing stitches evenly along the flower outline.
- When you reach the top of the petal, turn back and use the same blanket stitch to outline the other side, meeting at the base.
- For the flower interior, you can add extra lines or leave it blank, depending on the design.
- Once a petal is complete, tie off the thread on the fabric’s backside by making a small knot.
- Trim excess thread and move on to the next petal, repeating the process.
How To Do Blanket Stitch On Edge?
Blanket stitch was made for edge, so doing it on edge is easy. Here is how you do it:
- Cut your fabric edge straight (or into the desired shape).
- Secure the fabric in an embroidery hoop if needed.
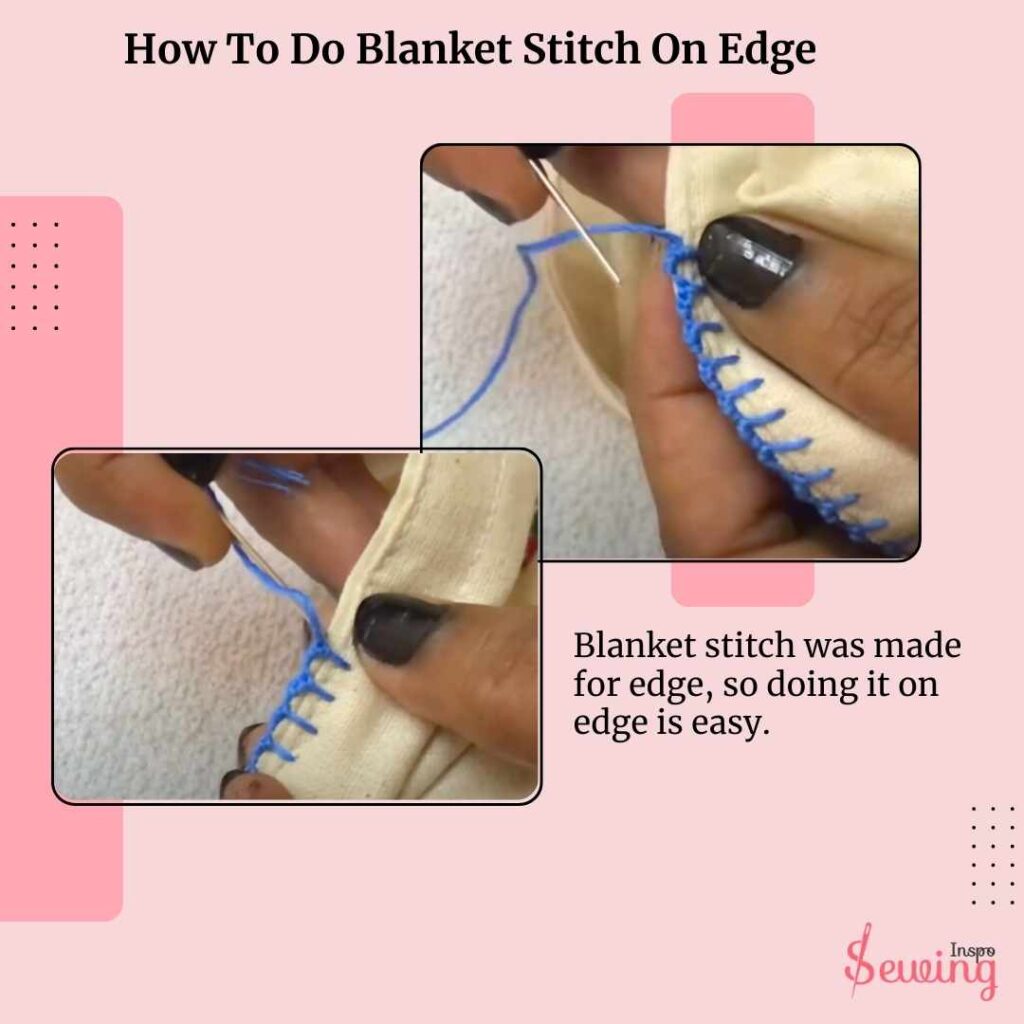
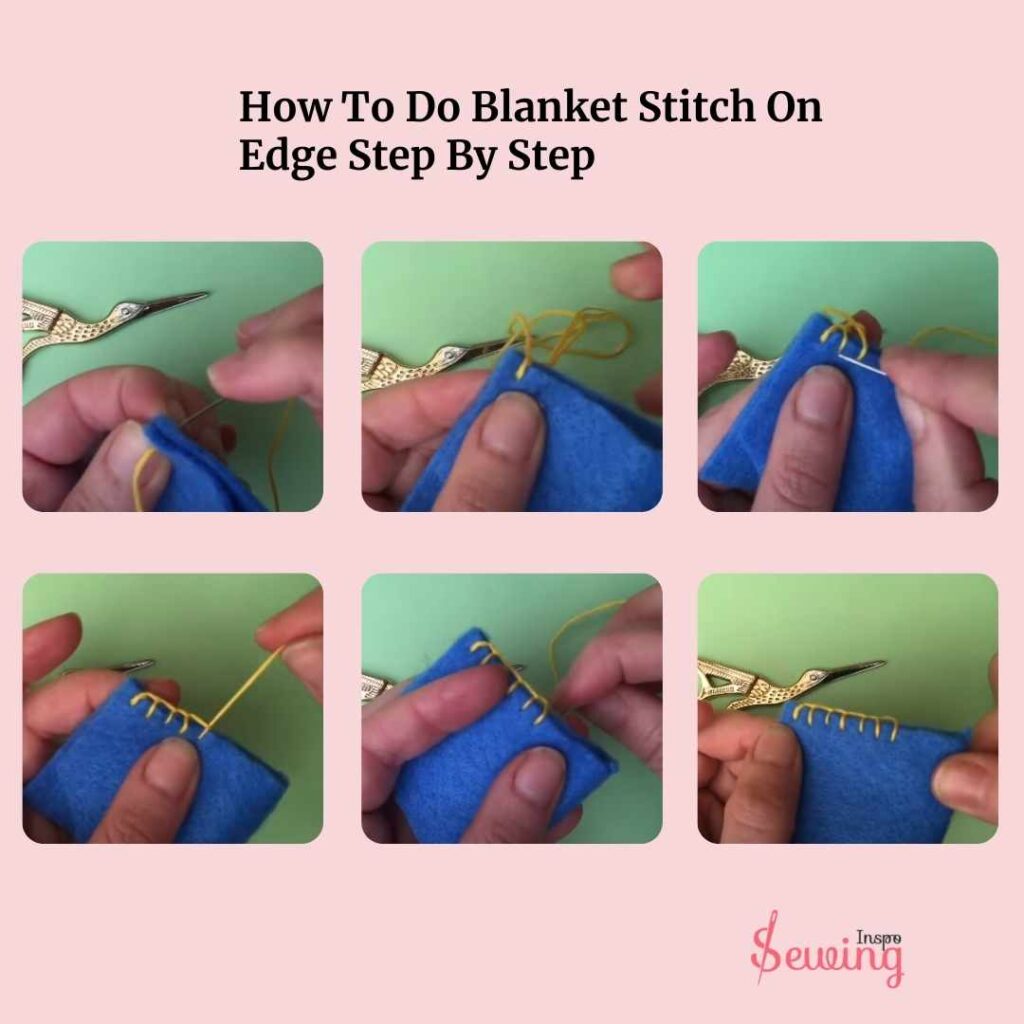
- Cut a length of thread (around 18 inches).
- Thread your needle and tie a knot at the end to secure it.
- Bring the needle up through the fabric slightly in from the edge (Point A).
- Insert the needle down just below the edge (Point B), keeping the thread looped under the needle before pulling tight.
- This secures the first stitch.
- Continue stitching along the edge.
- Pull gently to tighten the loop, ensuring the thread sits neatly on the fabric’s edge.
- Repeat the process, spacing your stitches evenly along the edge.
- At the end of the edge, secure the thread by tying a small knot on the fabric’s backside.
- Trim any excess thread.
How To Blanket Stitch Two Pieces Together?
Doing blanket stitch in 2 pieces is easy peasy work. You only gotta do-
- Align the Fabrics
- Thread the Needle
- Start the Stitch
- Make the Blanket Stitch
- Continue Stitching
- Secure the End
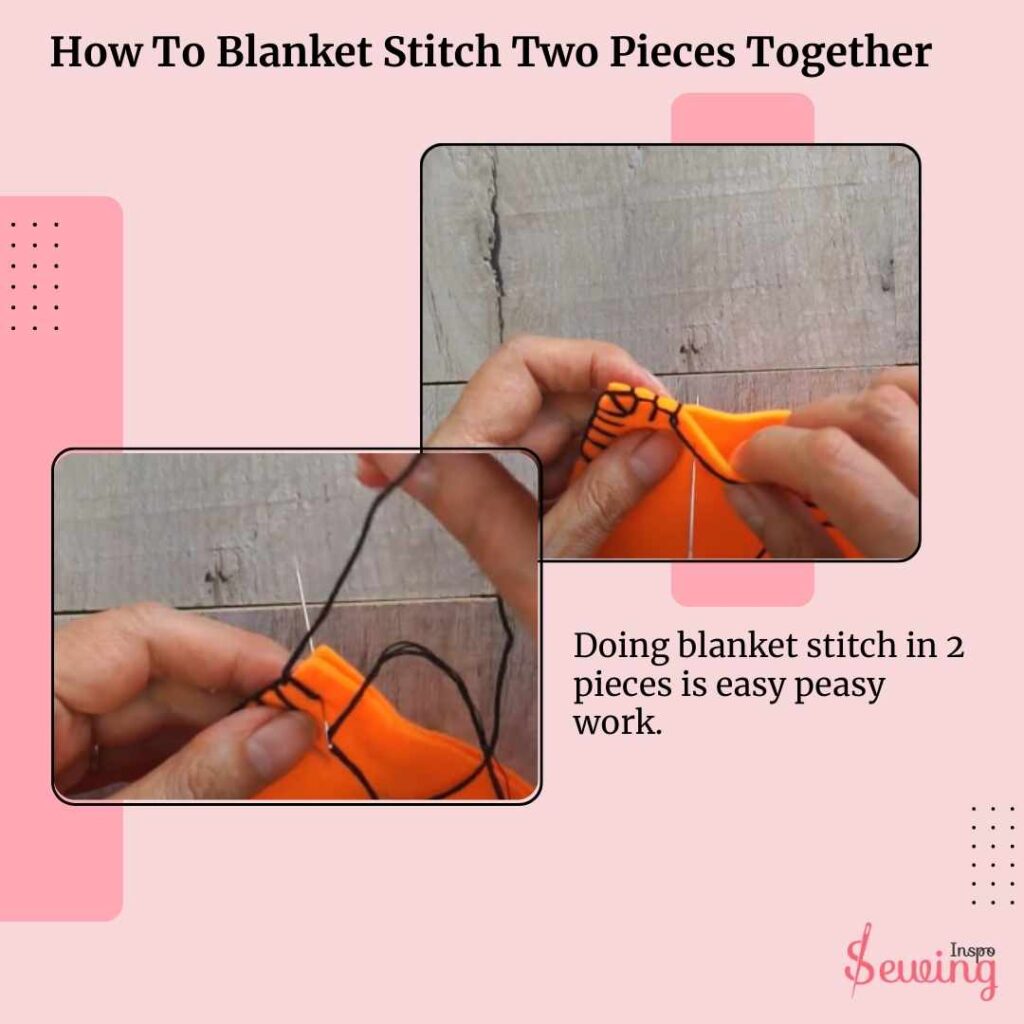
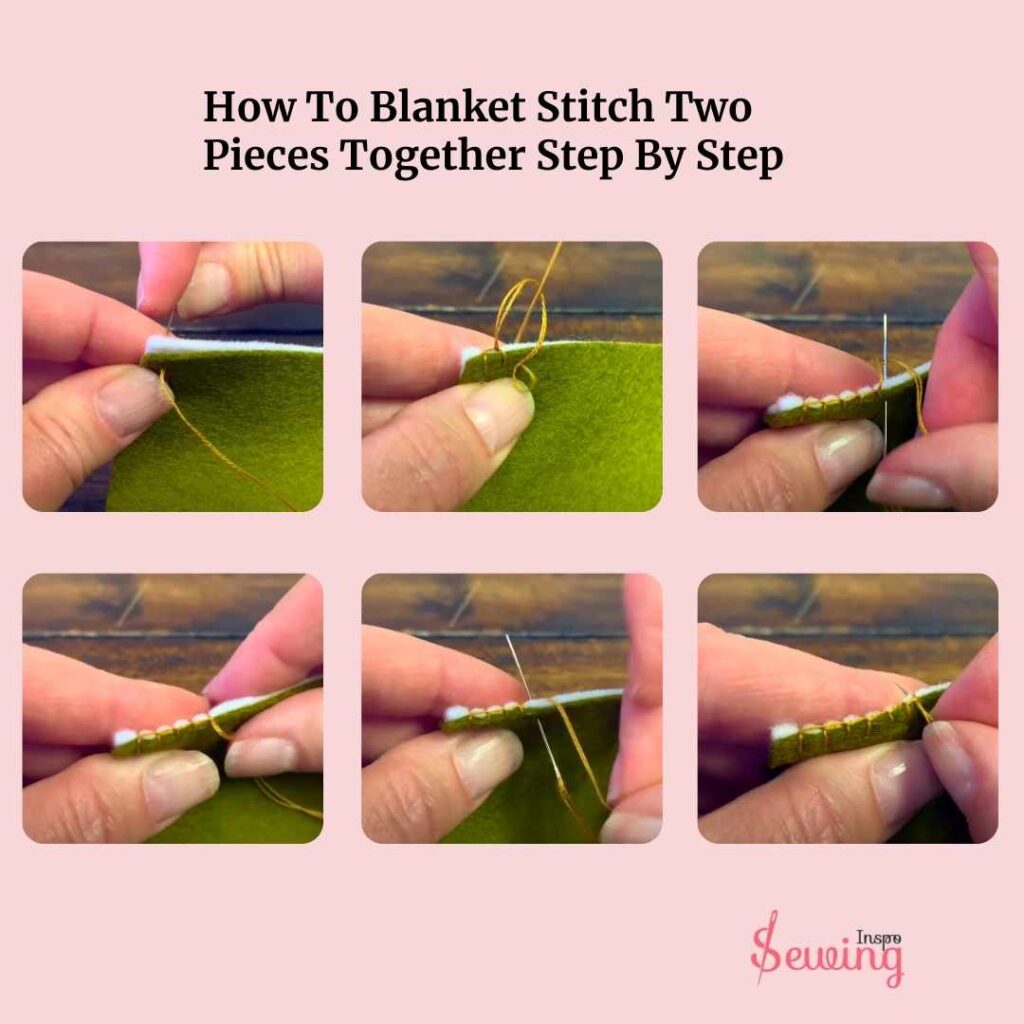
- Place the two fabric pieces together with the edges aligned.
- Pin them in place if necessary to prevent shifting.
- Cut a length of embroidery floss (about 18 inches).
- Begin at one end of the fabric edges.
- Insert the needle from between the two pieces of fabric, pulling it through the edge of the top layer so the knot is hidden between the layers.
- Insert the needle down through both fabric layers about 1/8 inch from the edge (Point A), keeping the thread loop under the needle.
- Pull the thread tight to create a neat loop around the edge of the fabric.
- Move a short distance along the edge and insert the needle down through both layers (Point B), again keeping the thread under the needle to form the loop.
- Repeat along the entire edge, keeping stitches evenly spaced for a consistent look.
- When you reach the end, tie a small knot on the inside of the fabric to secure the thread.
How To Sew Corners With Blanket Stitch?
Doing blanket stitch around the corner is the kinda tricky part, but you can do it with little patience. Here is how I did it:
- Prepare The Corners
- Reaching the Corner
- Anchor the Corner
- Turn the Fabric
- Continue Stitching
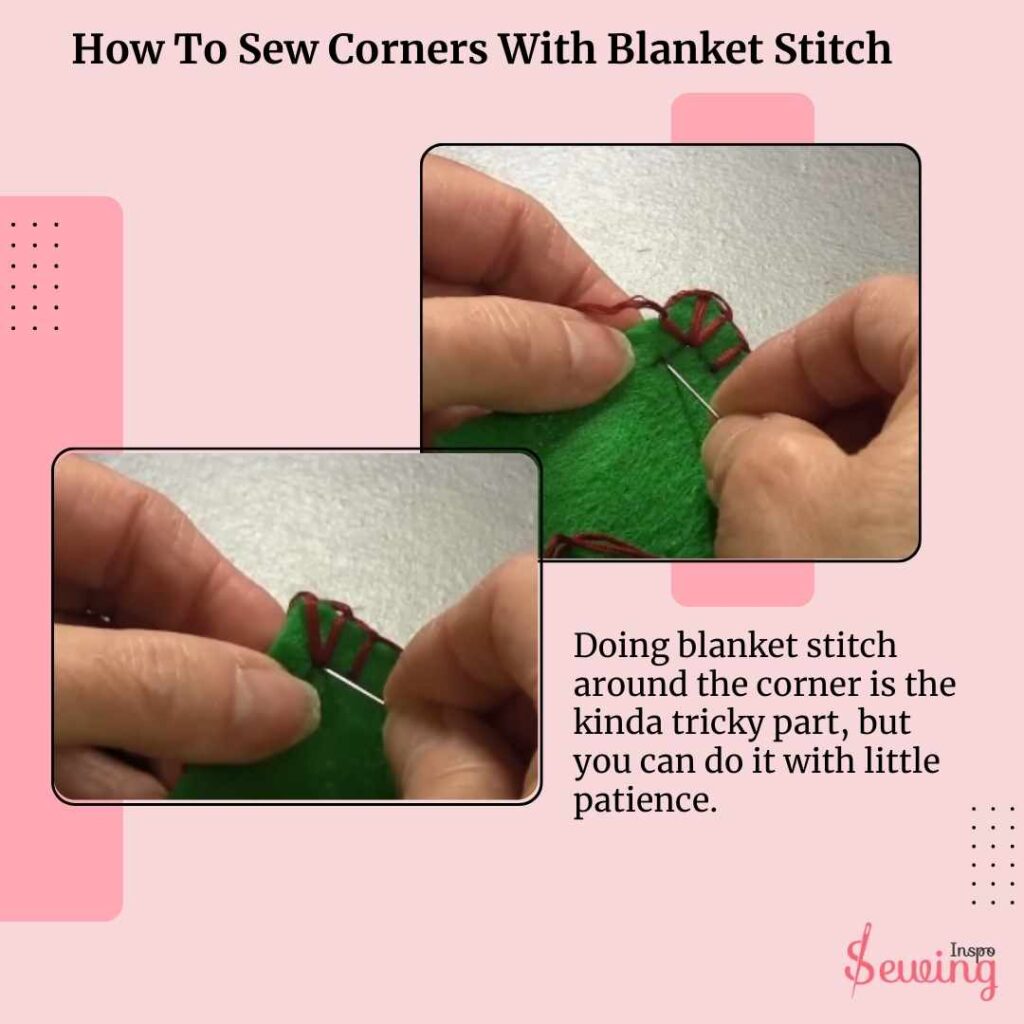
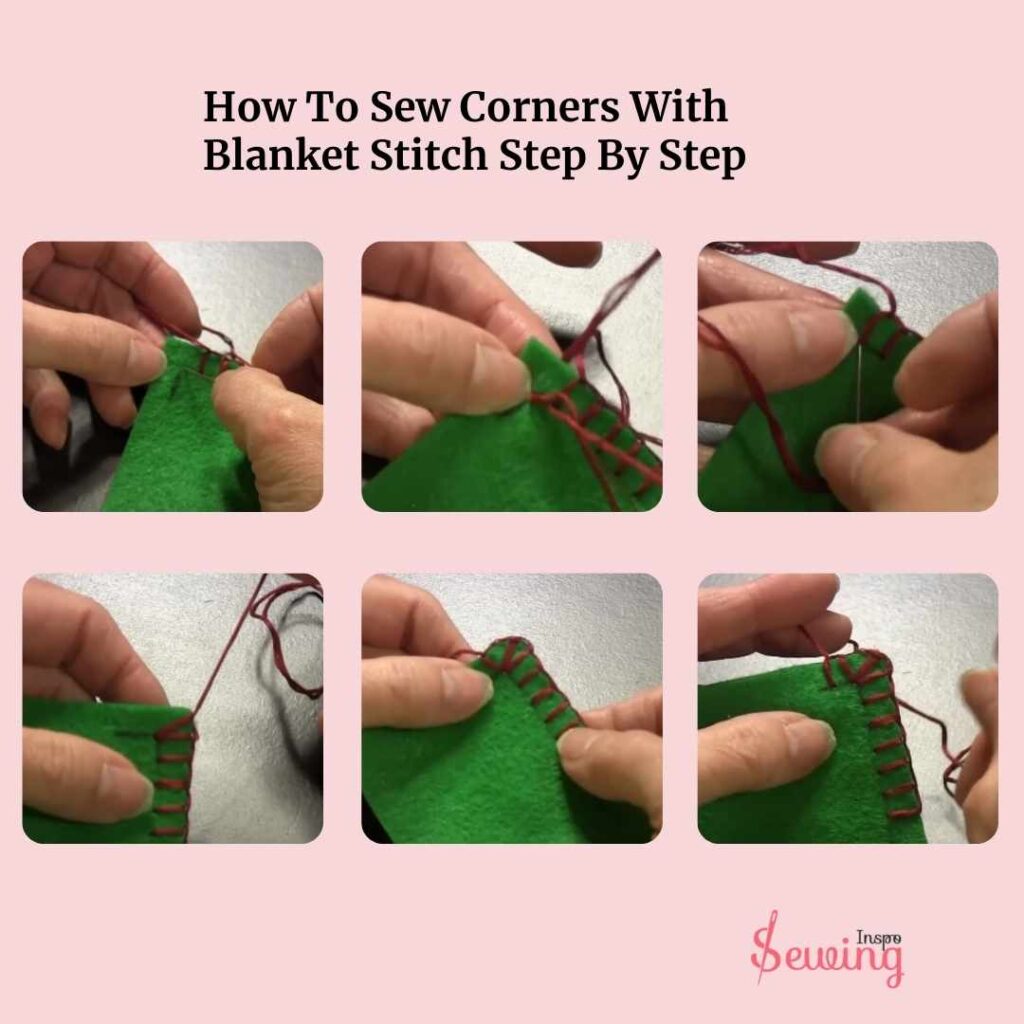
- Work your blanket stitch as usual along one edge of the fabric, bringing the needle up at Point A and down at Point B while keeping the thread under the needle to form the loop.
- When you start stitching the corner, ensure your last stitch aligns with the edge of the fabric.
- Insert the needle at the corner point (where the 2 edges meet). Make a stitch perpendicular to the one before it. Pull the thread through to form a loop around the corner.
- To secure the corner, insert the needle back into the same hole at the corner point, forming a second loop. This creates a clean, reinforced stitch at the corner.
- Rotate the fabric slightly to work along the next edge.
- Start the first stitch on the new edge by inserting the needle a short distance from the corner, keeping the thread under the needle to form a loop.
- Continue blanket stitching along the new edge as you did previously, maintaining even spacing and tension.
My Blanket Stitch Quick And Easy Guide
How To Do Blanket Stitch On Felt?
Blanket stitch on felt is another creative way to use this stitch. So I make a Benny with it. Here is how it works.

- Print or draw a bunny shape on paper and cut it out.
- Pick your felt—I went with 100% woven felt because it’s soft, sturdy, and easy to stitch.
- Pin the bunny template to the felt and cut out your bunny shape.
- Thread your needle with a color that matches or contrasts for fun!
- Use running stitch or overcast stitch for the tummy and muzzle.
- Add felt ears using the same stitch.
- For the eyes, cut black felt circles or stitch them on with black embroidery floss.
- Place your second felt piece behind the bunny for thickness.
- Start your blanket stitch at the edge, insert your needle in and out with a loop, and stitch around the bunny.
- If the thread runs out, no worries—just knot it and keep going!
Once it’s done, you’ll have an adorable felt bunny with sturdy, neat edges. Blanket stitch not only holds it all together but adds a lovely handmade vibe. 💖
How To Blanket Stitch On Fleece?
After making a felt bunny, I wanted something cozier. That’s when the idea of a fleece blanket with blanket stitch popped into my head. And yep, I’m so glad I tried it—and wrote it down for my sewing book, too!
- Pick Your Fleece: I went with cotton fleece—super soft, easy to work with, and perfect for hand stitching.
- Cut Your Fabric: I cut mine between 30–35 inches, but you can adjust based on your snuggly needs.
- Mark Your Edges: Use a fabric marker to make a guide ½ inch from the edge. This keeps your stitches neat and evenly spaced.
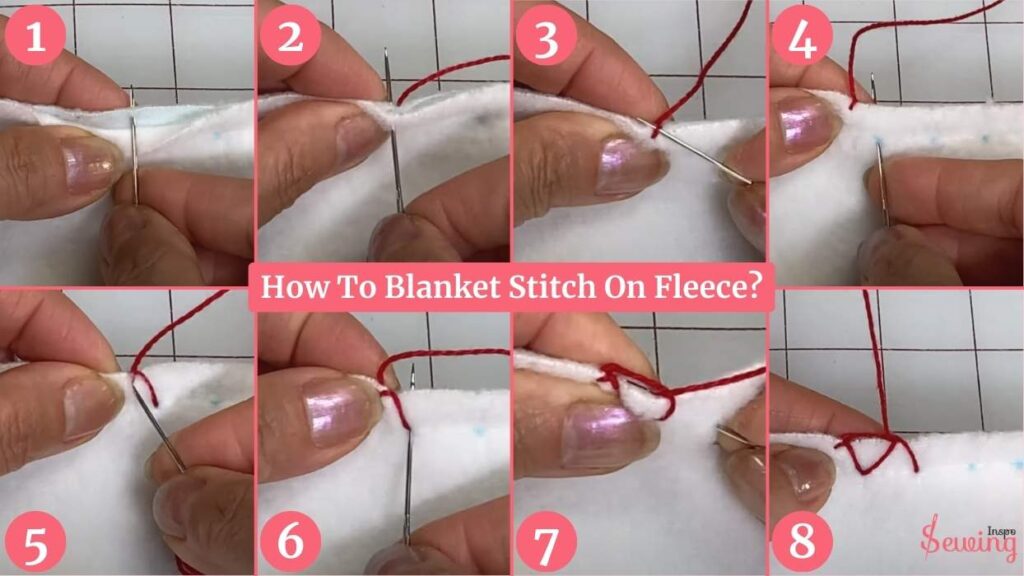
- I grabbed a size 24 chenille needle and #9 pearl thread.
- To hide the knot, bring the needle from the back to the front.
- Start stitching 1/8 to 1/4 inch from the fabric edge.
- As you stitch forward, a loop forms—that’s your blanket stitch magic happening! ✨
- Keep repeating this motion along the edge.
Trickiest Part The Corners:-Instead of a sharp turn, add extra stitches around the corner to keep the curve smooth and pretty. Yes, I ran out of thread midway 😅 but just re-threaded and kept going!
Finishing Touch: At the end, I tucked the thread under the back stitches, made a tiny knot, and trimmed it. And just like that… a warm fleece blanket was born 😍
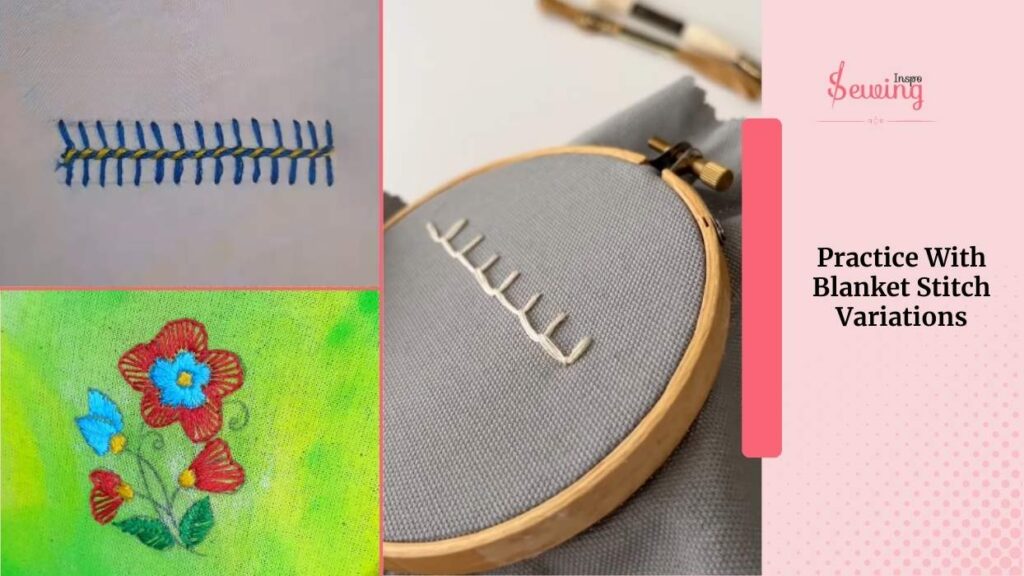
Practice With Blanket Stitch Variations
-Thank you for teaching me blanket stitch, grandma. But I read in practical embroidery that there are 22 types of blanket stitch. Is that true?
-Those are just an idea. It can be more depending on your skill. But as a beginner, you can practice with-
The whipped blanket stitch is great for adding borders. You can use the same color for the whipping to make horizontal lines pop or mix it up with contrasting colors for a cool two-tone effect. You can even do tacking stitch by hand. If you’re into quilting, the closed blanket stitch is your go-to. It gives edges a clean finish, hiding any wonky cuts like a champ. Feeling fancy? Try the crossed blanket stitch for some decorative flair.
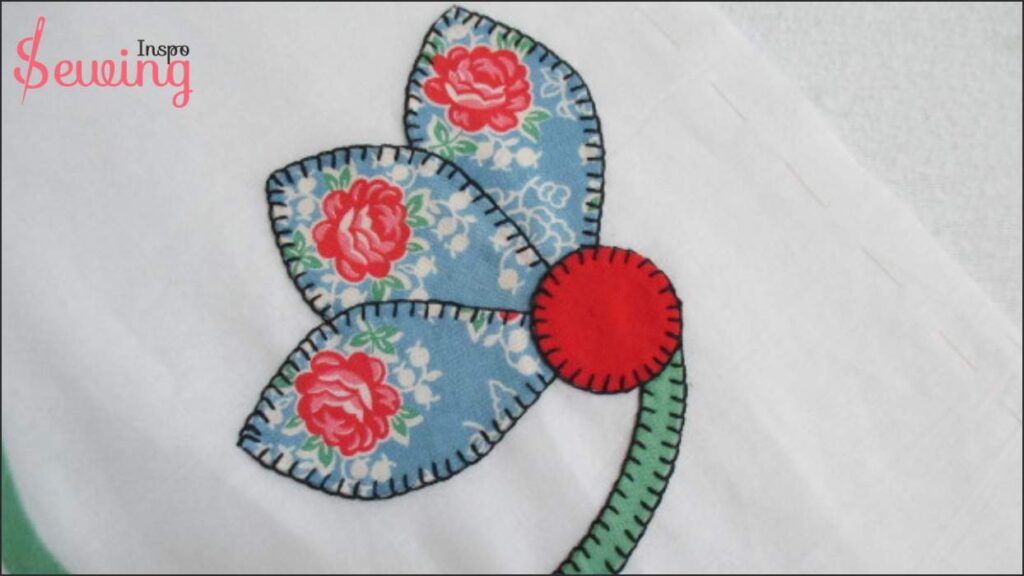
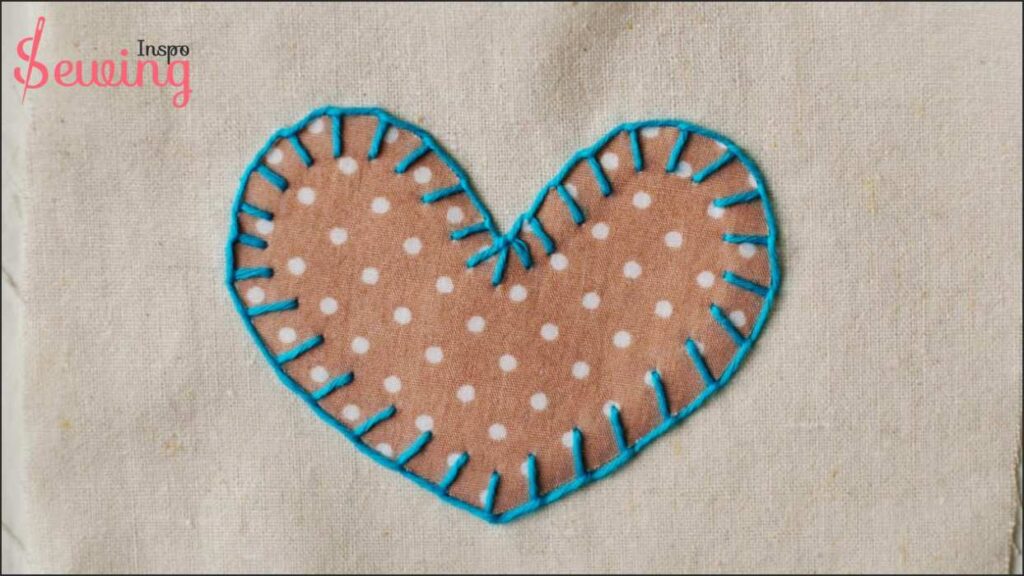
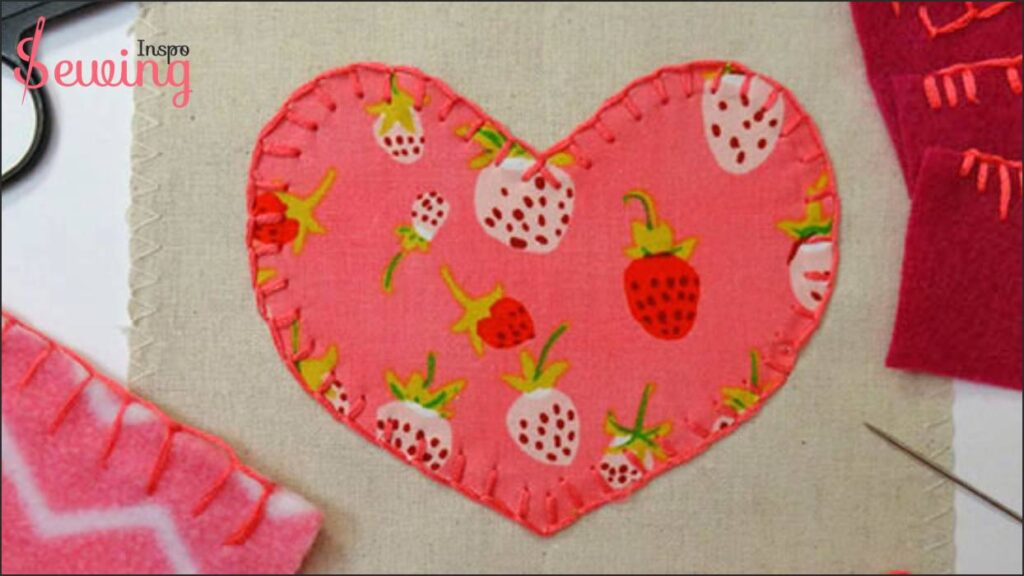
Blanket Stitch Applique
Blanket stitch is not just for blankets. Once you become an expert, you can even make beautiful applique with it.
– how do you hand sew a blanket stitch applique, Grandma?
-That’s easy. To hand sew a blanket stitch appliqué, first, cut out your shape and pin it onto the fabric. Thread your needle, knot the end, and start stitching by bringing the needle up through the fabric’s edge and then back down. Before pulling tight, pass the needle through the loop to secure the stitch.
Repeat this process, spacing your stitches evenly until you’ve outlined the entire shape. Finish with a final stitch and knot on the wrong side of the fabric.
Here are a few of my blanket stitch applique works:
Does Blanket Stitch Stop Fraying?
Yes, blanket stitch can stop fraying—it loops over the edge and hugs it tight. And for thick fabrics like wool, felt, or heavy cotton? It’s a total winner. Strong, reliable, and lasts for years… but not forever.
It depends on:
- Your fabric type (delicates like silk may still fray)
- Your thread quality
- How tight and neat your stitches are
- And how much your project is used or washed
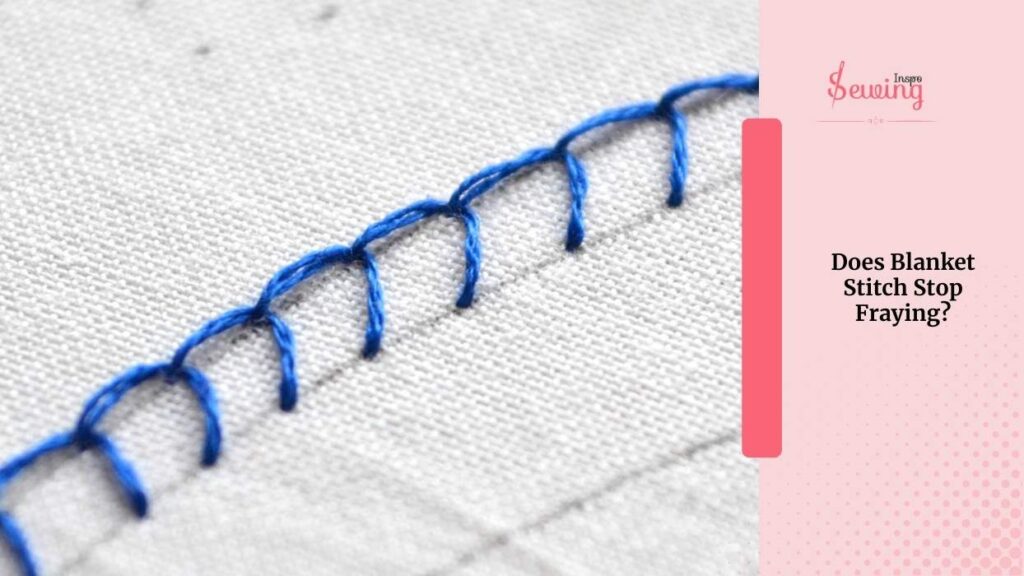
How long will it survive? Well,
On a well-loved blanket? It may last 3–4 years or even more if cared for. On delicate or overused fabrics? Fraying can sneak in.
So yep, blanket stitch is your best bet for hand-stopping fraying. Just treat it kindly, and it’ll keep those edges neat and snug.
Blanket Stitch Applique Pdf
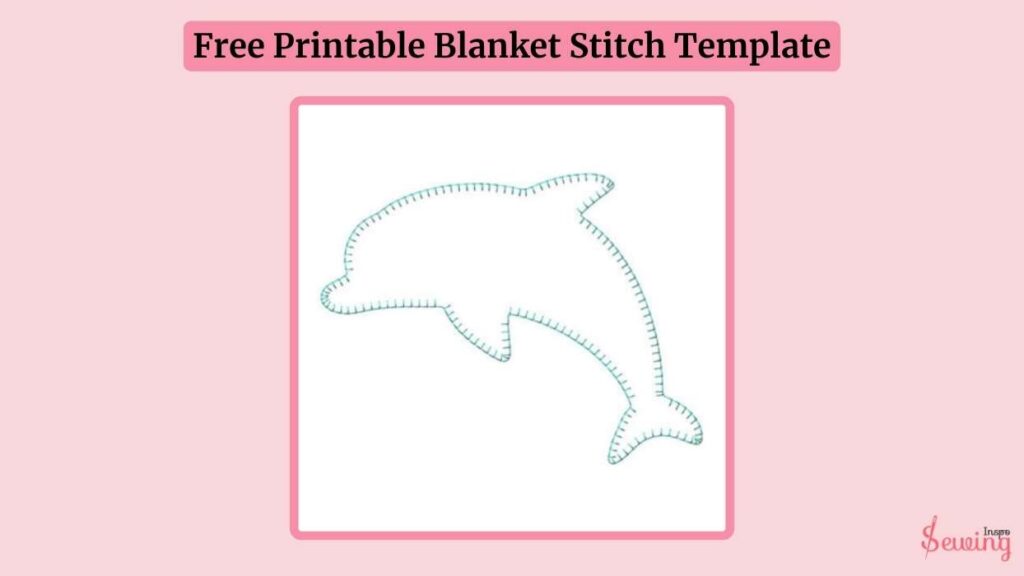
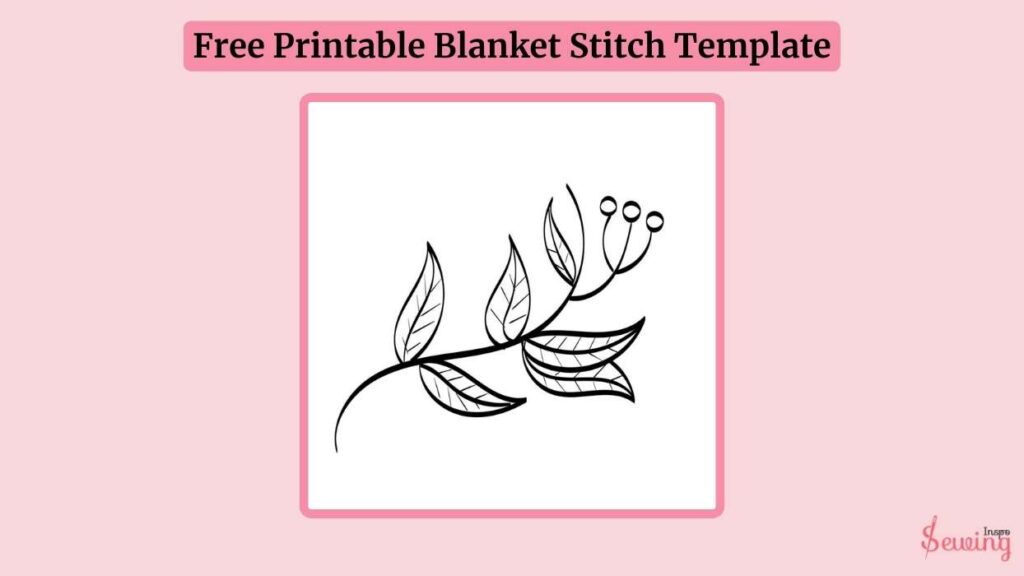
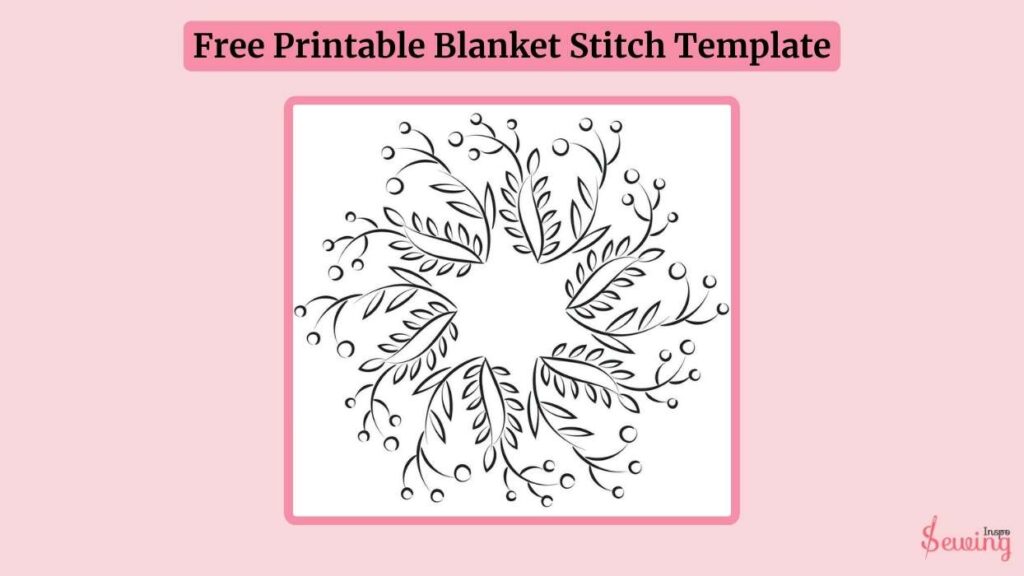
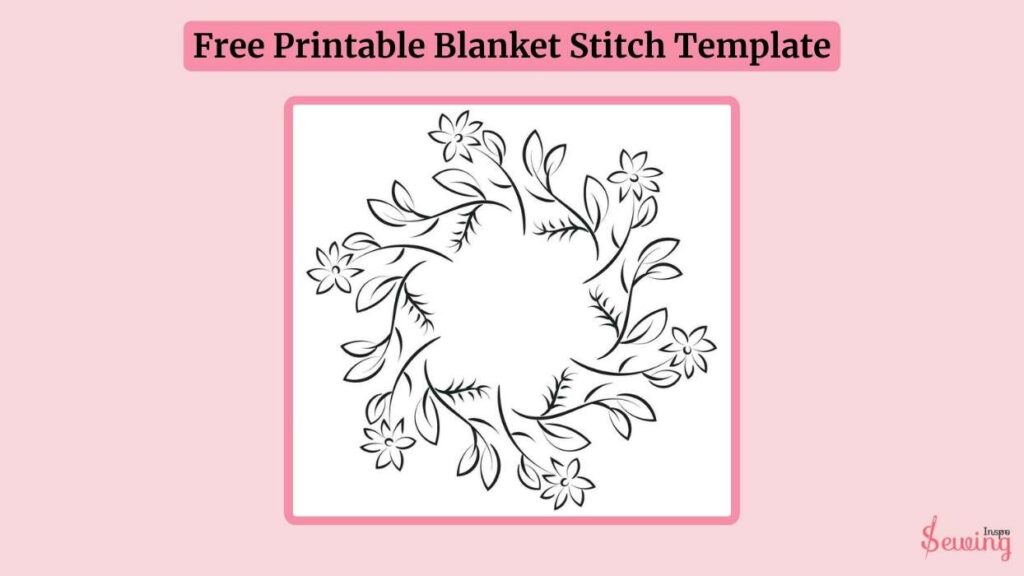
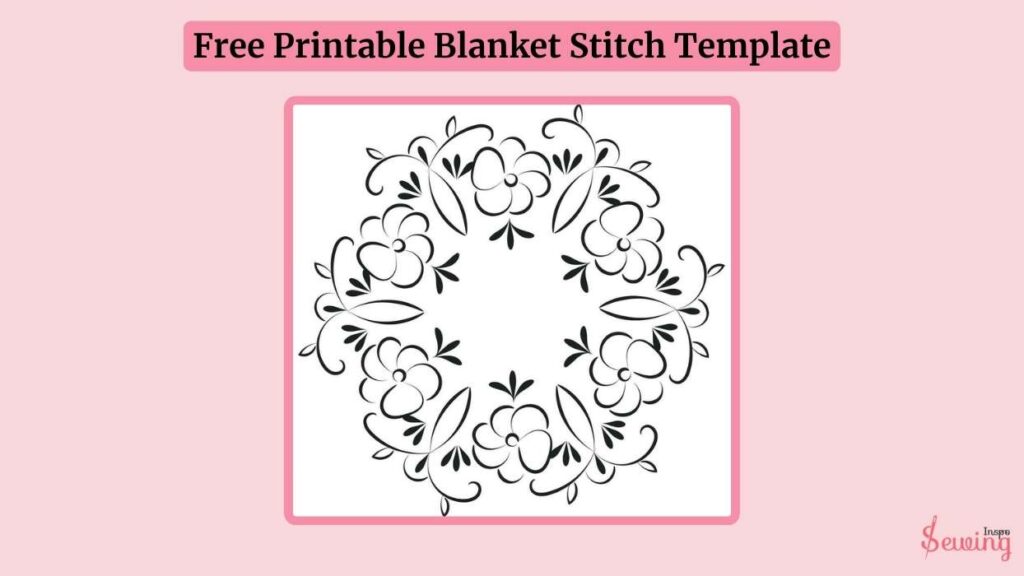
Blanket Stitch Template
here is my Blanket Stitch Template
Frequently Asked Questions
What Is Blanket Stitch Used For?
The blanket stitch is a pretty stitch used to tidy up the edges of blankets and fabric. Sometimes, it’s called a cable stitch or crochet stitch. You can see this stitch on both sides of the blanket. It’s also handy for holding down folded hems.
What Hand Stitch Is Also Called A Blanket Stitch?
The blanket stitch, also called open buttonhole, cable, or crochet stitch, is a simple sewing stitch where you make spaced loops. It’s used to tidy up edges, strengthen thick fabrics, and stop them from fraying. You can do it by hand or with a sewing machine.
Is A Blanket Stitch Secure?
Yes, a blanket stitch is generally secure. It’s often used to bind the edges of fabric together, providing both a decorative finish and functional reinforcement.
Final Thought
Thanks, Grandma, for teaching me how to hand sew a blanket stitch.
I think now I can do blanket stitching occasionally.
However, if you are still in doubt, feel free to reach out to us.
We will answer your question.


Leave a Reply