
I still remember the first time I tried a chevron stitch. I wasn’t planning on it. It just happened. I was doodling with thread on a scrap of fabric, and suddenly those neat little V-shaped lines started to appear.
At first, they were crooked and uneven, but the more I stitched, the more that zigzag rhythm pulled me in. It felt almost like the fabric was breathing with each row I added.
Before I knew it, I had filled an entire piece with this bold, geometric pattern. That’s when I realized the chevron stitch wasn’t just decorative. It had character.
But it was something new to my sewinginspo student. So I thought, why not teach them? So here I am.
Table of Contents
What Is The Chevron Stitch?
The chevron stitch is a stitch that forms a series of neat, V-shaped zigzags across the fabric. I like to call it an uneven zigzag stitch.
It’s worked in horizontal rows, with each row creating sharp peaks and valleys that look like a chevron pattern.
What I love about it is that it’s both simple and versatile, like counted cross stitch.
You can make the Vs tight and close together for a bold, dense look, or space them out for a lighter, more delicate design. It’s often used for borders, bands, and decorative accents, and it adds a rhythmic, almost woven texture that instantly catches the eye.
How To Do Chevron Stitch Patterns?
To do the chevron stitch pattern, follow the steps below,
- Plan My Chevron Rows
- First Diagonal Stitches
- Controlling Stitch Lenght
- Building A Patterned
- Filling or Expanding
Plan My Chevron Rows
I start by sketching zigzag guidelines on the fabric with a fabric pen:
- I draw two parallel horizontal lines (about 1–1.5 cm apart). Drawing helps to do popcorn stitch patterns too
- Then I mark evenly spaced vertical points across both lines. This keeps the chevrons uniform.
- These marks will be where my needle comes up or goes down.
This gives me the “skeleton” of the chevron pattern. That’s how to cross stitch with a pattern, too.
First Diagonal Stitches
I thread my needle usually with 2–3 strands of cotton floss if I want a bold look. My favorite size is 7 embroidery/crewel needle, long enough to scoop the fabric without bending. I use this for teddy bear stitching patterns too.
- I bring my needle up through the first bottom mark on the lower line. I do this for peyote stitch too.
- Then I angle the needle at about 45° and take it down through the first top mark on the upper line.
- I bring the needle back up at the next bottom mark and again stitch diagonally up to the top.
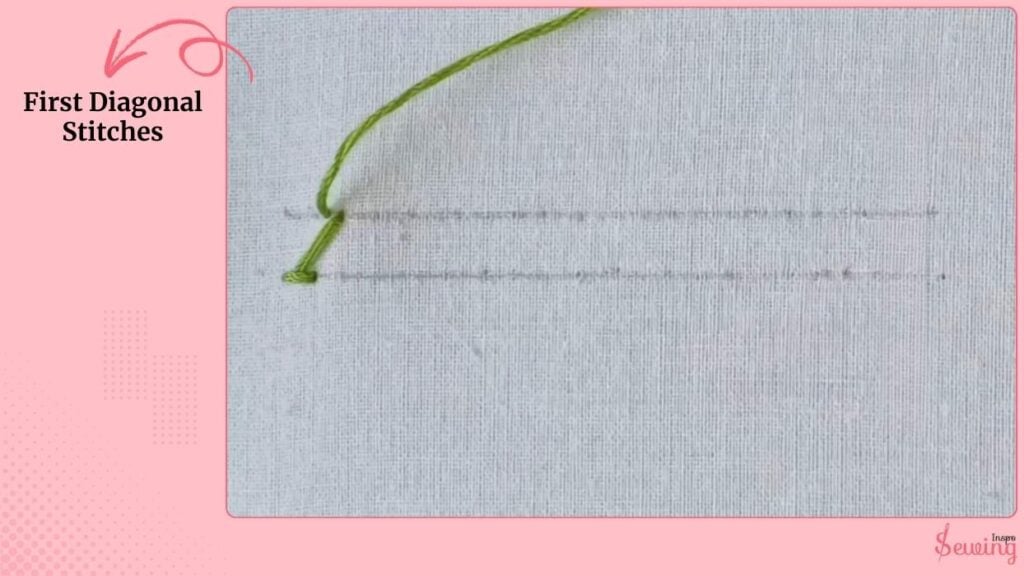
Each stitch forms one side of the V. When I keep repeating across the row, those Vs line up into a zigzag band.
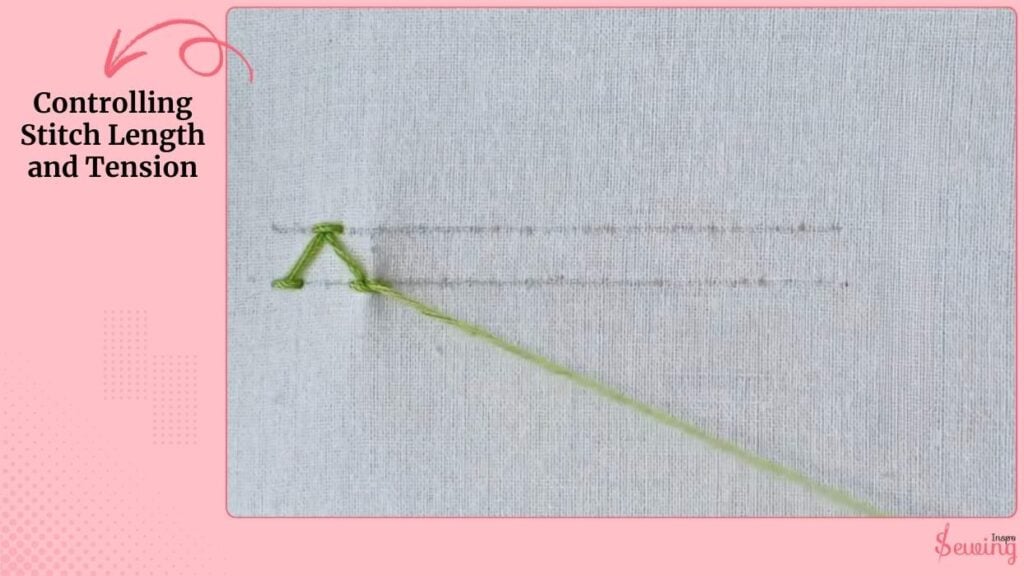
Controlling Stitch Length and Tension
Here’s where it can go wrong if I’m not careful. I aim for 5–7 mm diagonals. Longer stitches (up to 10 mm) give a bold look, while shorter (3–4 mm) make a finer texture.
And I keep the needle consistent at around 45°, making each V sharp and even. I use this for sewing patterns for leather.
I pull the thread snug, but not too tight. Suppose I tug too hard, the canvas puckers. Too loose, and the stitches sag. If you are sewing canvas on the tie then this step will help you too.
I often run a fingertip lightly along the row as I go. If it feels smooth and even, my tension is right.
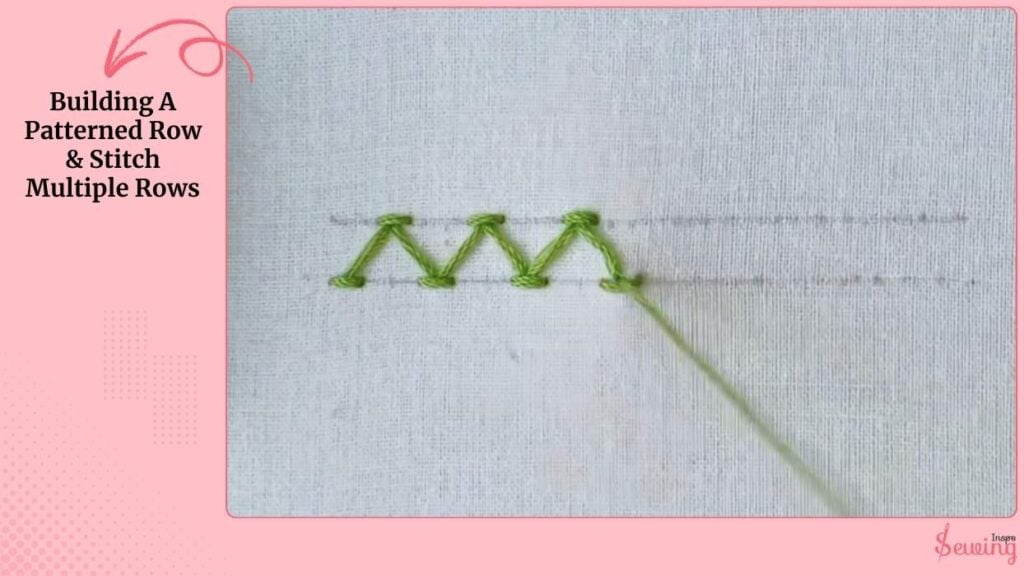
Building A Patterned Row & Stitch Multiple Rows
One row is just the start. To make it a true chevron pattern, I stitch multiple rows. For stacked stripes, I place the next row directly below the first, keeping peaks aligned.
For a woven zigzag look, I offset the next row so the new peaks land in the valleys of the row above. To make it pop, I sometimes alternate colors in each row. Say, navy and white, or red and gold.
This is where the stitch transforms from just a border line into a repeating pattern.
Filling or Expanding the Design
If I want a big design (like filling a fabric square), I keep layering rows until I get the size I want.
- Bold Pattern: Use thicker thread (like pearl cotton #5) and wider spacing between the top and bottom lines (up to 2 cm). I use this thread for diamond stitching pattern.
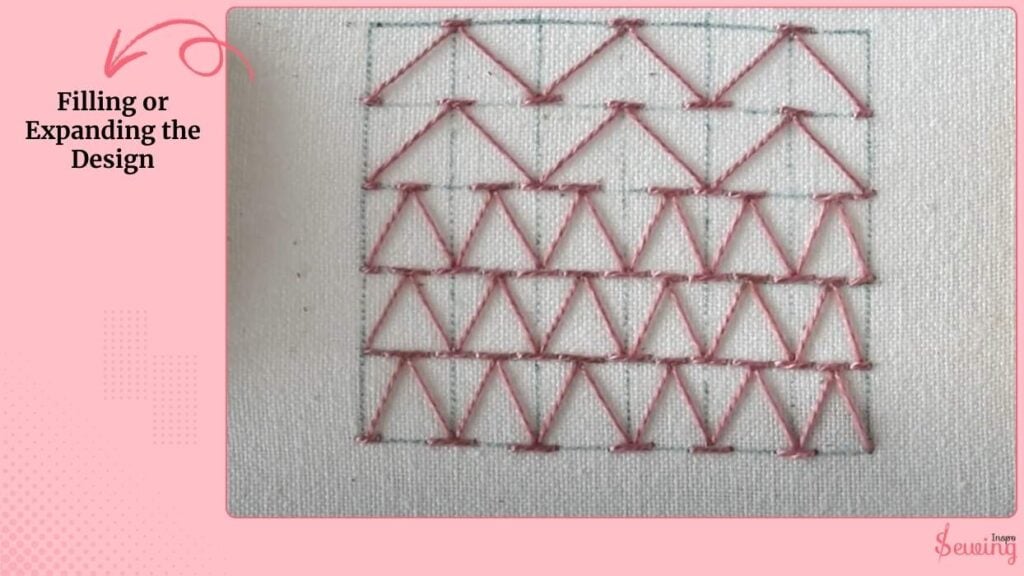
- Delicate Fill: Use 1–2 strands of floss, closer lines (0.5–0.7 cm apart), and shorter stitches. I use this for checker stitch too.
- Needle Size Tip: For thick thread, switch to a size 5 embroidery needle so the eye isn’t too tight. For finer work, stick to size 7–9.
The result is a fabric full of rhythmic zigzags that feel geometric yet hand-drawn.
Raised Chevron Stitch Embroidery
If you want something more 3d effect and eye-catching, then do the raised chevron version.
The raised chevron stitch is a decorative embroidery technique that adds height and texture to your work.
Unlike a standard chevron stitch, this version is “laced” or “whipped” with a second thread. It gives a bold, three-dimensional look. Here is how it works-
- You begin by laying down a row of V-shaped stitches
- Next, a second thread is introduced.
- Instead of piercing the fabric, this thread is woven over and around the arms of the V’s.
- It only goes into the fabric at the start and end of the row.
- As you wrap the second thread around the base stitches
It is perfect for edging linens, samplers, or decorative bands.
Chevron Stitch Patterns In Sewing PDF
Free Chevron Stitch Patterns In Sewing
If you are lost and don’t know which pattern to do, then you can use those as reference,
Frequently Asked Questions
What is the difference between Ripple and Chevron?
Ripple and chevron patterns look similar at first glance, but they’re not the same. A ripple has soft, wavy curves that flow up and down like gentle waves, while a chevron has sharp, defined V-shaped points.
What is the best angle for a Chevron pattern?
The classic chevron looks best when worked at about a 45° angle. This keeps the zigzags balanced not too shallow, not too steep. Wider spacing can make a more dramatic V, while closer spacing creates a finer, tighter zigzag.
Which crochet stitch looks the best?
That depends on the look you want! For chevrons, the double crochet stitch is the most popular because it gives height and definition without being too bulky. But if you prefer a lighter, airier chevron, the half-double crochet works beautifully too.
Conclusion
Every time I work on a chevron pattern, I find myself getting lost in the rhythm of those little zigzags. There’s something so satisfying about watching the Vs line up row after row.
And honestly?
Once you get the hang of the rhythm, it’s one of the most rewarding stitches to play with.


Leave a Reply