
The other day, I was hemming a shirt when I spotted Grandma’s old sewing machine tucked away in the corner. It had that vintage charm, with a handwheel that still turned like magic. “This old girl can still make perfect buttonholes,” Grandma said proudly as she walked in.
“Buttonholes? Like the ones on shirts?” I asked, half-expecting some complicated explanation.
She grinned. “Yep. With the buttonhole stitch machine. And trust me, the machine does the hard part for you.
Machine Buttonhole
To sew a buttonhole on an old machine, manually zigzag stitch both sides and ends of a marked rectangle, then carefully cut open the center.
Before I could blink, she had a piece of fabric under the presser foot. “Let me show you how to sew a buttonhole stitch using a machine. It’s all about the right settings, a steady hand, and a little patience.”
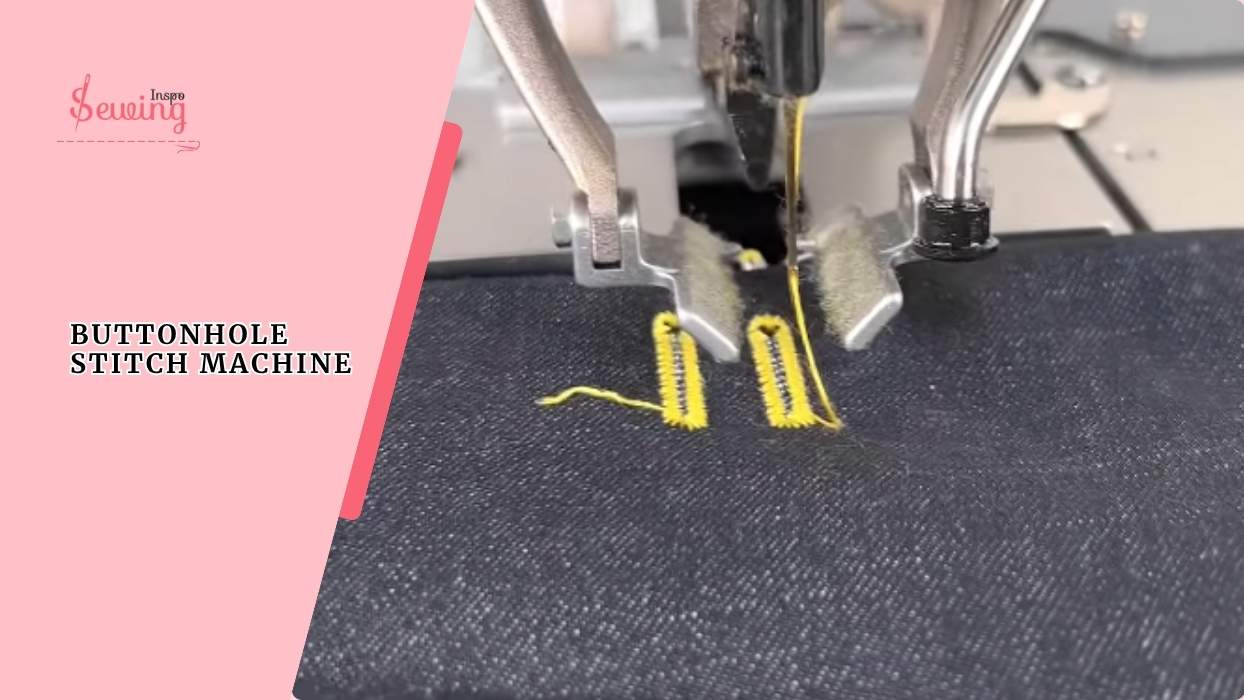
Table of Contents
What Is A Buttonhole Stitch On A Sewing Machine?
A buttonhole stitch on a sewing machine is a tight zigzag stitch sewn in a rectangular shape. It is usually made up of two dense side bars (satin stitches) and two narrower end bars (tack stitches).
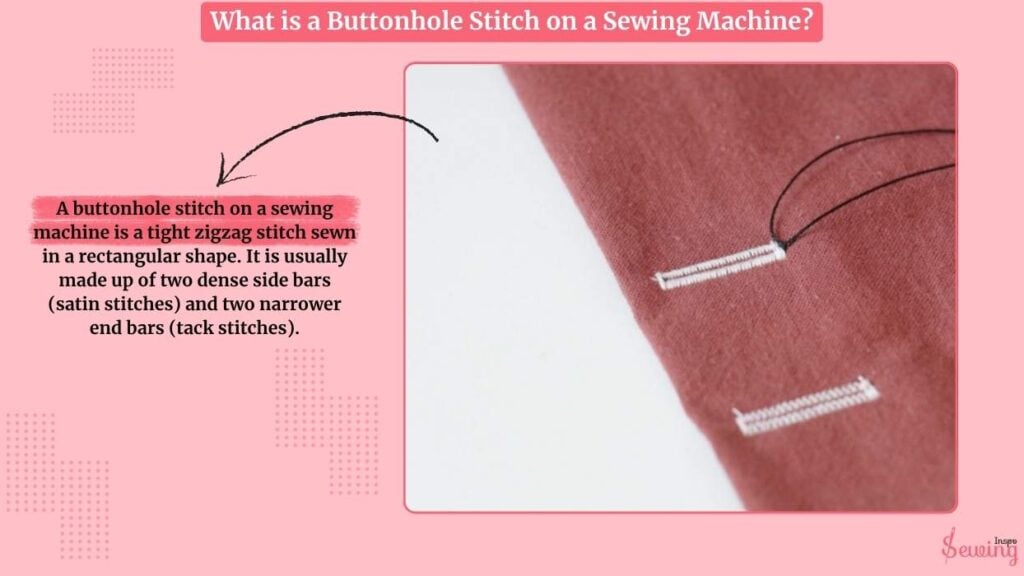
This stitch not only keeps the fabric from fraying but also ensures the buttonhole is strong enough to handle repeated use.
Types Of Buttonhole Stitch On Sewing Machine With Pictures
A modern sewing machine has 5 different types of buttonhole stitches already built in, like a serger stitch on sewing machine. Each of them looks different and serves a different purpose.
- 1 step buttonhole
- Standard/4-Step Buttonhole
- No Bartack Buttonhole
- Keyhole Buttonhole
- Top Bartack Buttonhole
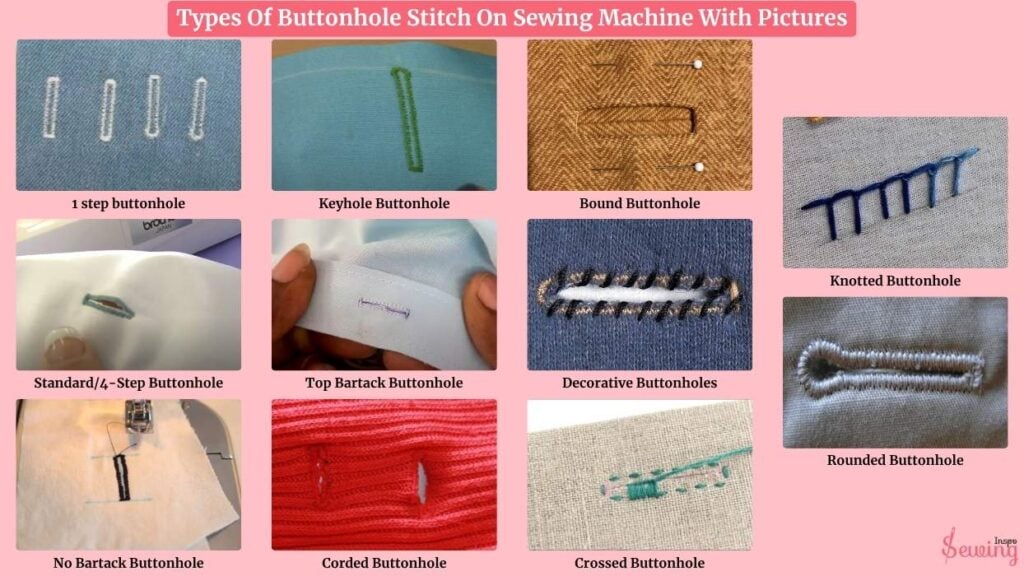
- Corded Buttonhole
- Bound Buttonhole
- Decorative Buttonholes
- Crossed Buttonhole
- Knotted Buttonhole
- Rounded Buttonhole
Which Machine Is Used To Make Buttonholes?
A buttonhole machine, also called a buttonholer, is a specialised sewing machine explicitly designed for making buttonholes. You’ll find these in 2 main forms:
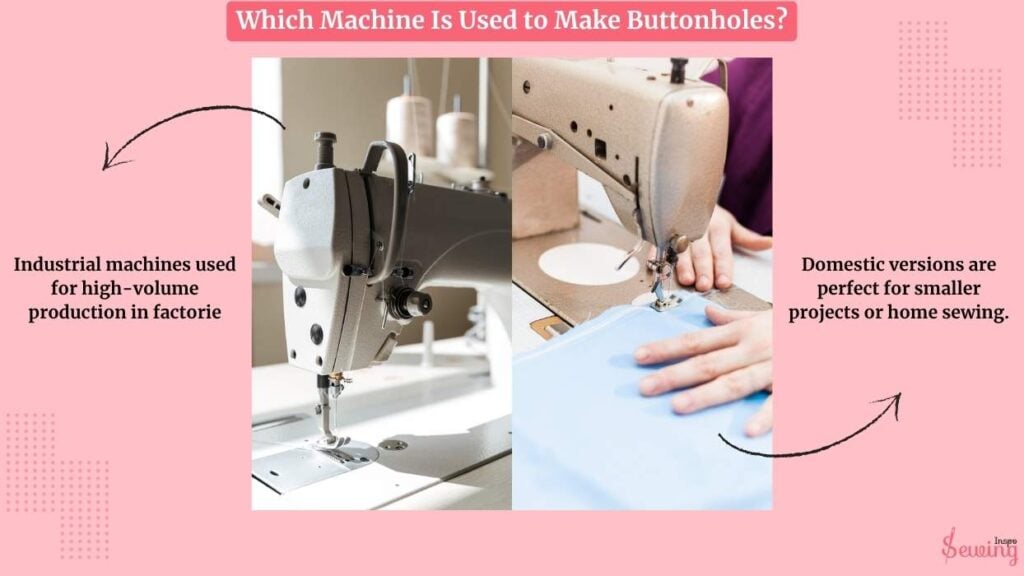
- Industrial machines used for high-volume production in factorie
- Domestic versions are perfect for smaller projects or home sewing.
Many modern home sewing machines come with a built-in buttonhole function, while older ones (or simpler models) can be fitted with a buttonholer attachment to achieve the same results.
| Fun fact?The first sewing machine capable of stitching buttonholes was invented by Charles Miller and patented in 1854. |
How To Do Buttonhole Stitch On Sewing Machine?
Grandma was doing buttonhole stitch on the old machine. So she takes out the machine and fabric and began explaining.
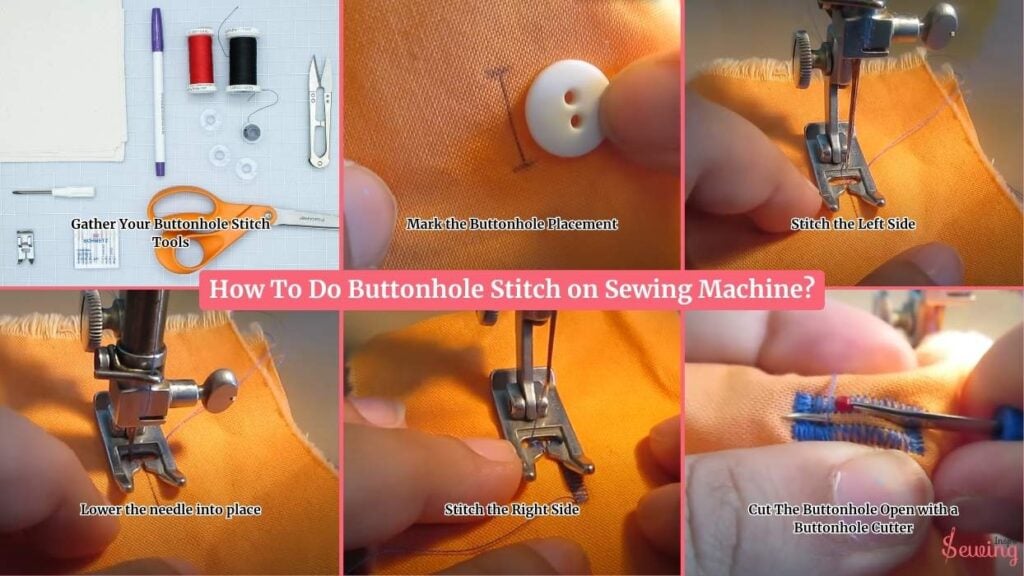
To do a buttonhole stitch on an old sewing machine, follow the steps,
Gather Your Buttonhole Stitch Tools
“Before we even plug in the machine,” Grandma says, “make sure you’ve got everything ready.”
You’ll need:
- Your sewing machine
- Thread (preferably polyester for strength)
- Buttonhole foot or mechanical buttonholer (if available)
- The actual button you’re sewing for

- A fabric marking pen or chalk
- Ruler or measuring tape
- Seam ripper or small sharp scissors
Mark the Buttonhole Placement
To mark the button placement, place the button flat on the fabric where you want the buttonhole. Use your ruler to mark a line that’s slightly longer than the button’s diameter, and add about 2–3 mm of extra space so the button slides through easily.
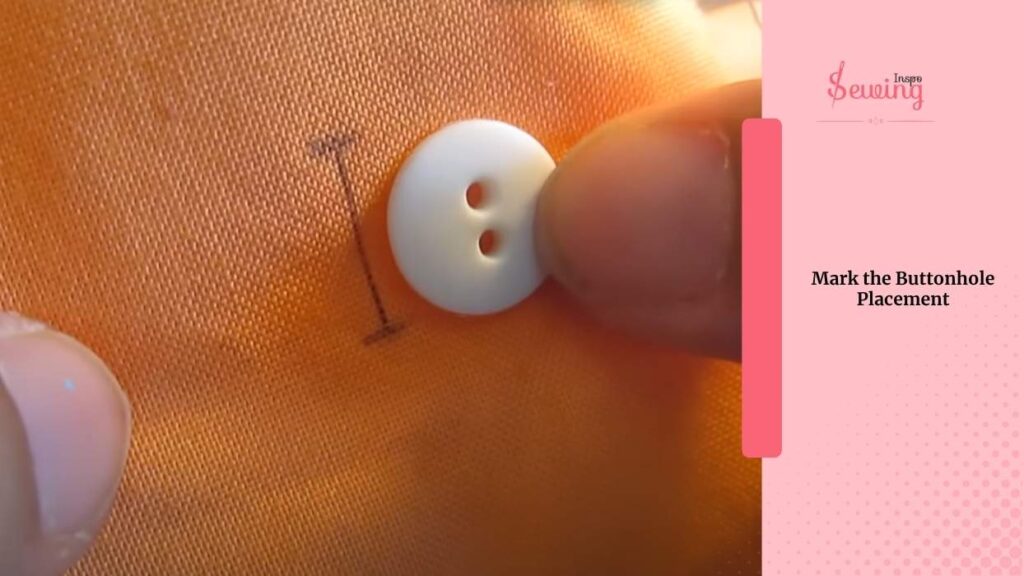
Mark the start and end points, and draw a straight vertical line (this will be your stitching guide). If making multiple buttonholes, mark all placements now to keep them evenly spaced.
Stitch the Left Side
“Alrighty, time to sew!” Place your fabric under the presser foot with the sewing needle at the bottom of the marked line.
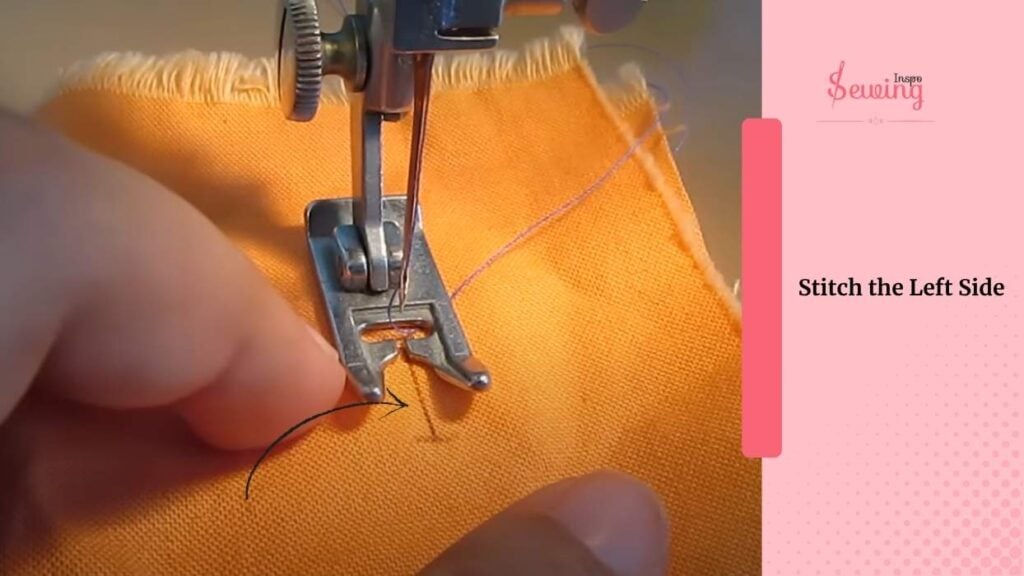
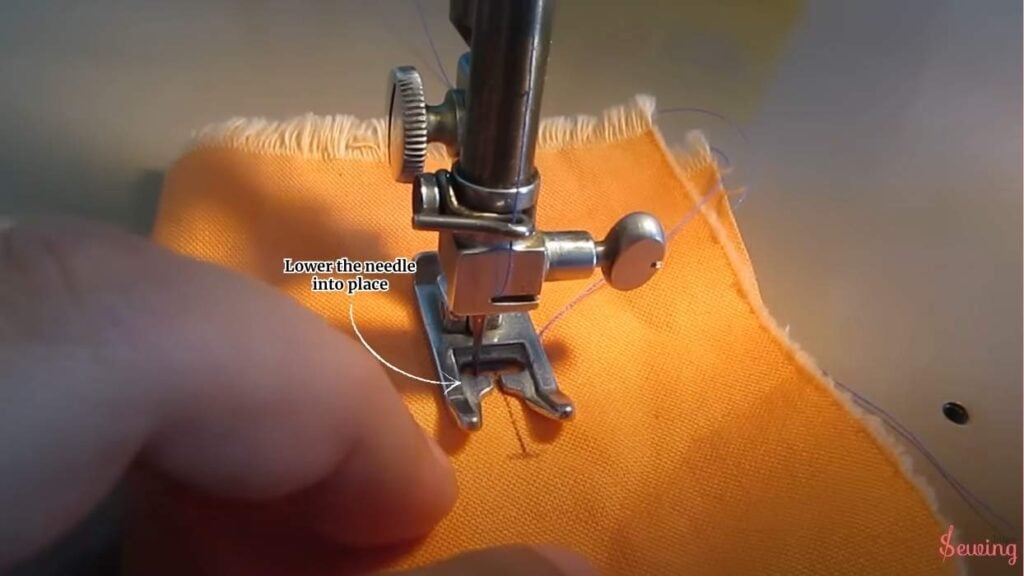
Lower the needle into place. Begin sewing a narrow zigzag stitch straight up the left side of your guideline. This will be the left column of the buttonhole. You can do it with a blind hem machine.
Stop sewing once you reach the top of your marked line. Count your stitches if you want to match the right side later. Use slow, even pressure and keep your hands steady. The neater this side is, the cleaner the whole buttonhole will look.
Grandma Tip: “Don’t tug the fabric—let the feed dogs pull it naturally. Your job is to guide, not wrestle.”
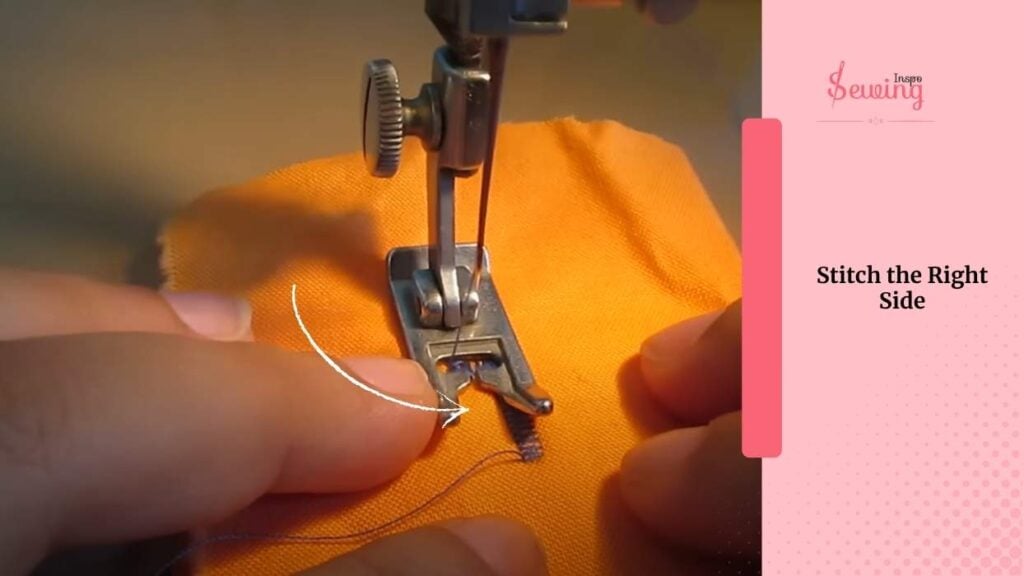
Stitch the Right Side
Sew down the right side of the guideline, keeping it parallel to the left. Try to match the stitch count and spacing to the first side. Don’t rush—it’s better to go slow and get clean lines. This is the second vertical column of your buttonhole like serger machine.
Grandma Tip: “If the fabric bunches or shifts, lift the presser foot and gently adjust. No need to panic.”
Cut The Buttonhole Open With A Buttonhole Cutter
Now comes the part that makes or breaks it. Grab your seam ripper or small scissors.
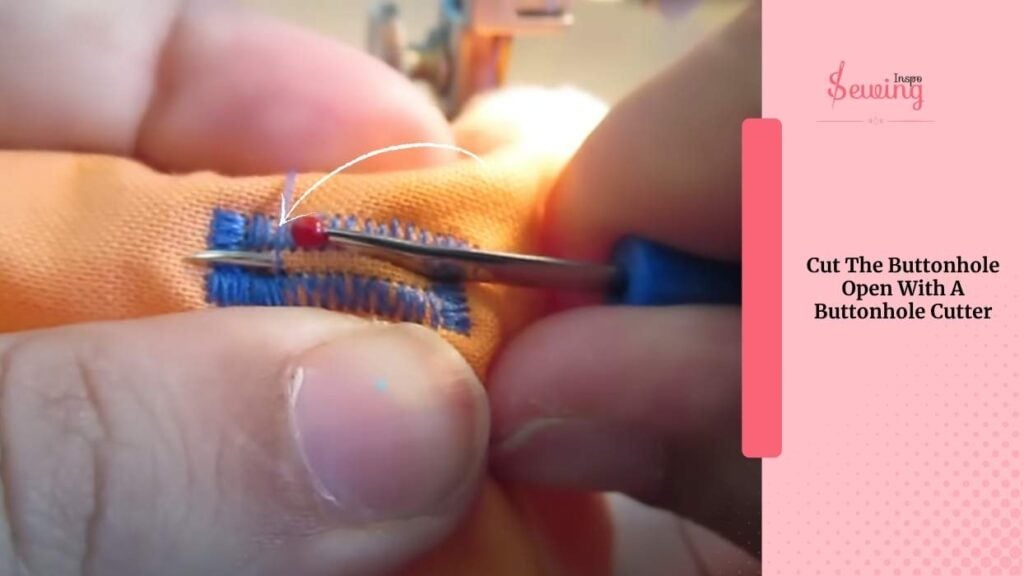
Insert a pin just before the top bar tack. This acts as a barrier, preventing you from accidentally slicing through it.
Carefully cut along the center of your zigzag columns, stopping just before the pin. Remove the pin, admire your work, and give yourself a little smile.
How To Do Buttonhole Stitch Machine Youtube?
If you feel stuck somewhere and want some real insight, then watch this video,
How To Sew A Button Hole On A Singer Machine?
After the grandma’s stitching session, I went home. You know I am the modern stitcher 😎 I don’t have an old sewing machine. I have the modern singer machine. So i thought of trying it with buttonhole stitch here. Here is how it went,
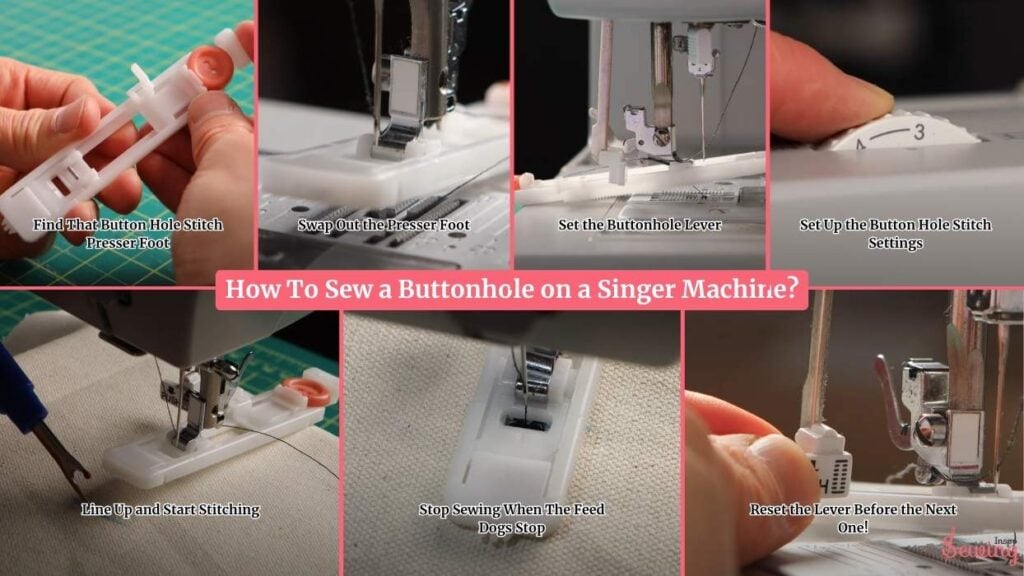
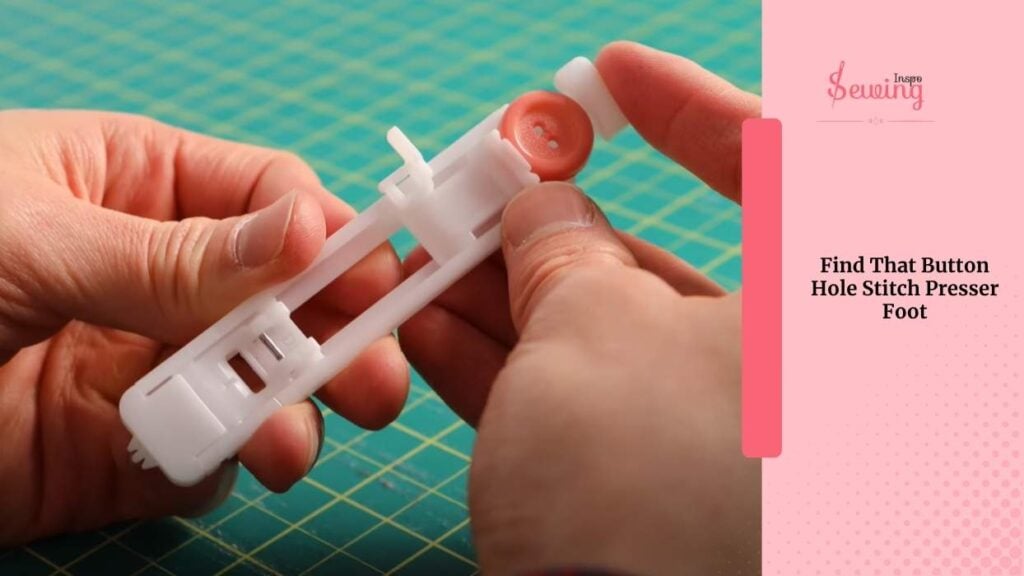
Find That Button Hole Stitch Presser Foot
Time to open the accessory case! I looked for the long white plastic presser foot—doesn’t even look like a foot at first glance. It’s got a sliding section in the back—that’s where the button goes.
Grandma once told me,
“That little holder in the back sets the size of your buttonhole automatically.” So I slid my button in snugly, and now the foot knew exactly how long the buttonhole needed to be.
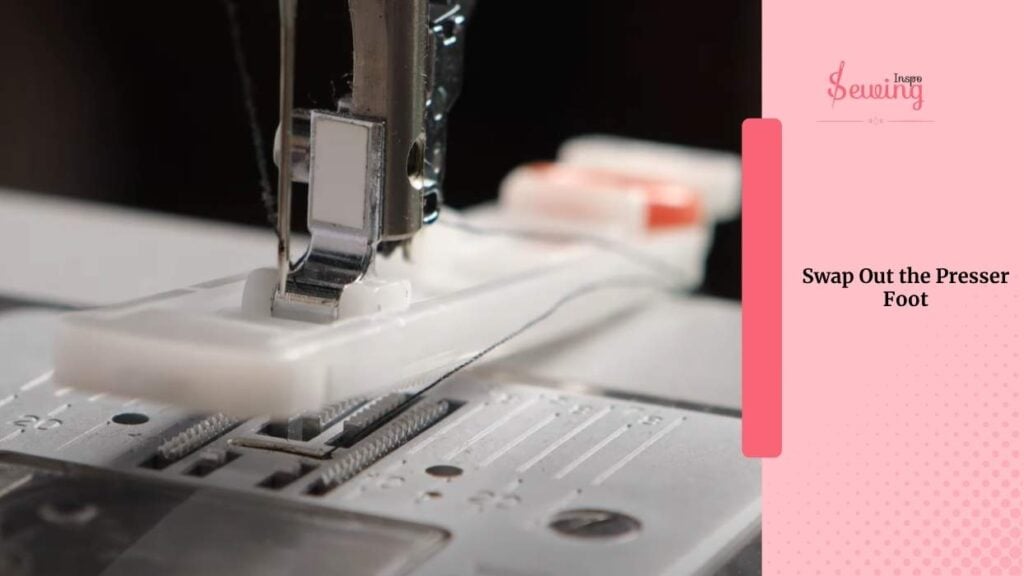
Swap Out the Presser Foot
I took off my regular presser foot and clicked in the buttonhole foot. The long end points toward the back (where the button is located), and I ensured the silver bar at the front snapped under the presser foot holder.
It felt a bit weird at first—kind of like putting on a shoe backward—but once it’s in place, it all makes sense.
Set the Buttonhole Lever
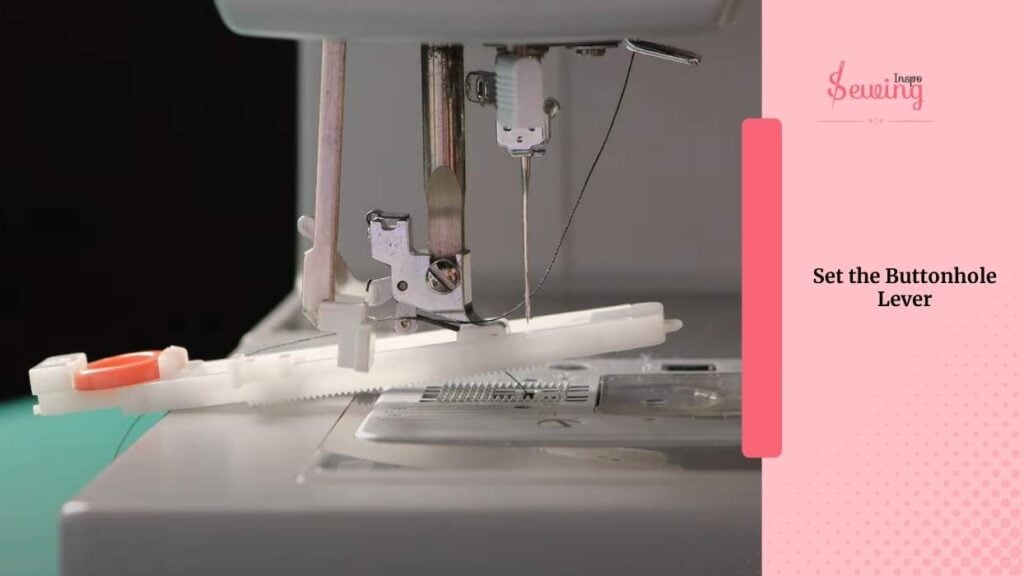
I found it, pulled it straight down until it clicked, then pushed it back toward the machine until it clicked again. That little lever tells the machine when to switch directions during stitching.
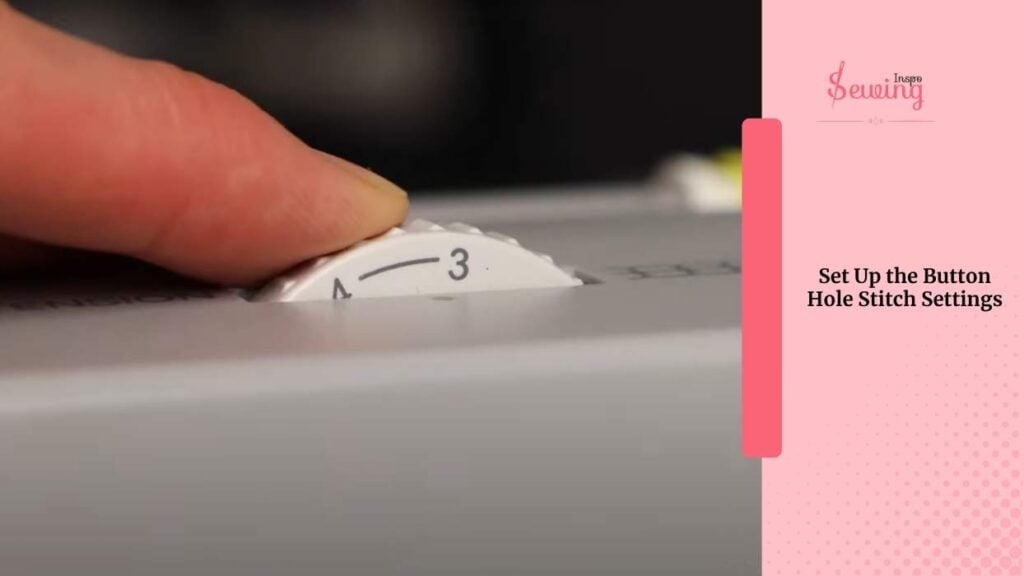
Set Up the Button Hole Stitch Settings
Now I set my machine to the buttonhole setting. There’s usually a small diagram that resembles a boxy buttonhole.
I adjusted my stitch length just past zero, which gives me a nice, dense zigzag. For the width, I chose something around 3–4 mm, depending on how bold I wanted the stitches to appear. If you wanna fill large buttonholes, then you can use a longer stitch. Then set the buttonhole stitch symbol.
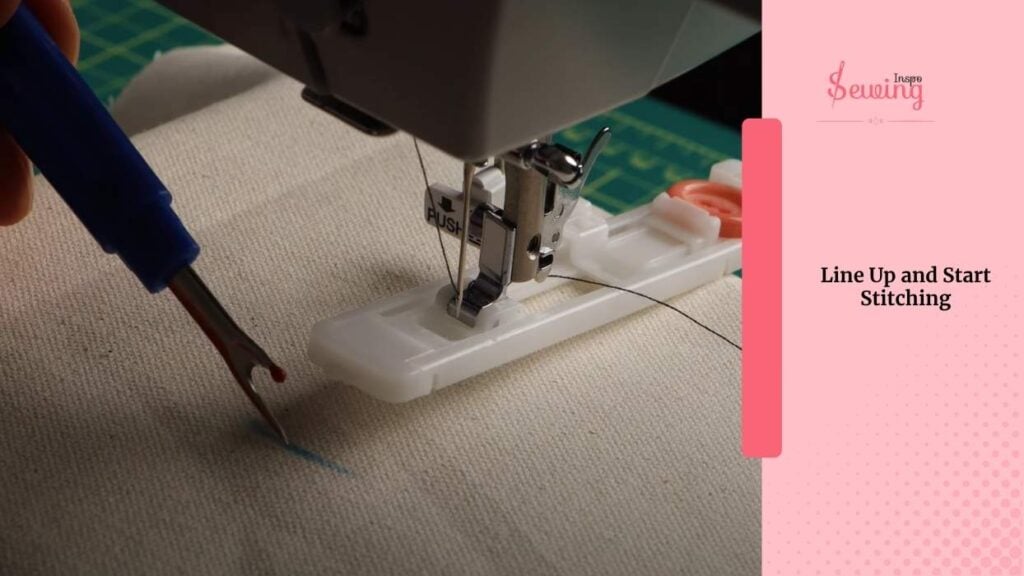
Line Up and Start Stitching
I lined up the starting point of the buttonhole with the gap in the presser foot (the opening where the needle drops). Once everything was aligned and my settings were good, I started sewing.
The machine pulled the fabric upward, stitching the left side first, then reversed direction automatically when the extension hit that buttonhole lever—just like Grandma said it would.
It stitched right back down the right side, creating a full buttonhole in one smooth, satisfying motion.
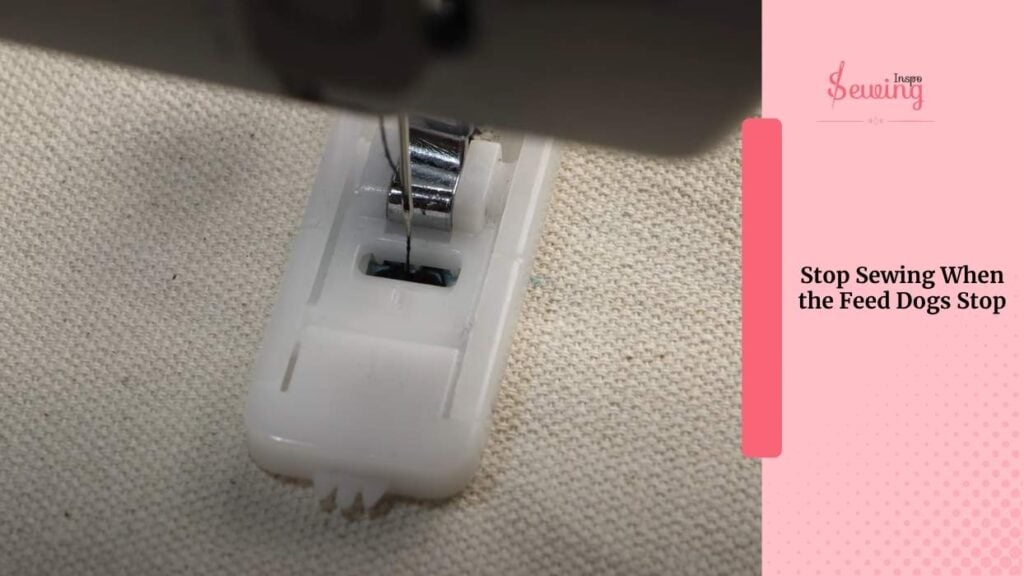
Stop Sewing When The Feed Dogs Stop
The moment the feed dogs stopped pulling, I knew it was done. I stopped sewing, lifted the presser foot, and snipped my threads neatly.
Looking down at the fabric, I had my first automatic buttonhole staring back at me—clean, even, and surprisingly professional.
Reset the Lever Before the Next One!
One last thing I almost forgot—resetting the lever before making another buttonhole.
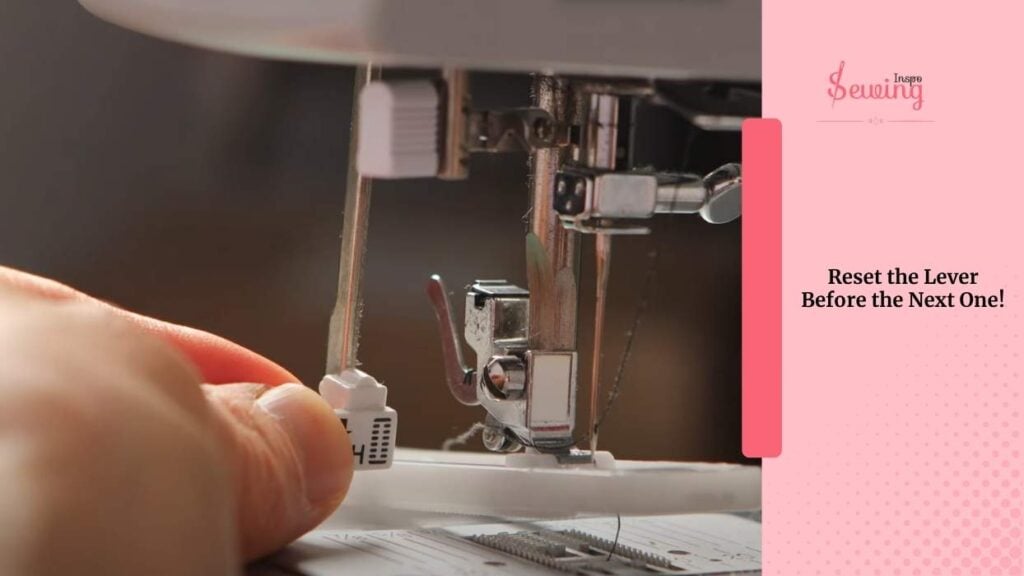
I reached behind the needle again, pulled the buttonhole lever down and pushed it back until it clicked, ready for the next one.
And done!
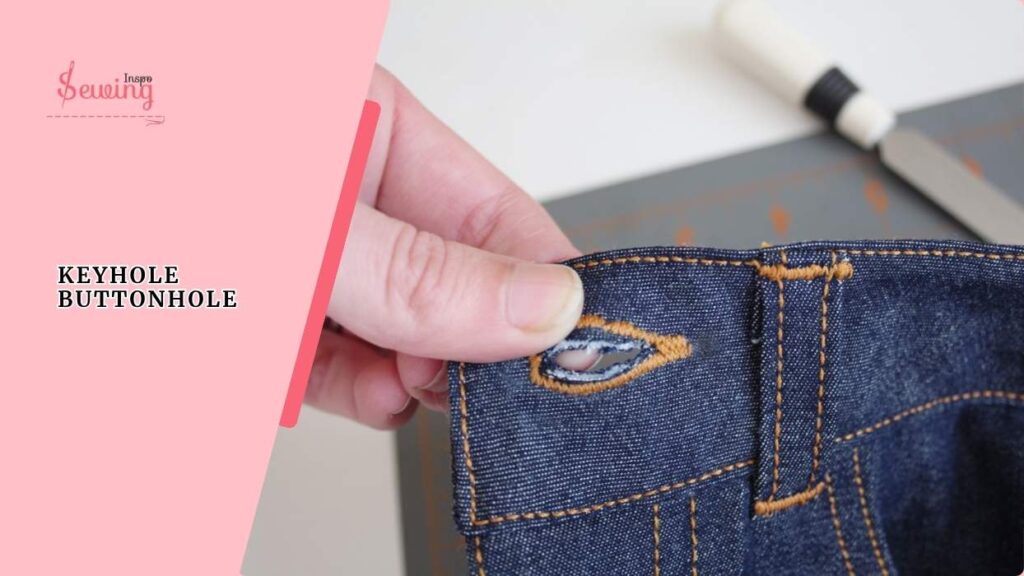
Keyhole Buttonhole Sewing Machine
A keyhole buttonhole stitch is a type of buttonhole with a rounded end on one side, resembling a keyhole shape. Here is how you can do it-
- Attach the buttonhole foot to machine.
- Adjust slider to match button size.
- Align fabric with red crosshairs on foot.
- Ensure foot is flat and locked down.
- Slide the fabric under your foot, aligning the marks with the crosshairs.
- Use laser or guide light if available.
- Double-check fabric is flat and the foot is positioned correctly.
- Choose keyhole buttonhole stitch from the machine menu.
- The machine sets the stitch width and sequence automatically.
- Press the green start/stop button or use the foot pedal.
- The machine sews one side, creates the rounded bar tack, then sews the other side and finishes with a flat bar tack.
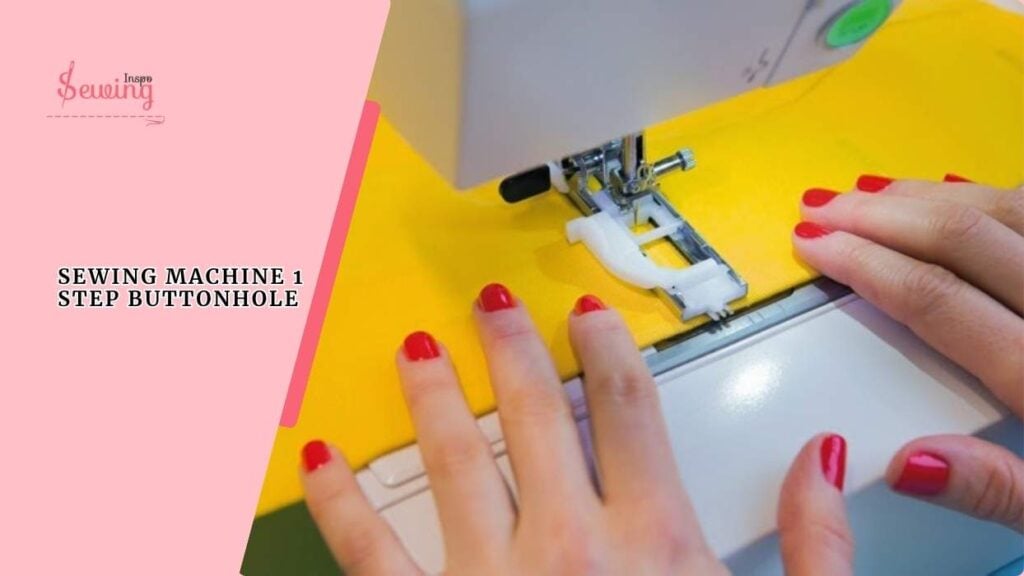
1 Step Buttonhole Stitch
A 1-step buttonhole is a built-in feature on most modern sewing machines. Once you place the button in the buttonhole foot, the machine uses a sensor or lever to measure the size. Here is how it works-
- Set the Button: Adjust the slider on the buttonhole foot to match your button size.
- Attach Foot & Thread Machine: Snap on the buttonhole foot and make sure top and bobbin threads are ready.
- Mark Fabric: Mark where the buttonhole should start and align under the foot.
- Pull Lever & Sew: Lower the buttonhole lever and press the pedal—machine does the stitching automatically.
- Finish & Open: Cut threads and carefully open the buttonhole with a seam ripper or buttonhole cutter.
Frequently Asked Questions
Is blanket stitch the same as buttonhole stitch?
They look super similar—and technically, they are the same family of stitches. But here’s the difference. The blanket stitch is usually used decoratively, such as along the edges of blankets or in felt appliqué. The buttonhole stitch is denser and tighter, designed to reinforce the edge. So, same technique, just different jobs.
What is another name for the buttonhole stitch?
You might hear it called the blanket stitch (especially in hand embroidery), but when it’s specifically used to sew functional buttonholes, it’s best known as the buttonhole stitch. Some also call it a whip stitch variation in older sewing books.
Is there a sewing machine that just does buttonholes?
Yes! There are industrial buttonhole machines made just for sewing buttonholes—fast, consistent, and perfect for factories. For home sewing, though, most modern sewing machines come with a built-in buttonhole function, or you can attach a buttonholer if your machine is older.
What stitch is best for a buttonhole?
The best stitch is a tight zigzag stitch, also known as a satin stitch, because it covers the raw edges neatly and holds up to wear. If you’re doing it by hand, the classic buttonhole stitch (or a tight blanket stitch) works beautifully.
Final Thought
Doing buttonholes used to sound intimidating. But after learning from Grandma (and letting the machine do its magic), it’s actually kinda fun—and weirdly satisfying to watch! If you’re a beginner, take it slow, test first, and don’t forget to enjoy the process.


Leave a Reply