
Cross stitching is kind of a complex stitch among types of stitches embroidery. So you can’t do it in any kind of fabric. Cause the x effect is pretty strong and it needs a strong fabric to hold on in it.
And 5 types of cross stitching fabric can actually hold this stitch well. For intense,
- Aida
- Evenweave
- Linen Cross
- Waste Canvas
- Plastic Canvas
Ok, but why? And which one is best for all kinds of cross stitch patterns? I know your confession. That’s why I document the whole fabric thing in my POV.
At a glance:
- Evenweave is my favorite fabric for this stitch.
- You can cross stitch any fabric, but not all of it suits it.
- Fabric count matters a lot when cross stitching.
- 14-count cross stitch fabric is another of the best fabrics for cross stitch.

Table of Contents
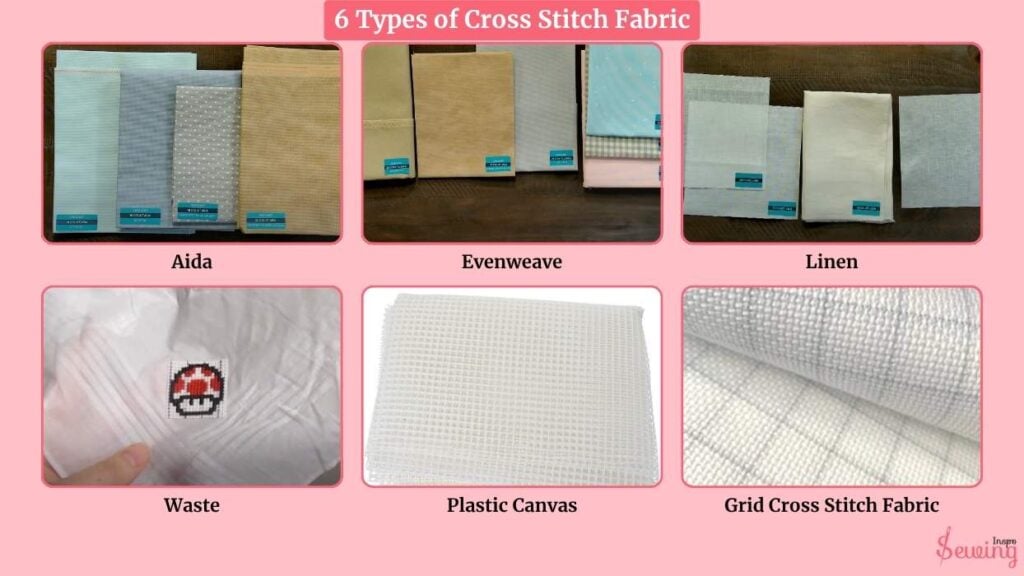
6 Types Of Cross Stitch Fabric
See, just like without the right thread and right needle. You can’t do a perfect cross stitch project. Like that, you need the right fabric to hold all the designs together perfectly and long enough.
- Aida
- Evenweave
- Linen
- Waste
- Plastic Canvas
- grid cross stitch fabric
Aida Cross Stitch Fabric
Aida cloth, also known as Java canvas, is a lightweight, open-weave cotton fabric designed explicitly. It fits perfectly on cross stitch materials. Thanks to its natural mesh-like structure, stitching on it is a breeze. Its stiffness means you often don’t need an embroidery hoop.
Why it’s so suitable for this stitch? Well,
Aida is woven with evenly spaced holes. It makes it easy to guide your stitches.
For example,

A 10-count Aida cloth has 10 squares per inch. The most common counts range from 7 to 20, with lower counts with larger holes and higher counts with finer details. It’s available in pre-cut sheets or bolts, typically between 40″ and 60″ wide, at most craft stores.
It offers a wide range of options to choose from. This fabric won’t even let cross stitch fraying.
Also, it’s a fan favourite cause this fabric is easy to wash. To clean your cross stitch, simply wash it gently in lukewarm water with mild soap, rinse it carefully, and lay it flat to air dry.
Another Alternative Fabric Stamped Cross Stitch
If you want to avoid the costly Aida fabric. Then use this stamped cross stitch. Stamped cross-stitch kits have the design already printed on the fabric. There is no need to spend hours reading charts or counting stitches.
The design is stamped right there on the fabric with ink, and all you have to do is follow the colors in the kit and stitch over the printed lines.

Evenweave
It’s softer than Aida and has an even thread count in both directions—hence the name! Unlike Aida’s visible square holes, Evenweave has a finer weave (usually 22 to 32 count), which makes it perfect for more intricate designs.

I especially love using it for Junimo cross stitch,
It handles all those little curves and details well. Since it doesn’t have pre-punched holes, it takes a bit of practice, but it’s totally worth it.
One of the best parts? You can stitch fractional stitches way easier, and if you stitch “over two,” it mimics Aida’s look but with a cleaner finish. It’s also great for outlining—everything just looks crisper.
Linen Cross Stitching Fabric
Now, linen is a little trickier to work with than Aida or evenweave. The threads aren’t all perfectly uniform, so you might run into some variation in thickness.
But honestly?
That’s part of the charm. It gives your piece character.
The cool thing is, linen usually comes in higher thread counts, 8 to 40 count. That means the holes are smaller and closer together.
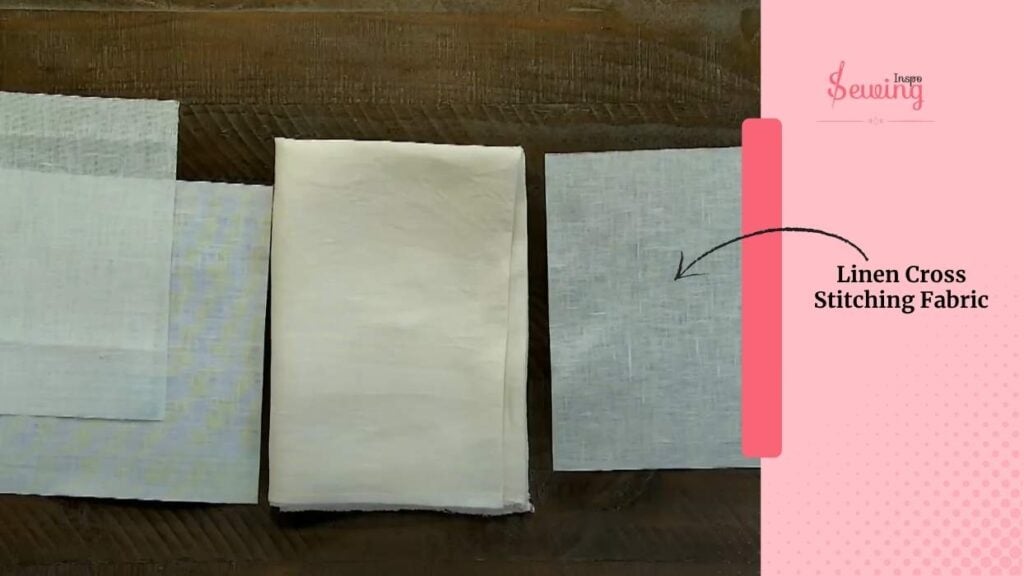
Most stitchers (including me!) work “over two threads,” which essentially yields the same size stitches as on 14-count Aida, but with a much more delicate appearance.
And the color and feel for a sec—linen has this soft, natural drape and comes in gorgeous, earthy tones. It’s perfect for vintage-style samplers, heirloom projects.
Once you get the hang of it, linen’s kind of addictive.
Waste Canvas Cross Stitching Fabric
Ever wanted to cross-stitch on a t-shirt, denim jacket, or even a tote bag? That’s exactly what waste canvas is made for, and honestly.
I love using it for personalizing gifts or stitching wedding patterns on fabric that generally wouldn’t work for cross-stitch.
Waste canvas resembles Aida—it’s stiff and gridded with evenly spaced threads. You simply baste it onto your fabric and stitch your design as usual.

Then comes the fun part:
You dampen the canvas and pull the threads out one by one. Like magic, only your beautiful stitching stays behind!
It usually comes in 8.5, 10, 12, or 14 count, so you’ve options depending on the level of detail in your project. I’ve even used it for bead cross stitches, and it works like a charm.
Plastic Canvas
Plastic canvas is seriously underrated—I love using it, especially for fun projects like stoney creek cross stitch.
It’s a stiff, grid-like material made from lightweight plastic, which means no embroidery hoop is needed. It holds its shape all on its own. That’s why it’s perfect for items like coasters, ornaments, bookmarks, or even 3D designs.

Just like Aida, it comes in different mesh sizes—5, 7, 10, and 14 count are the most common. Lower counts have bigger holes for chunky yarns, while higher counts work great with finer threads.
One thing I really appreciate?
It doesn’t stretch or shrink. So once you stitch something, it stays exactly how you made it—no wonky fabric or puckering. It’s super beginner-friendly and ideal when you want something sturdy and long-lasting.
Grid Cross Stitch Fabric
This is one of the easiest fabrics to work with for cross-stitch. The grid lines are usually marked every 10 stitches. It helps me stay on track, especially with large & complicated patterns like counted cross stitch material.
I can spot exactly where I am without constantly double-checking the chart. It’s like having built-in training wheels, but in the best way.
I mainly go for pre-gridded Aida. It’s easy to find, and the lines wash out with water once I’m done stitching. I love how it makes complex projects feel so much more manageable, and I can stitch faster without second-guessing every section.

Honestly, once I started using gridded fabric, I couldn’t imagine going back to plain aida.
Frequently Asked Questions
Why does some fabric make cross stitching harder?
Tighter weaves (like linen) or slippery fabrics (like satin) don’t have obvious holes, making it harder to count stitches and guide the needle.
Does cross stitch fabric need to be washed before stitching?
Aida shouldn’t be washed beforehand as it can shrink. Evenweave and linen can be pre-washed if they feel stiff or dusty.
How do I stop Aida fabric from fraying?
You can use masking tape, fray check, or hem the edges with a zigzag stitch to prevent fraying.
Can I use embroidery fabric for cross stitch?
Some embroidery fabrics work, but they don’t always have the grid-like structure of Aida, making stitching more challenging.
Conclusion
So yes, I like to use evenweave fabric as cross stitching fabric cause the wavy effect makes it easier for me to stitch. I don’t have to struggle or spend so much time here. So, if you are looking for a faster way to cross stitch, then use this fabric.
So, what’s your favorite type of cross-stitching fabric? Let sewinginspo know.


Leave a Reply