
So there I was, staring at my canvas as if it had just insulted my stitching skills. 😤 I wanted to try something classic tent stitch. However, after a few wobbly attempts, it became clear that I needed backup.
Cue a call to the expert herself—grandma. She chuckled (like she knew I’d mess it up) and said,
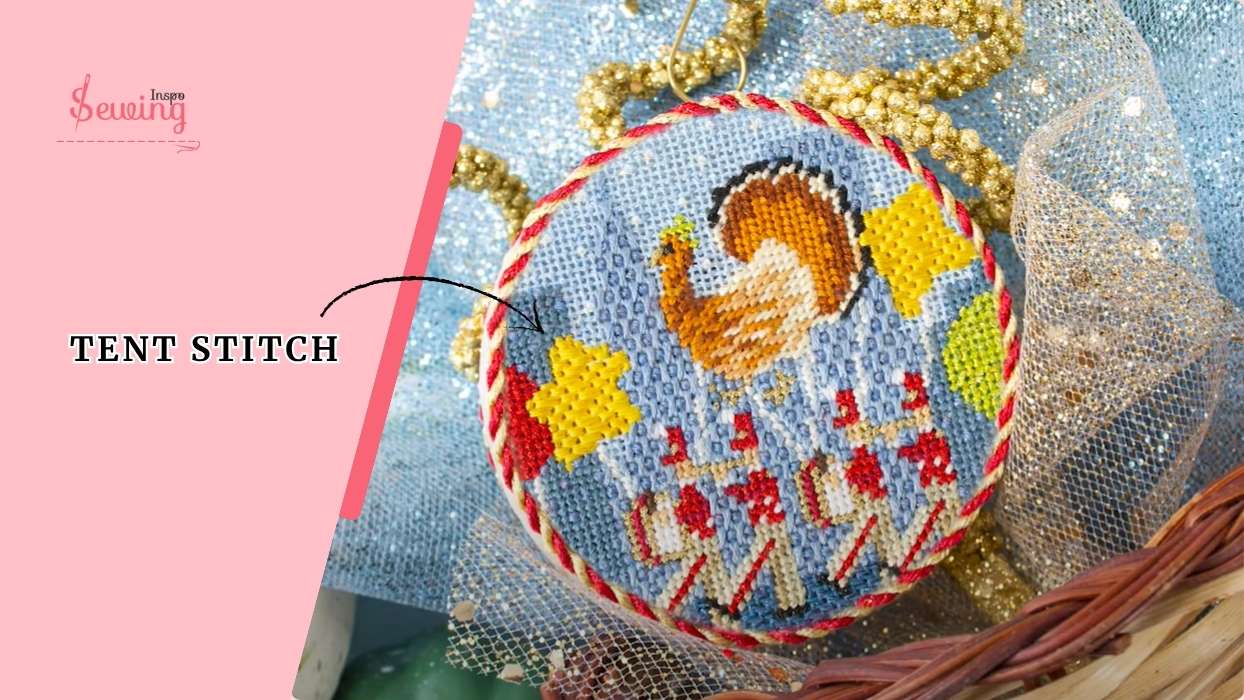
Tent Stitch
To tent stitch, simply bring your needle up through the canvas, make a diagonal stitch over one intersection, and repeat across your design.
Okay, sounds doable and easy. But is it the reality? I had to do it to make sure. So I tried needlepoint tent stitch of my own.
What You Will Learn on tent stitch needlepoint::
- Use mono canvas for tent stitch.
- Insert the needle diagonally from bottom left to top right.
- Move to the next hole directly to the right and repeat the diagonal stitch.
- Stitch across the row with each stitch slanting at a 45-degree angle.
Table of Contents
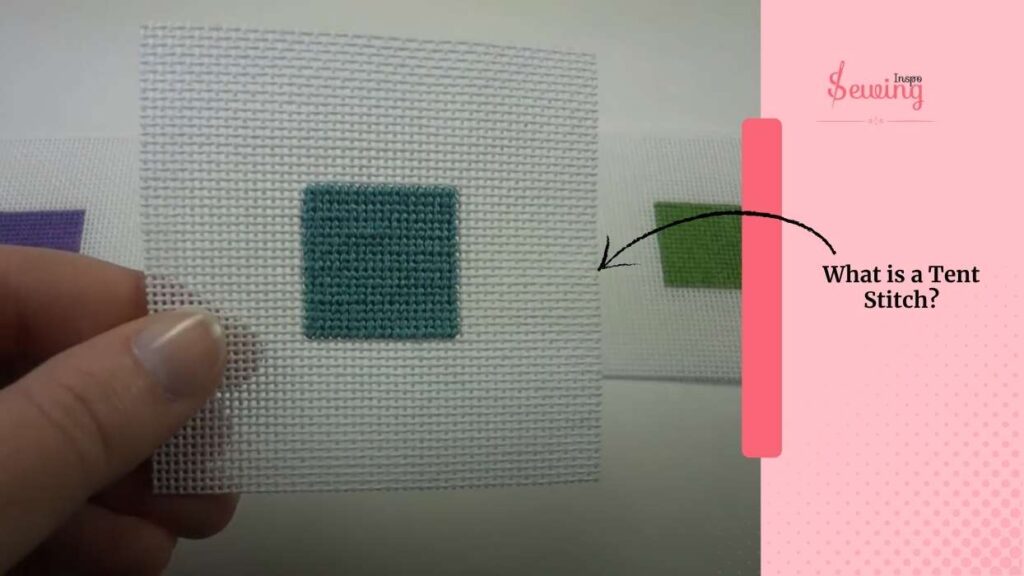
What Is A Tent Stitch?
A tent stitch is basically a half cross stitch. That’s why it’s sometimes called tent stitch cross stitch. It’s a small, diagonal stitch that covers one intersection of the canvas. It is simple, clean, and perfect for creating detailed designs or filling in large areas. That’s why tent stitch is mostly used in needlepoint.
Fun fact is there are 4 different ways to do it also,
- Basketweave tent stitch
- Half cross tent stitch
- Mosaic stitch
- Cashmere stitch
If you see type of stitches with pictures then you will definitely find this stitch interesting. All of them are truly interesting, I assure you. But among them, my favourite is the half-cross one. Cause it’s quick and easy like blind stitch.
Tent Stitch Embroidery
This stitch is perfect for embroidery. It looks great with embroidery work. Here, have a look at some embroidery. This makes the perfect embroidery stitch.

Let’s Do Tent Stitch Needlepoint
After the short session with grandma, I decided to give it a try. So to do tent stitch you just need to follow 6 steps,

I Grab A Mono Canvas
Now, there are several types of needlepoint canvas, but for this project, I chose mono canvas. Why? Because it’s got evenly woven vertical and horizontal threads. And it comes in various mesh sizes—like 10, 12, 13, 14, even 18.

And apparently, if you want something fancy, then you can go up to 56 mesh if you’re feeling fancy.

Needlepoint Kit
If you don’t wanna go through the hassle of selecting the right canvas, then just get a kit.
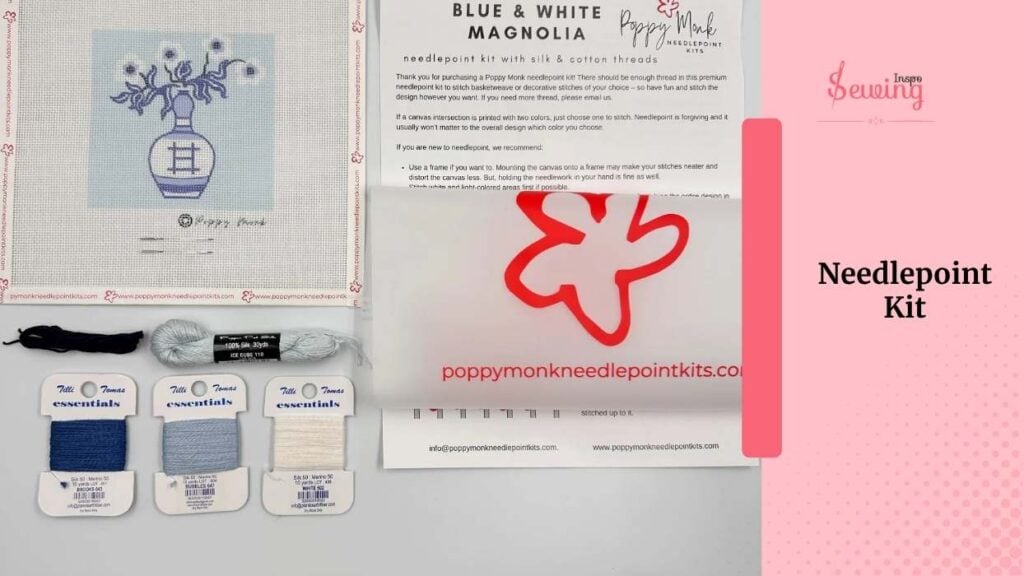
A needlepoint kit is a ready-to-use package that includes everything needed to complete a needlepoint project. It typically consists of a canvas with a printed design, threads (often made from wool or cotton), a needle, and instructions. Ideal for beginners or hobbyists seeking a relaxing for tent stitcher.
Bring The Needle Up Through The Canvas
So, I started by holding my mono canvas. Alternatively, you can use a frame or hoop for extra control. With my needle threaded and ready, I flipped the canvas over to locate my starting point, which was the bottom left corner, where I wanted the very first stitch.
Now,
I gently brought the needle up from the back of the canvas, sliding it right through the hole at that bottom left intersection.

This is the starting point in the correct corner, ensuring that all your stitches remain consistent in direction and tension.
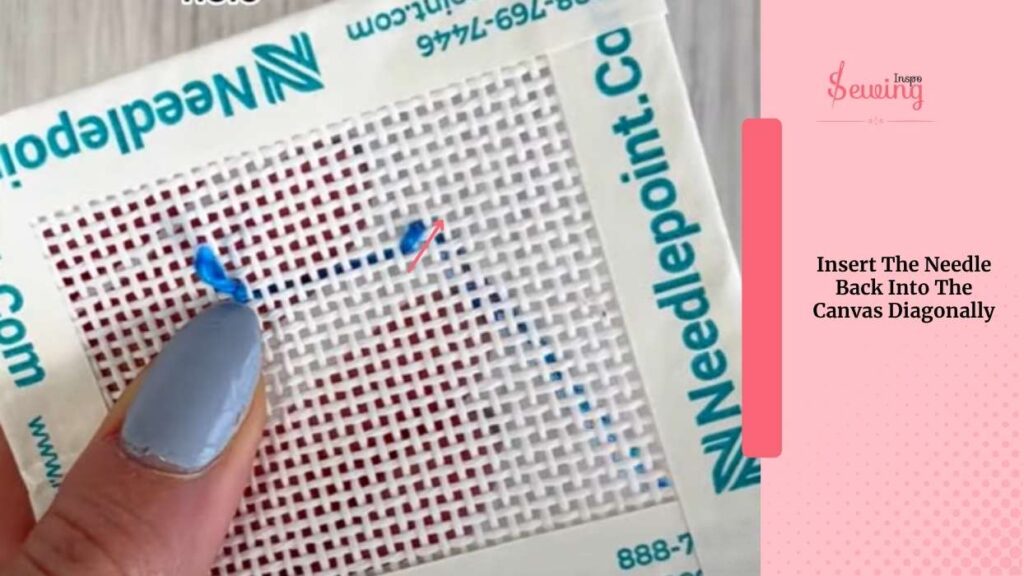
Insert The Needle Back Into The Canvas Diagonally
To make the tent stitch, insert the needle diagonally back into the canvas, slanting from the bottom left to the top right. Pull the waxed thread through to the back. That’s the entry for the tent stitch.
Move The Needle To The Next Hole
Once I had that first stitch in place, I moved my needle directly to the next hole on the right—nice and easy, no jumping around. I brought the needle up from the back again. Just like before, keeping my tension smooth and steady.
Now for the next stitch,
I made the same diagonal move from bottom left to top right, crossing over one intersection on the canvas. It felt like doing an overcast stitch by hand, except more geometric and satisfying due to the even-weave grid.

Repeat This Stitch By Stitch
I kept repeating this—stitch by stitch—always moving one hole over to the right, then making that familiar diagonal at a 45-degree angle. I ensured that my stitches were even in size and spacing, just like saddle stitch.
I keep checking every few moves to ensure I’m not pulling too tight or getting the angle off. This will create the best hand stitch for seams.

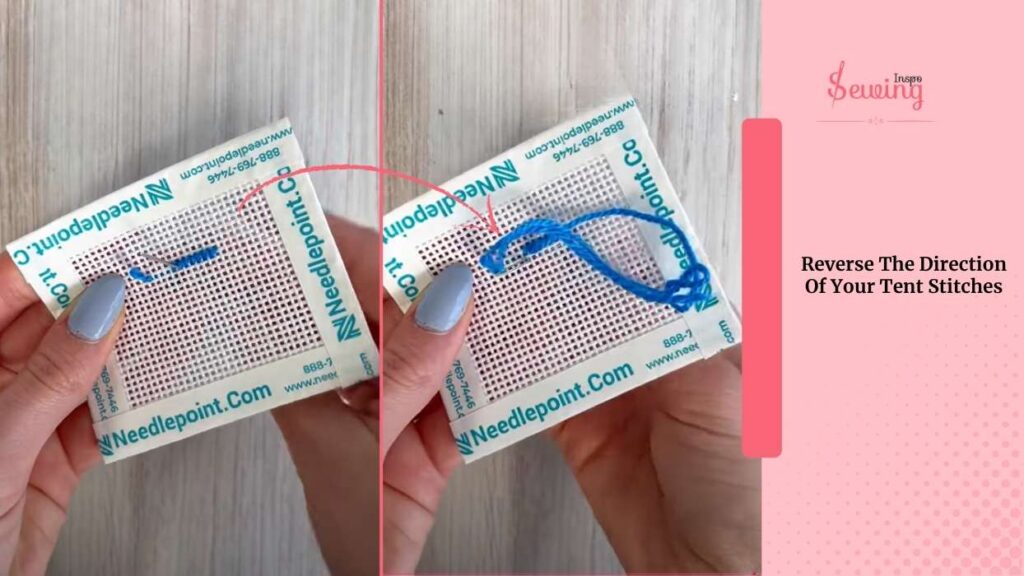
Reverse The Direction Of Your Tent Stitches
When you reach the end of the row and need to work the next row from left to right, reverse the direction of your stitches. This means you will make each stitch in canvaswork from the top right to the bottom left.
Again, maintain the same angle and spacing, ensuring that the thread still forms a diagonal stitch across 2 threads on the back of the canvas.
When you are done, cut the excuse thread. You got a beautiful tent stitch.
Tent Stitch Diagram
Here is a diagram illustrating what I just discussed.

Tent Stitch Embroidery Designs
Want to try tent stitch? But don’t know where to begin? No worries, try this embroidery design.

Frequently Asked Questions
What Is The Tent Stitch Used For In Needlepoint?
The Tent Stitch is primarily used for covering large areas of a needlepoint canvas. It creates a dense, smooth, and even surface, making it ideal for backgrounds, borders, and detailed areas in needlepoint projects.
How Does The Continental Tent Stitch Differ From Other Variations Of The Tent Stitch?
The Continental Tent Stitch involves making diagonal stitches from the bottom left to the top right corner of each canvas square, working from left to right. This method provides better coverage on the back of the canvas, uses less canvas thread compared to the Basketweave Tent Stitch, and is faster to execute than the Half-Cross Stitch.
What Type Of Thread Works Best For The Tent Stitch?
Perle cotton, wool, and silk threads are commonly used for the Tent Stitch due to their durability and ability to provide good coverage. The choice of thread depends on the desired texture and finish of the needlepoint project.
Now It’s Your Time To Tent Stitch
So, I teach you how to tent stitch.
Now do your try it out on your own.
And share the stitch picture with sewinginspo.


Leave a Reply