
That day I was doing some stitching, but I wouldn’t attach 2 pieces of fabric quite well. So, I went and asked my grandma what to do.
She said you need to do padded satin stitch here. I asked how to pad stitch?
She explained-
Pad Stitch
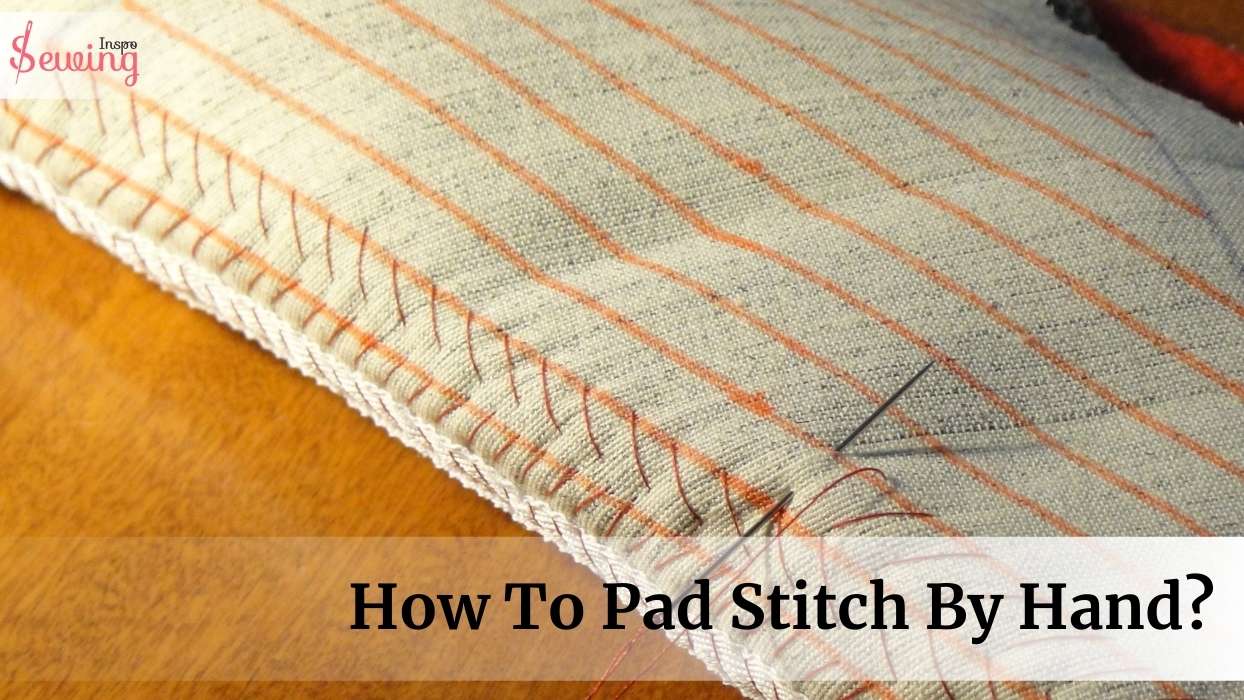
To pad stitch, simply sew small, even stitches through both layers of fabric to secure the layers together, typically used in tailoring to shape collars and lapels.
But that’s not the full picture. Let’s give you a full picture pad hand stitch.
At A Glance:
- Use an 8-size needle for pad stitching.
- Silk thread is recommended for pad stitching.
- Stitch diagonally in a diagonal shape.
- Match stitch length to the distance between rows for consistency.
Table of Contents
What Is Pad Stitching?
Pad stitching is a diagonal version of a basting stitch.
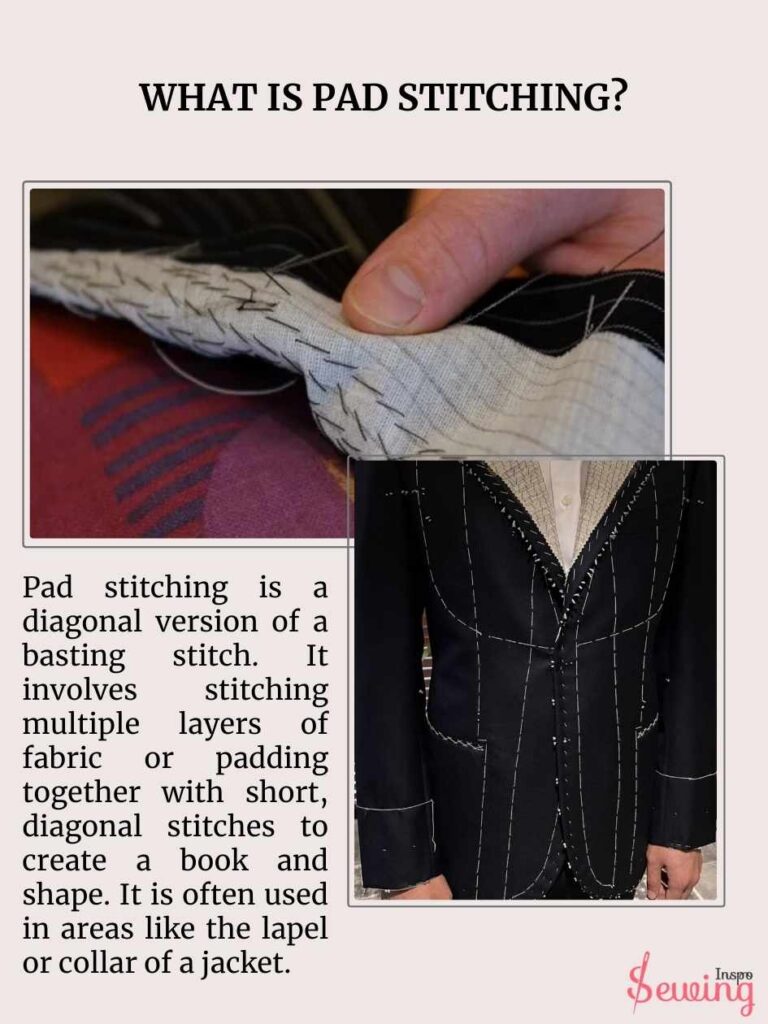
It involves stitching multiple layers of fabric or padding together with short, diagonal stitches to create a book and shape. Pad stitching is often used in areas like the lapel or collar of a jacket. Whenever you attach something, do pad stitching. That’s what is pad stitching.
This isn’t one of the strong hand stitch but it still works one of the basic among 7 basic hand stitches.
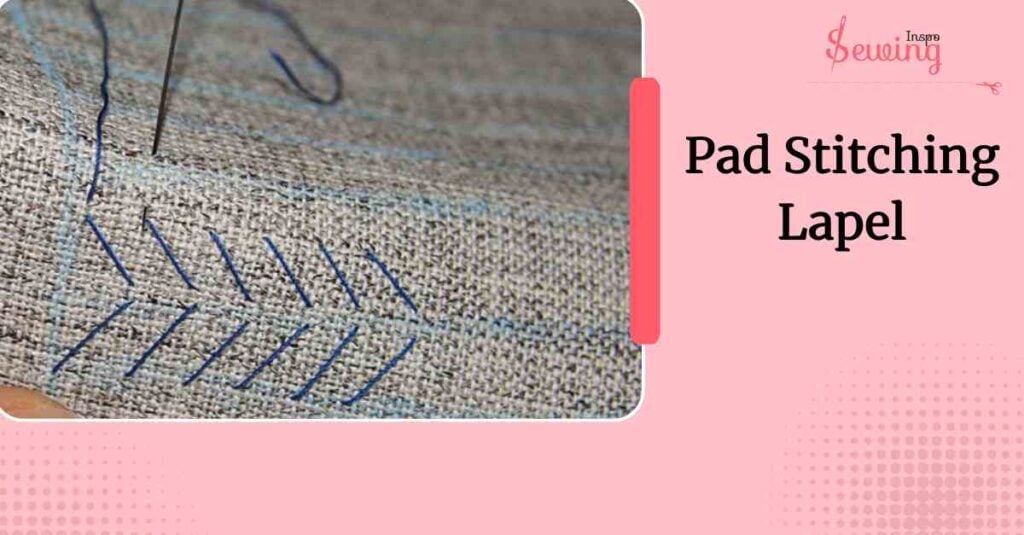
Pad Stitching Lapel
Pad stitching involves sewing a series of small, diagonal stitches through the lapel fabric and the interfacing underneath.
These stitches aren’t meant to be seen from the outside. They’re hidden. But they act like tiny “hinges” that help the lapel bend, curve, and naturally roll toward the chest.
When done right, pad stitching gives three big benefits:
- It adds structure and body to the lapel.
- It controls the roll line so the lapel sits exactly where you want it.
- It helps the garment keep its shape even after years of wear.
To do it, you hold the lapel in a gently curved position and stitch small angled stitches from one side to the other, following the roll line. The more curved you hold the lapel while stitching, the better the final roll looks.
Even though it’s a slow, hand-done process, pad stitching is one of the secrets behind a beautifully tailored jacket.
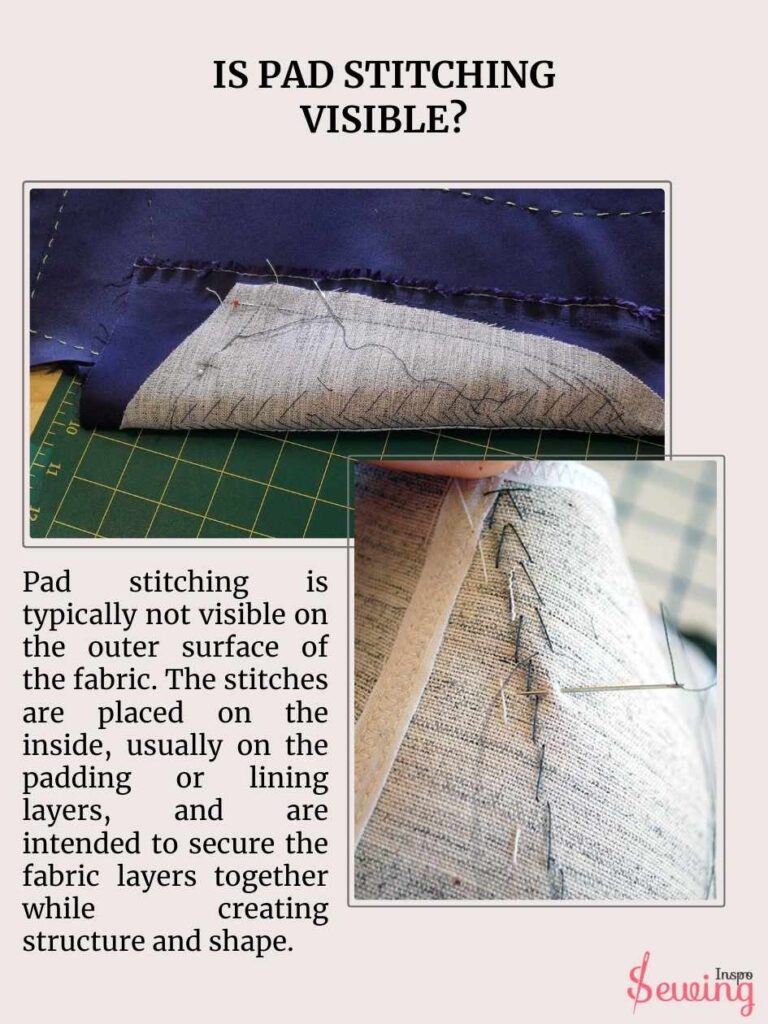
Is Pad Stitching Visible?
Pad stitching is typically not visible on the outer surface of the fabric.
The stitches are placed on the inside, usually on the padding or lining layers, and are intended to secure the fabric layers together while creating structure and shape.The most visible pad stitch is pad stitching lapel.
The stitching is generally done in a way that it remains hidden like Catch Stitch. It ensures a smooth, clean look on the exterior of the garment. However, sometimes, very fine stitches may be slightly visible along the edge, but they should not detract from the overall appearance.
What Is The Purpose Of A Pad Stitch?
The purpose of a padded stitch is to provide structure and shape to a garment by joining layers of fabric together, typically in areas like collars, lapels, and jacket fronts. This hand-sewing technique helps maintain these areas’ desired shape while adding stability and support. Just like tacking stitch do!
Pad stitching allows the fabric to roll and mold smoothly, creating tailored details and ensuring the garment retains its form over time.
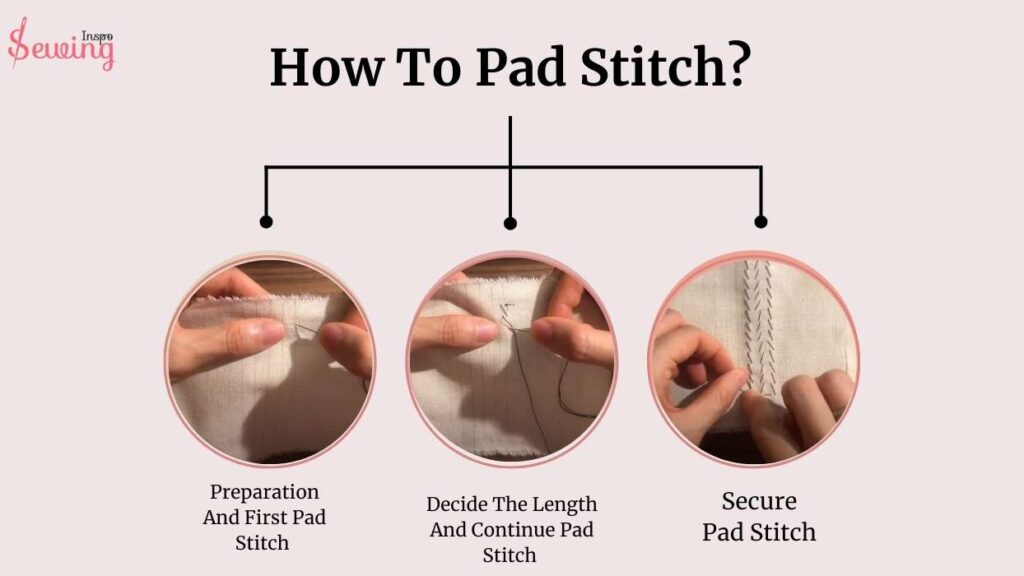
How To Pad Stitch? Easy Pad Stitching Tutorial
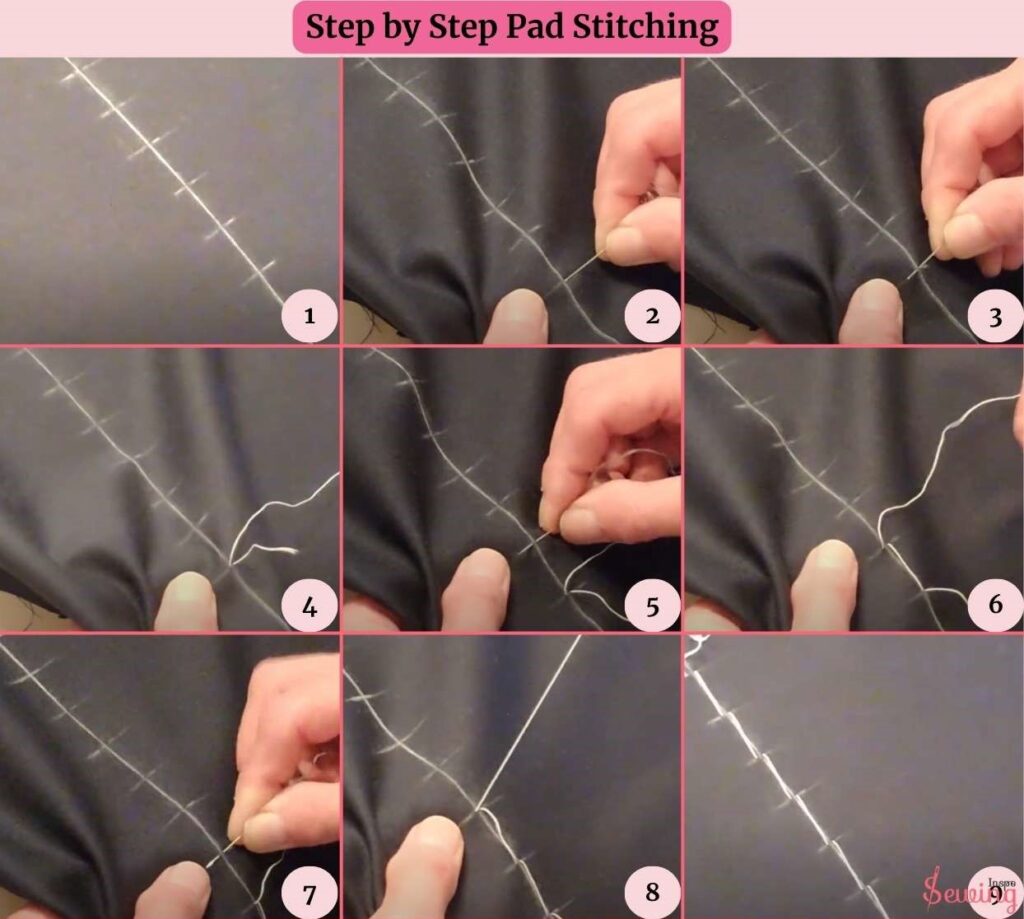
To do the pad stitch, you just need to follow 3 steps. As in;
- Preparation And First Pad Stitch
- Decide The Length And Continue Pad Stitch
- Secure Pad Stitch
Now let’s start padding stitch. Let me teach you how to pad stitch easily.
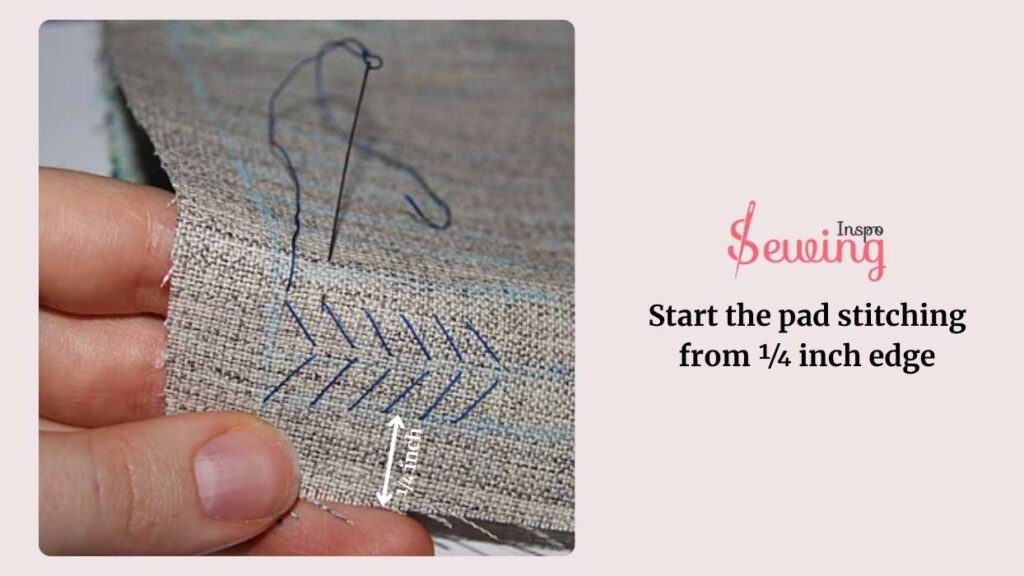
How To Start A Pad Stitch
To start the pad stitch, gather 2 fabrics together. Then mark a line! You can do this while doing pick stitch too. Grab a needle and thread. And start the stitch, thread the needle, and make a knot at the end. And start the pad stitching from ¼ inch edge. This means the invisible stitches are 1/4″ long and 1/4″ wide.
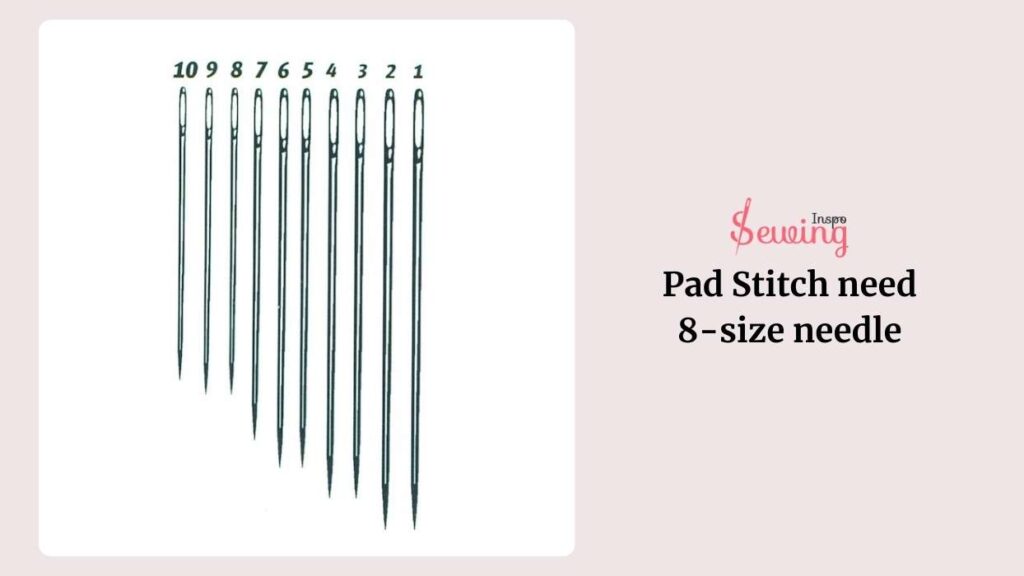
-What size needle should i use for Pad Stitch?
For pad stitch, I normally use an 8-size needle for stitch pad. You can use it for pad stitching a lapel, too.
Length Of Pad Stitch
The length of pad stitches can vary greatly, from tiny millimeters to as long as 3/4 of an inch or even more. I use those length for overcast stitch too.

It all depends on denser stitches. You can even do chain stitch padding; it all depends on you. But wait wait! ¾ inch isn’t the only length of stitch,even for a pad stitching collar.
You can customize the length of the pad stitch. Here are a few stitches you can work on:
Here’s grandma’s rule of thumb: if your rows of sewing stitches are 1/8 inch apart, try to make your stitches about 1/8 inch long too.

Now, make ¼ inch pad stitches in a diagonal shape. Keep repeating the process of padding stitch.
Secure Pad Stitch By Hand
To secure pad stitch, grab the last thread, align it with the fabric, and hold it with 1 finger. Then stitch over that thread first on the left and then right.
Then, go all the way down with the pad stitch, cut it at the extra part of the thread, and end the pad stitch.

That’s how to pad stitch.
A Beginner’s Guide to Pad Stitching
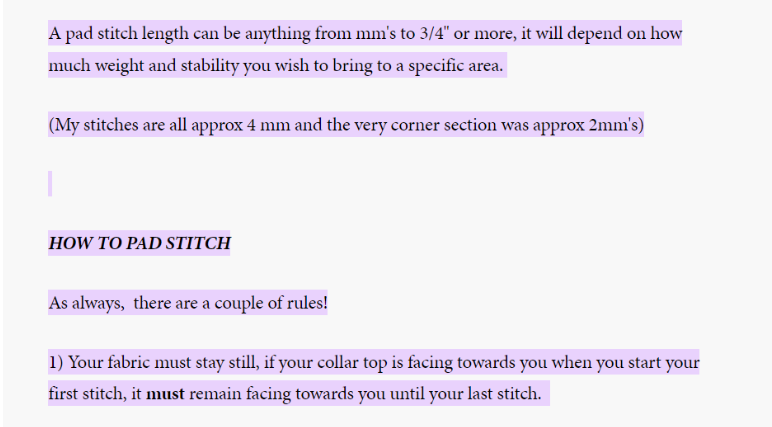
How To Pad Stitch A Lapel?
To pad stitch a lapel, start by placing the tape’s center along the marked roll line. Then, use a long stabstitch, whipstitch, or hemstitch to catch only the interfacing layer. Begin pad stitching at the roll line, holding the lapel firmly with your thumb, and roll it between your fingers.
Shape the layers over your hand, catching a bit of the outer fabric underneath. Control stitch depth by feeling with your finger, and space rows 1/4 to 1/2 inch apart. Avoid stitching into seam allowances. Pad stitching creates a V shape, stabilizing the layers of the stitch pad.
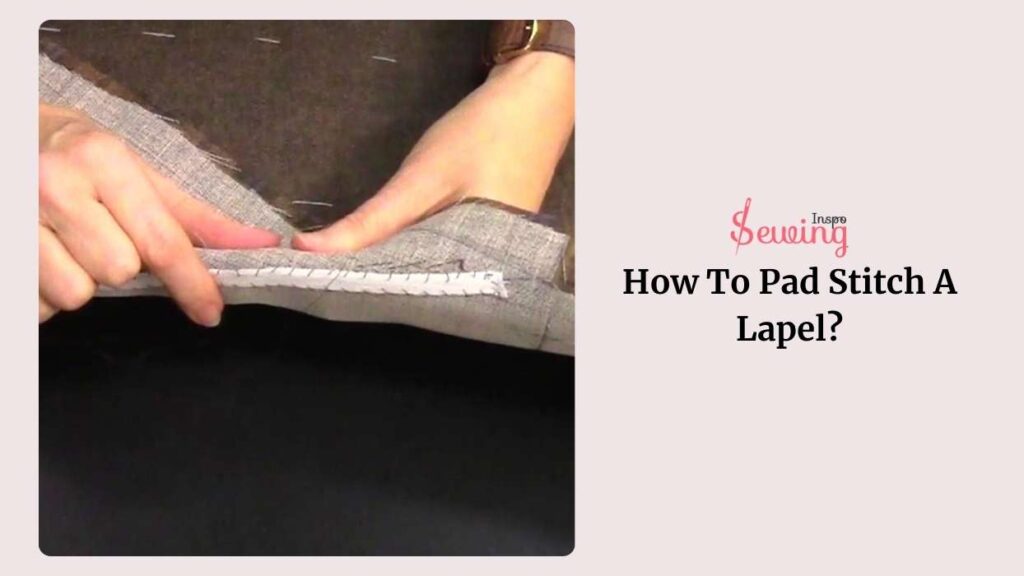
Is Padding Stitch Strong?
Yes, padding stitch is surprisingly strong. It is much stronger than it looks.
Even though the stitches are small and hand-sewn, they’re designed to hold the layers of fabric and interfacing together for years.
Pad stitching isn’t meant to take heavy stress like a seam, but it is meant to keep shape, support the lapel, and maintain structure. And it does that extremely well.
Because the stitches are tightly packed, slightly angled, and worked in a controlled pattern, they create a firm, stable foundation that keeps the lapel from collapsing or losing its roll.
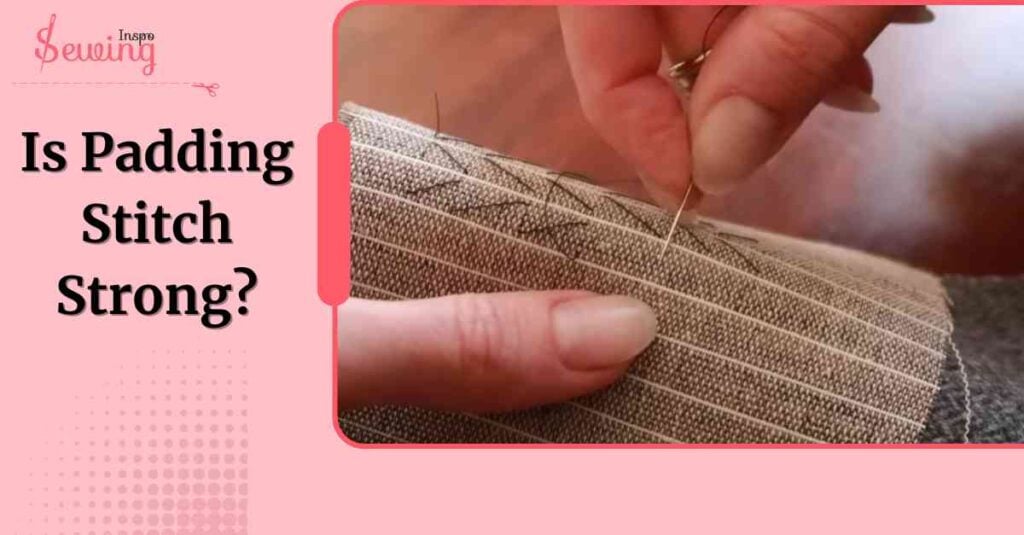
How To Pad Stitch A Collar?
To pad stitch for the collar, start by laying the hair canvas on top of the undercollar fabric and basting along the roll line. Pad stitch the stand with 1/4″straight stitches, rolling the fabric under the line. Pad stitching collar makes the perfect line.
Then, pad stitch the fall with 1/2″ stitches, ensuring they stay outside the seam allowances. Maintain consistent stitch distance and control depth by feeling with your finger. Be cautious not to pierce through the bottom layer.
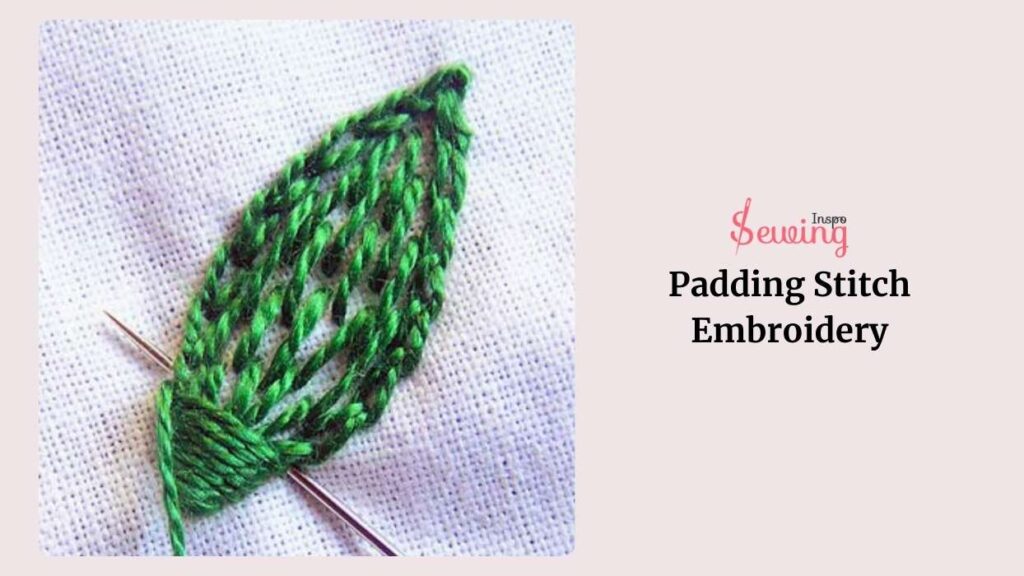
Padding Stitch Embroidery
Pad stitch is basic, but it can also be done with embroidery stitches. So, here is few of my layer of padding stitch embroidery work.
How To Pad Stitch A Collar?
To pad stitch a collar, follow these 5 steps:
- Cut your collar fabric and any necessary padding (such as wool or fusible interfacing). Place the padding under the collar fabric.
- Align the collar pieces and make sure the padding is correctly positioned under the fabric, ready for stitching.
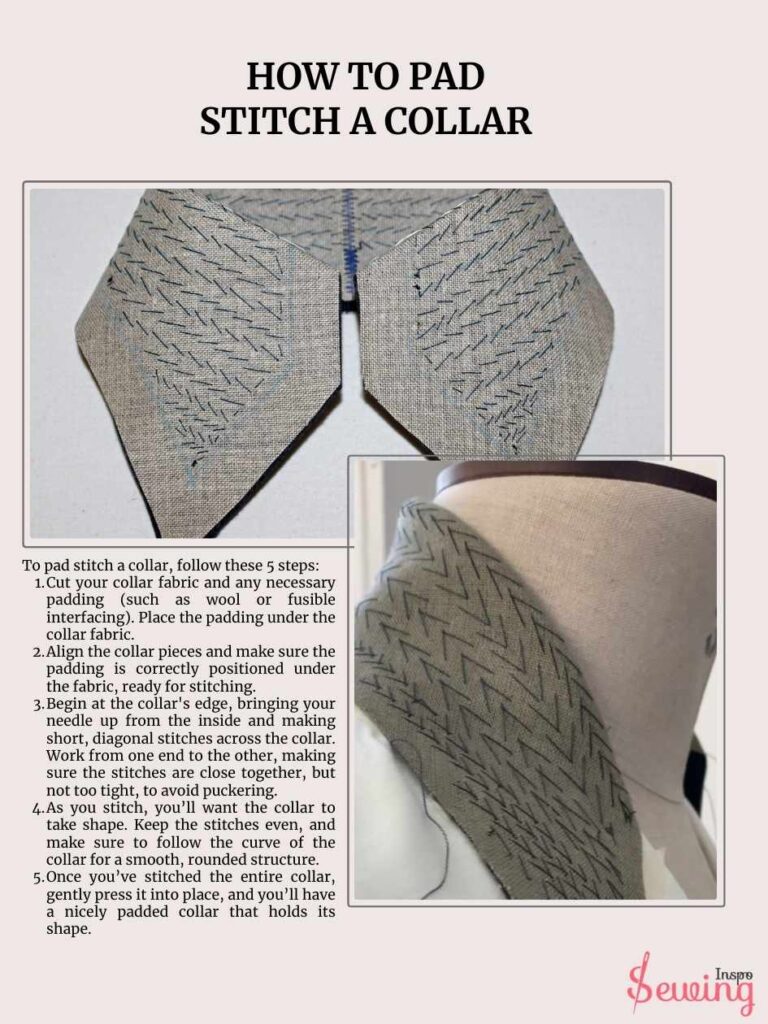
- Begin at the collar’s edge, bringing your needle up from the inside and making short, diagonal stitches across the collar. Work from one end to the other, making sure the stitches are close together, but not too tight, to avoid puckering.
- As you stitch, you’ll want the collar to take shape. Keep the stitches even, and make sure to follow the curve of the collar for a smooth, rounded structure.
- Once you’ve stitched the entire collar, gently press it into place, and you’ll have a nicely padded collar that holds its shape.
This technique gives the collar a firm, structured look, ideal for tailored garments like jackets or coats.
What Is The Best Thread For Pad Stitching?
The best thread for pad stitch is the silk thread. Silk thread is a popular choice because it’s strong, smooth, and flexible, gliding easily through the fabric and creating neat stitches. High-quality cotton thread is also a great option since it provides a firm hold and is sometimes easier to work with than silk.
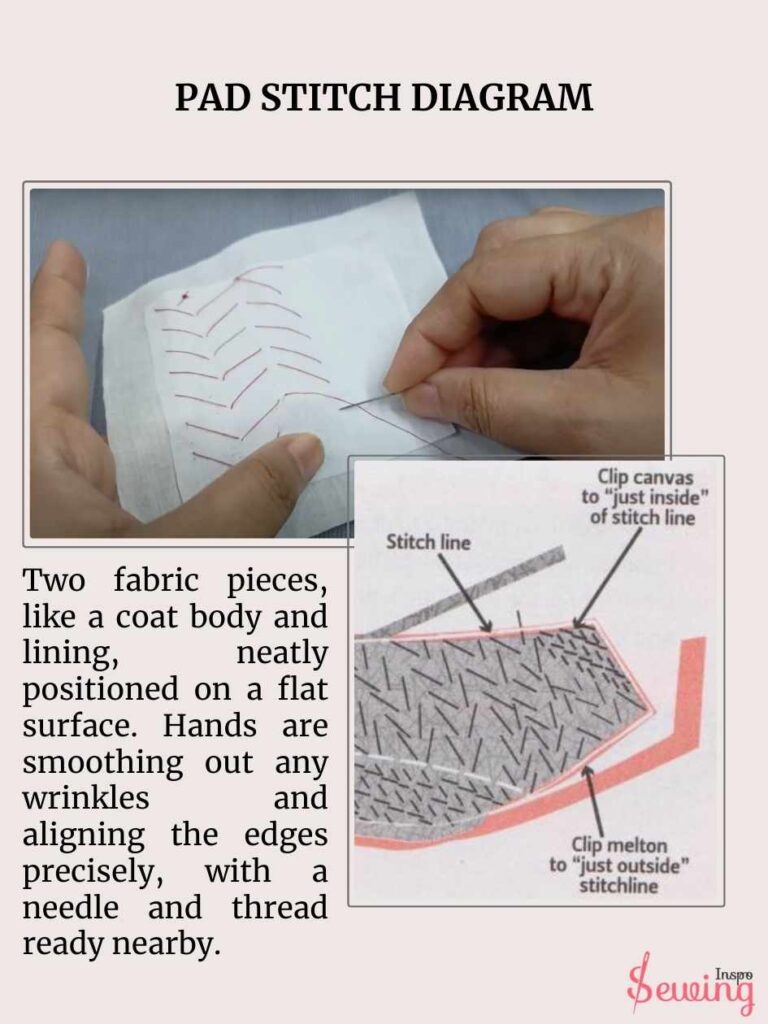
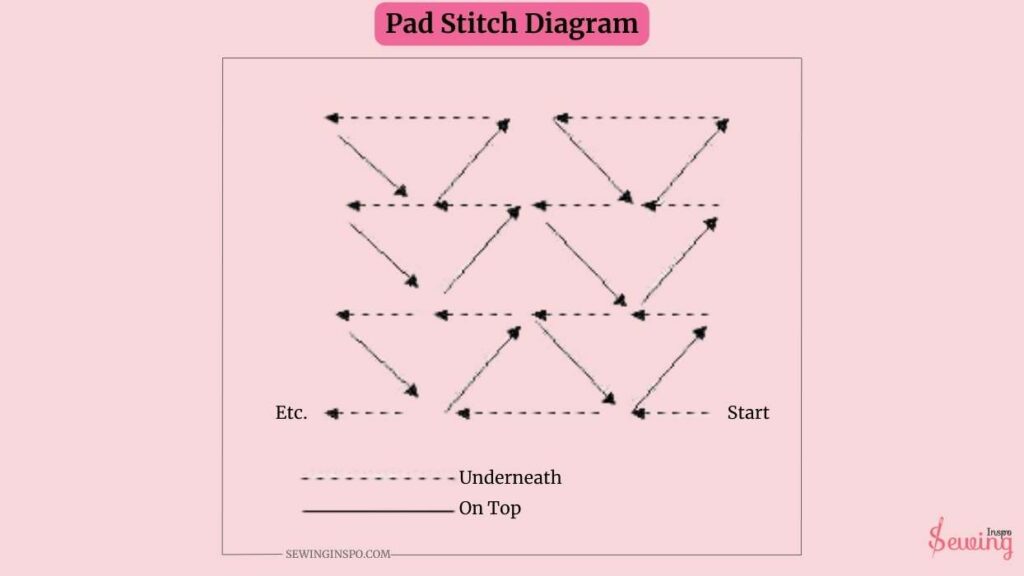
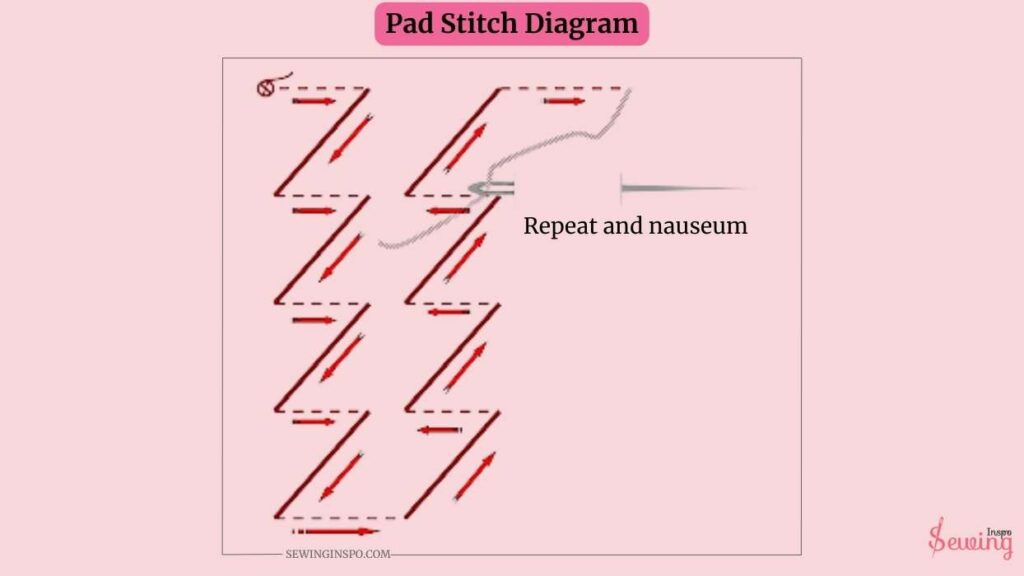
Pad Stitch Diagram
Here is a diagram form of the whole steps.
I think it will clear out the process more clearly-

Pad Stitching Patterns
Pad stitch is easy and invisible that’s why it is a fun stitch to work with. Here is few patterns I have done with it:
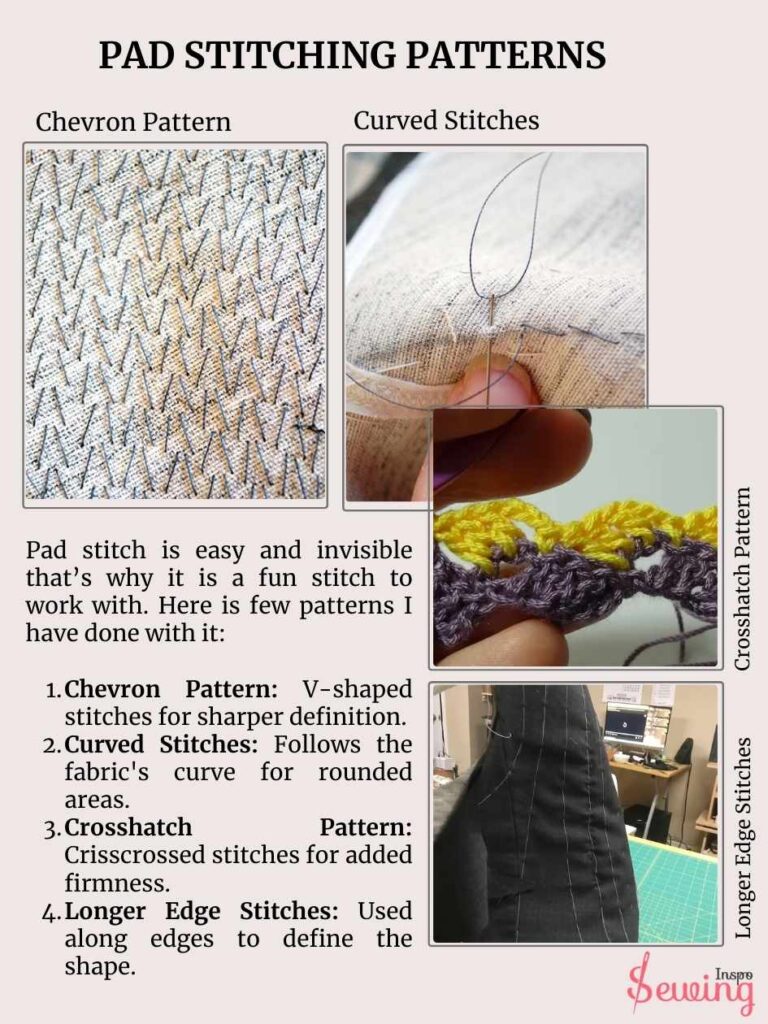
- Chevron Pattern: V-shaped stitches for sharper definition.
- Curved Stitches: Follows the fabric’s curve for rounded areas.
- Crosshatch Pattern: Crisscrossed stitches for added firmness.
- Longer Edge Stitches: Used along edges to define the shape.
These stitches are generally hidden inside the garment, providing structure without being visible.
Pad Stitching Pdf
A Pad Stitching PDF is your go-to guide for tailoring techniques. It walks you through how to create that structured, professional look by using pad stitching, which is perfect for areas like lapels and collars. So download it and save it for later-
Frequently Asked Questions(FAQ’s)
How Do I Choose The Right Thread For Pad Stitching?
Choosing the right thread for pad stitching depends on the fabric and the project. Silk thread is often preferred for its strength and flexibility. High-quality cotton thread is another good option, offering a firm hold. For heavier fabrics, polyester thread is strong and versatile. Buttonhole twist thread is also excellent for tailored garments due to its thickness and durability.
What Stitch Length Should I Use For Pad Stitching?
The stitch length for pad stitching should be relatively small, typically around 1/4 inch (6 mm) to 3/8 inch (10 mm). Smaller stitches provide better control and stability, ensuring that the layers of fabric are securely attached and the desired shape is maintained. Adjust the stitch length based on the thickness of the fabric and the specific requirements of your project.
Sum up
That’s how to pad stitch, do you understand now?
Yes, I do, grandma. Now I think I can do pad stitch wherever I want.
I will do some pad stitching and show you soon.
In the meantime, why don’t you share some of the pad stitch work?

Leave a Reply