
The lightning stitch is like a mini zigzag stitch, but it moves in a smooth, tilting motion that looks just like a little lightning bolt flashing across your fabric. That’s why it is also called lightning bolt stitch.
I love the way it looked, so I decided to learn how to do it. So I asked a machine stitch expert, and she gave me a little brief,
Lightning Stitch
To do a lightning stitch on your sewing machine, select the lightning bolt icon, use a ballpoint needle and polyester thread, and sew with gentle fabric guidance.
Wanna try? Let’s try lightning stitch sewing machine together.
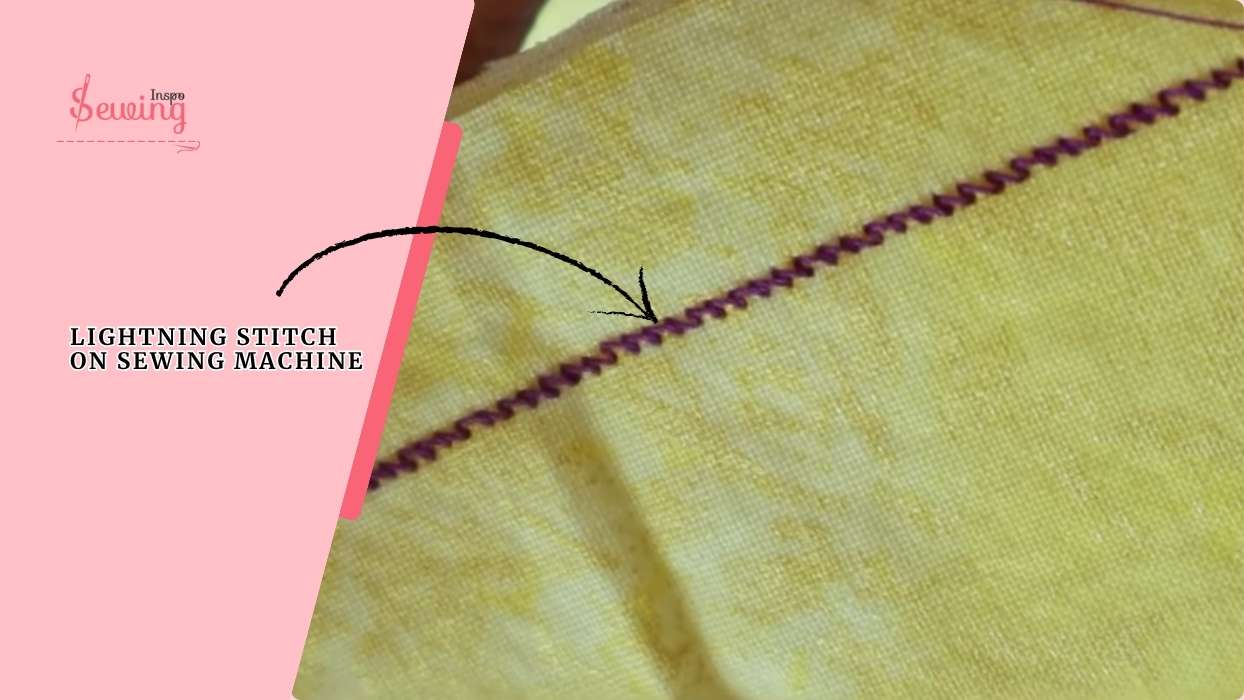
Table of Contents
What Is A Lightning Stitch On A Sewing Machine?
A lightning stitch is a type of stretch stitch on your sewing machine that resembles a narrow zigzag, resembling a lightning bolt. It’s made to move with stretchy fabrics, like knits. That’s why it is also called lightning bolt stitch.
So your seams don’t snap when sewing stretch fabric. It’s stronger and flatter than a basic zigzag. That’s why it’s ideal for seams on t-shirts, leggings, and other stretch garments like catch stitch.

How To Use Lightning Stitch On Sewing Machine?
To do a lightning stitch, follow 5 steps,

Setting up Lightning Stitch
I’m on a Brother CS6000i today and scrolling through the stitches. The lightning stitch typically resembles a squished or flattened zigzag. It’s shaped like a stretched-out S. Kind of like this: ⚡


On my machine, it’s stitch #6 is the lightning bolt stretch stitch.
If you’re not sure where it is, your machine manual will tell you exactly what the symbol looks like and how to set it. You can find it on a chainstitch machine, too.
The machine defaults the stitch length to about 2.5 mm and the width to 1–1.5 mm, which is perfect for stretch seams. However, if your fabric is extremely stretchy or thick, you can experiment with the settings. Sometimes i can experiment with sewing machine overlock stitch.
Just always test first! I always do. Even if I’m doing edge stitching.
Lay My Fabric Right Sides Together
Now I lay my fabric right sides together—this will be a shoulder seam on a sewing knit top. I smooth it out and pin every 2–3 inches using ballpoint pins. This helps a lot using embroidery chain stitch machine.
The key is not to stretch the fabric while pinning—let it lie naturally.

Mark My Seam Allowance
Then I mark my seam allowance—usually ⅝ inch or ½ inch, depending on the pattern I’m following. Before diving into the actual project, I always do a test run on a fabric scrap. It helps me ensure the stitches are coming out just right—no puckering, no jumping stitches.

Slide Fabric Under Presser Foot
Now I slide the fabric under my presser foot and align it with my seam guide. I lower the needle first, then I start stitching.
As the needle goes,
I can see that “zigzag lightning” motion. It moves in a shallow wave pattern, which makes the seam stretch-friendly but way less bulky than a regular zigzag. At frist it kinda resembles a gathering stitch sewing machine.

I Let The Feed Do The Work
I let the feed do the work—no pulling or stretching. I just gently guide the fabric.
The stitch has a magical way of stretching along with the material. It’s perfect for necklines, side seams, and even leggings, like a blanket stitch.

Securing the Stitch & Pressing
When I reach the end of the seam, I do a quick backstitch (about ½ inch) to lock it in. The lightning stitch is strong, but it still needs a little reinforcement at the start and end.
I snip the threads, stretch the seam with my hands to tet it, and boom! No snapped threads. Just a smooth, stretchy, like ease stitching.
Finally, I hit the seam with a warm iron (and a pressing cloth, if needed) to set it flat.

Lightning Stitch On Sewing Machine Pdf
Save this PDF just in case you forget any of the above steps.
How To Remove Lightning Stitch On Sewing Machine?
Sometimes you need to remove some stitches. But removing a lightning stitch can be a bit tricky since it’s dense and slightly zigzagged.
It’s totally doable with some patience. I grab a seam ripper and start from the bobbin (underside) side, That’s where the stitches are usually easier to catch. I gently slide the ripper under a few stitches at a time, every inch or so, and then slowly pull the top thread out.

Because the lightning stitch is tighter than a regular straight stitch, I take it slow to avoid tearing the sewing stretchy fabric. If needed, I use tweezers to pull out tiny thread bits left behind.
Frequently Asked Questions
Should I start ripping from the top or bottom thread?
Always start from the bobbin (underside) side. Those stitches are looser and easier to grab with a seam ripper.
How can I avoid damaging my fabric?
Go slow, work in 1-inch sections, and be gentle with the ripper. Avoid tugging the thread too hard; instead, loosen several stitches before pulling the thread.
Final Thoughts
Honestly? I love the lightning stitch. It’s perfect when I want something that looks like a straight stitch but acts like a stretch stitch. It blends in beautifully, doesn’t pucker, and holds up to movement like a champ.
If you’re sewing knits fabric or making clothes you want to actually wear comfortably. The lightning stitch is your best friend. Trust me, once you try it, you’ll be hooked.


Leave a Reply