
A 4-step buttonhole is one of the more traditional methods for sewing a buttonhole, but it’s still used on many basic sewing machines today.
4 Step Buttonhole
Instead of doing it all in one go like the 1-step version, you’ll guide the machine through four separate parts—one side of the buttonhole, a bar tack, the other side, and then the final bar tack.
It takes a bit more attention since you have to switch between steps manually, but once you get the hang of it, it’s pretty straightforward. But is 4 step buttonhole sewing machine better than traditional buttonhole stitch?
Let’s see.
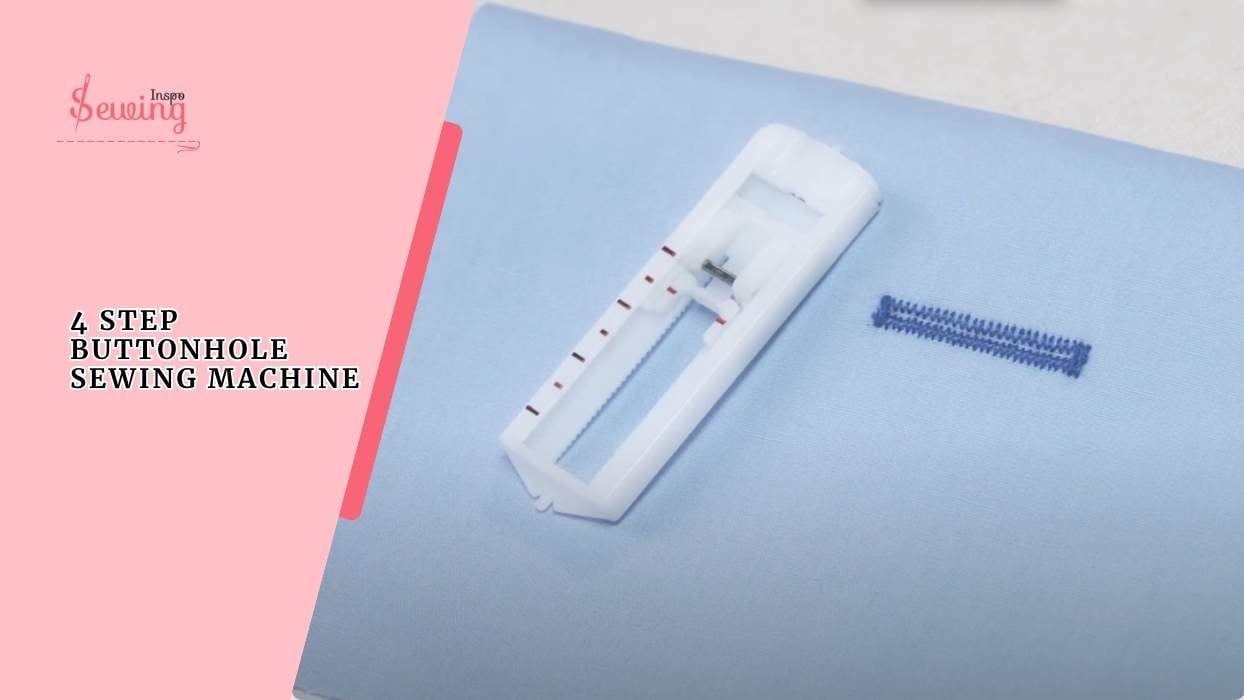
Table of Contents
What Is 4 Step Buttonhole Stitch On a Sewing Machine?
The 4-step buttonhole stitch on a sewing machine is a manual method of sewing a buttonhole in four parts.
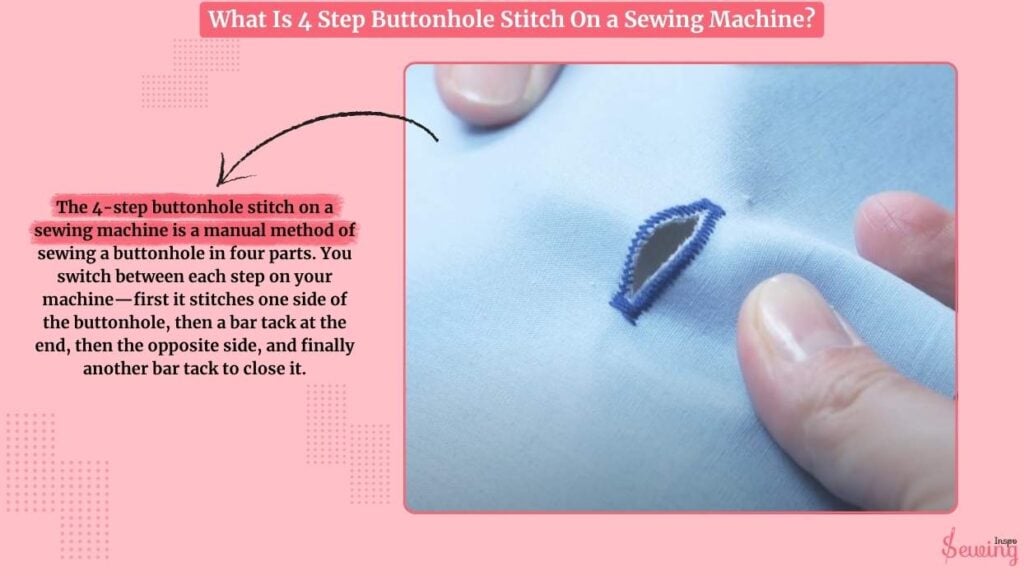
You switch between each step on your machine—first it stitches one side of the buttonhole, then a bar tack at the end, then the opposite side, and finally another bar tack to close it. This is the total opposite of a keyhole buttonhole
Can Every Sewing Machine Do 4 Step Buttonhole Sewing Machine?
No, not every sewing machine can do a 4-step buttonhole. Only those that have the specific 4-step buttonhole function built in.
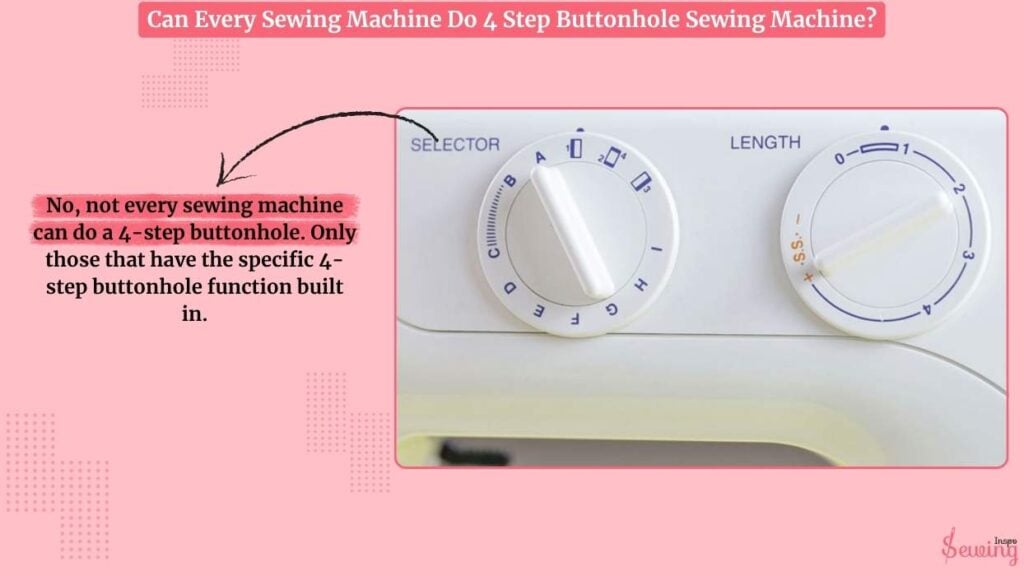
Basic mechanical machines often include this feature with a dial or stitch selector marked for steps 1 through 4. However, some very old machines or ultra-simple models may not have any buttonhole function at all.
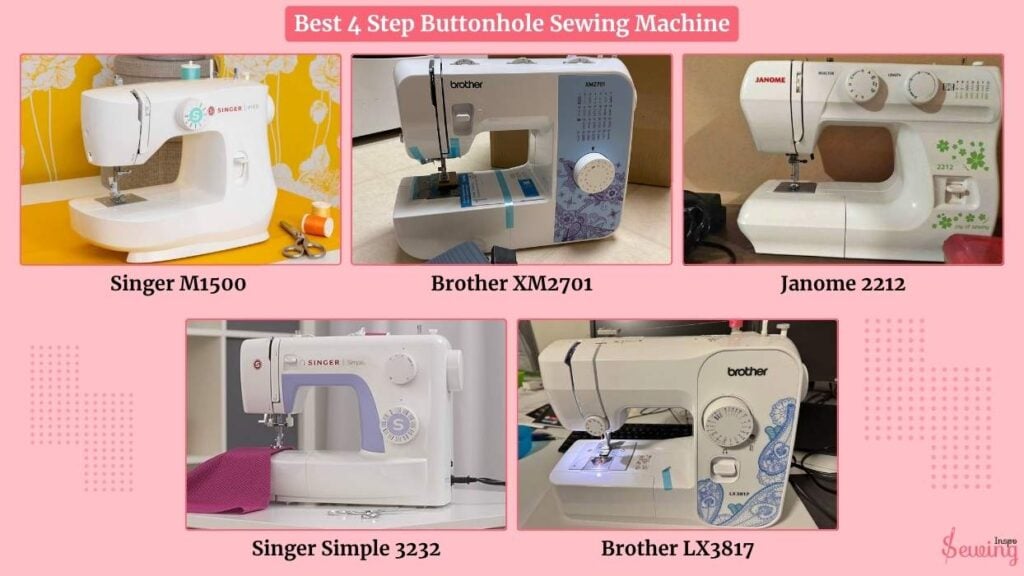
Best 4 Step Buttonhole Sewing Machine
If you’re looking for a reliable sewing machine that offers a 4-step buttonhole, you’re likely after something simple, mechanical, and budget-friendly. No worries, I have budget friendly list for you.
- Singer M1500
- Brother XM2701
- Janome 2212
- Singer Simple 3232
- Brother LX3817
How To Sew A Four Step Buttonhole Stitch On A Sewing Machine?
The 4-step buttonhole might sound tricky at first, but once you do it a couple of times, it feels like second nature. Let’s go through it in detail—I’ll guide you through every step like we’re machine stitching it together.
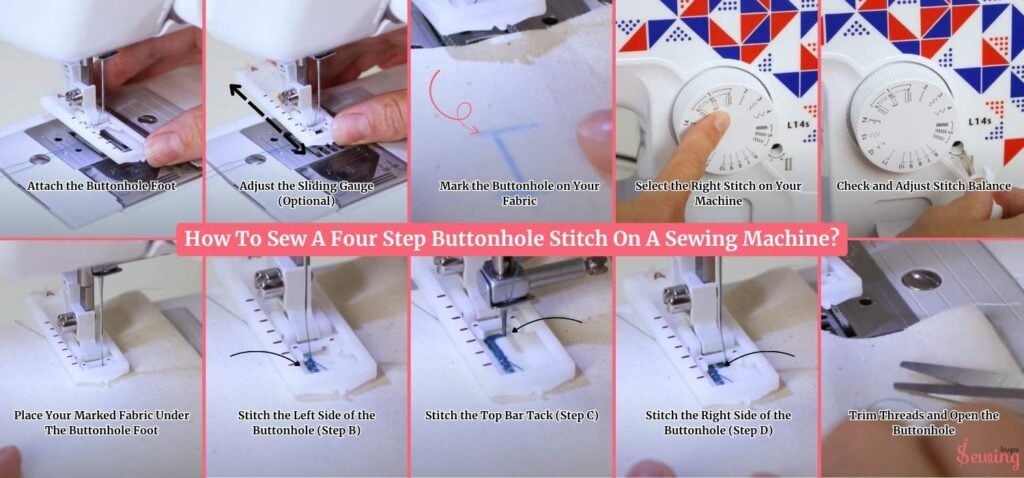
Attach the Buttonhole Foot
Take out the 4-step buttonhole foot that came with your sewing machine. You’ll notice it has a long base with a sliding gauge—that part helps guide the size of your buttonhole.

Attach the foot to your machine just like any other presser foot:
Lower your presser foot lever while aligning it with the shank on the foot, and it should snap right into place. Before you start sewing, I like to pass the needle thread through the little gap in the foot so it stays out of the way while stitching.
This prevents it from getting caught or tangled mid-buttonhole.
Adjust the Sliding Gauge (Optional)
Now look at the sliding part at the back of the buttonhole foot. Push it toward the back of the machine, so you’re starting with the open area at the rear of the foot. This is optional, but it helps align the buttonhole size.
Some people prefer to use the markings on the foot to measure buttonhole length, especially if you don’t want to mark your fabric.

Mark the Buttonhole on Your Fabric
Using a fabric-safe pen or chalk, mark the starting point and length of your buttonhole directly on the fabric. This gives you a guide to follow as you sew and helps keep everything straight and centred, like leather stitching.
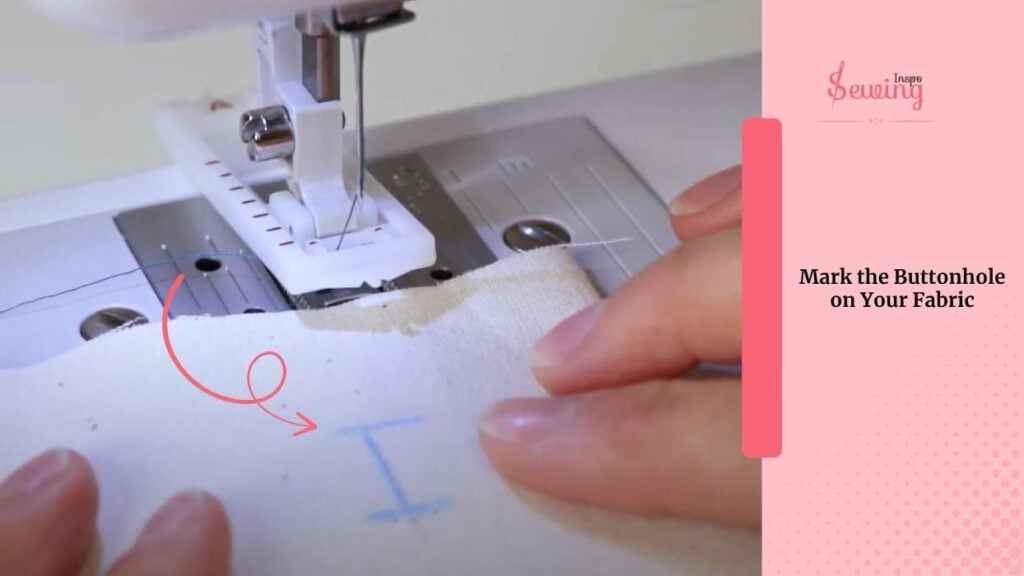
Draw a straight line the length of the button plus a little extra (around 2–3 mm). If you’re making multiple buttonholes.
It also helps to mark where each one will go to keep them evenly spaced. Do this on the right side of your garment if the buttonholes are visible.
Select the Right Stitch on Your Machine
Now, let’s get to the stitch dial. On a 4-step buttonhole symbol on a machine like the Brother L14s, the buttonhole stitch is grouped under one number.
But broken into 4 positions labeled A, B, C, and D. Each of those letters represents a different part of the buttonhole:
- A stitches the bottom bar tack
- B stitches the left side
- C stitches the top bar tack
- D finishes with the right side
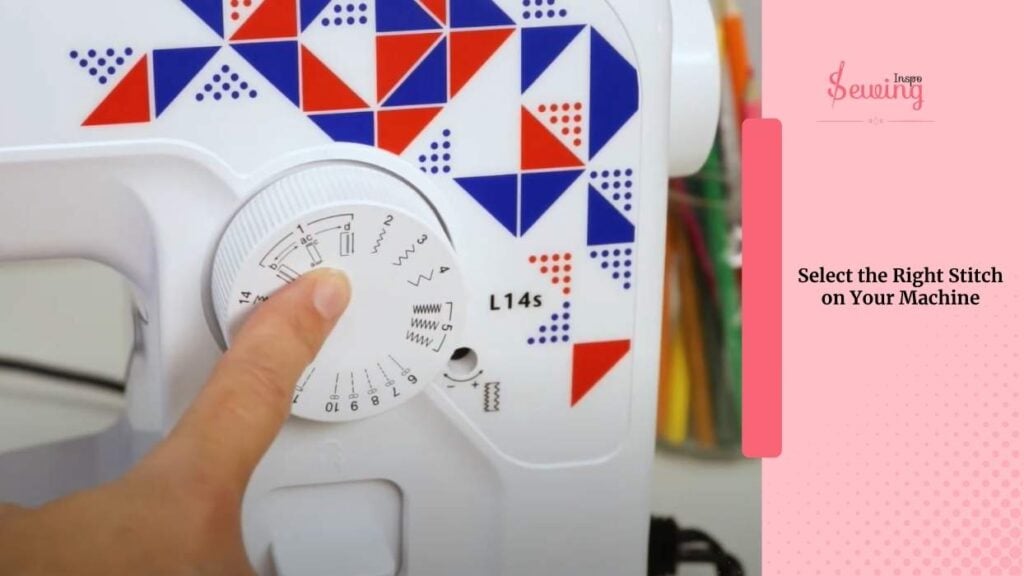
You’ll need to turn the dial to each letter as you sew manually. It’s important to do this at the right time, so don’t rush through.
Check and Adjust Stitch Balance
Take a second to check the stitch balance screw (if your machine has one). It’s usually a small dial or screw near the stitch selector. This lets you adjust the tightness of the stitches on either side of the buttonhole.
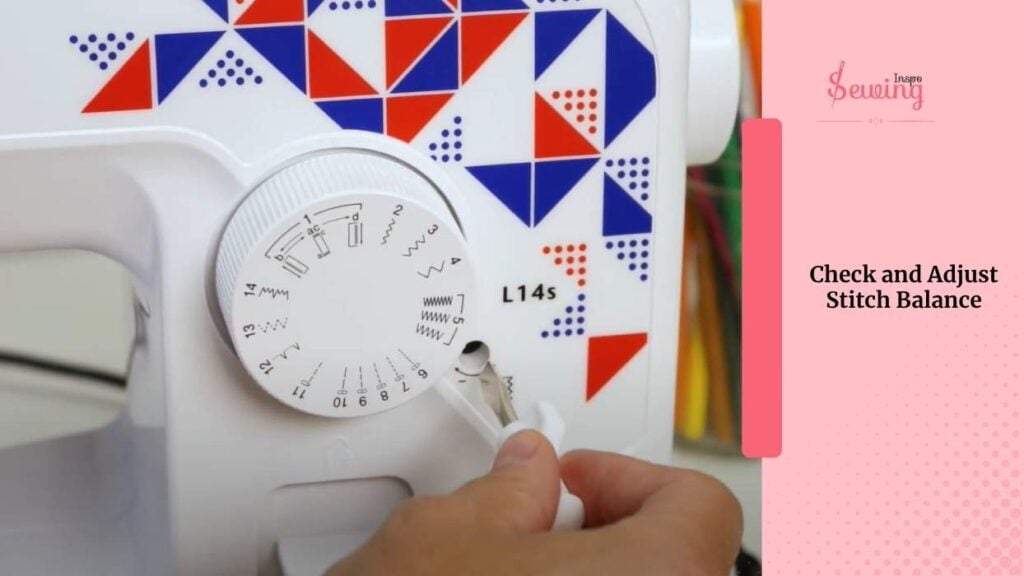
If one side ends up looking tighter or more compact than the other, a tiny turn of this dial can even it out. It’s not always needed, but it’s good to know it’s there in case you’re seeing uneven results.
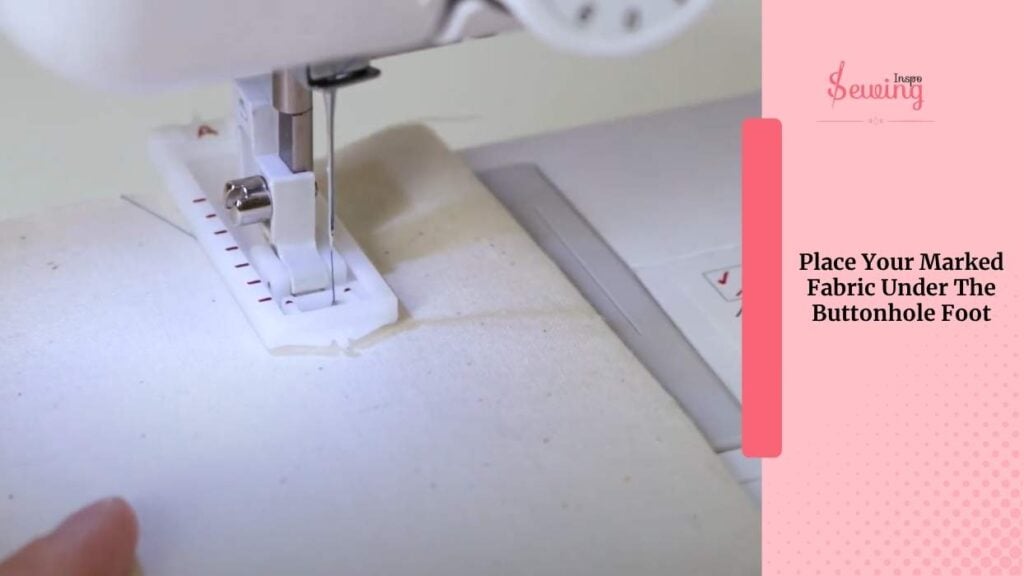
Place Your Marked Fabric Under The Buttonhole Foot
Now place your marked fabric under the buttonhole foot, aligning the center mark of the foot with your fabric marking. Most feet will also have red guide lines—line the horizontal ones up with where you want your bar tack to go.
Turn your machine dial to A and begin stitching. This will create a small set of zigzag stitches that form the bottom bar tack of your buttonhole.
I usually sew about 5–6 stitches, then stop with the needle down on the left side, which helps transition cleanly into the next step.
Stitch the Left Side of the Buttonhole (Step B)
Without moving your fabric, turn the stitch dial to B. This will sew a dense zigzag line going up the left side of your buttonhole. Keep your fabric steady and let the feed dogs do the work.
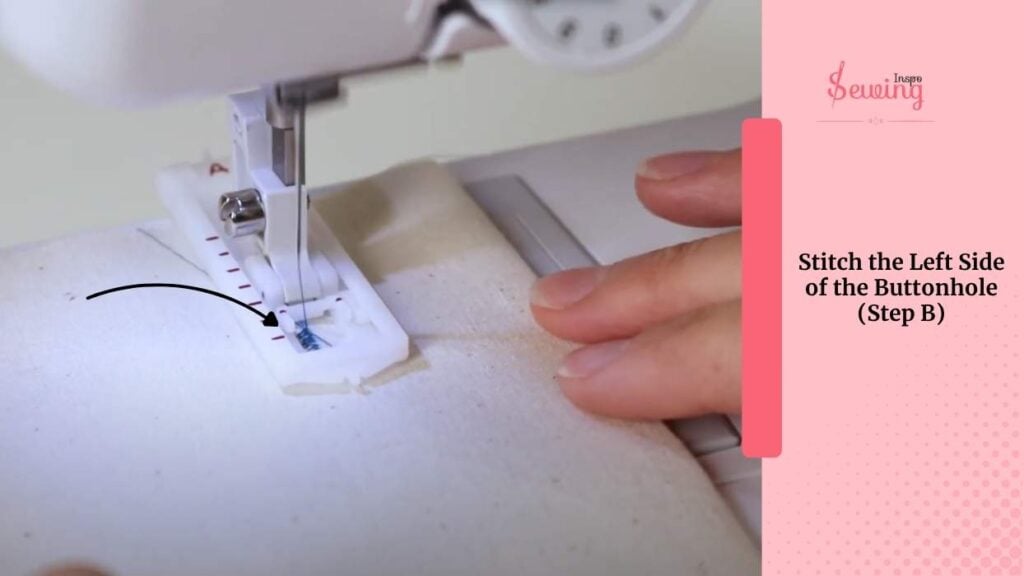
Try not to pull or push the fabric, just guide it gently. Stitch until you reach the top of your marked line. Stop again with the needle on the left side to prepare for the top bar tack.
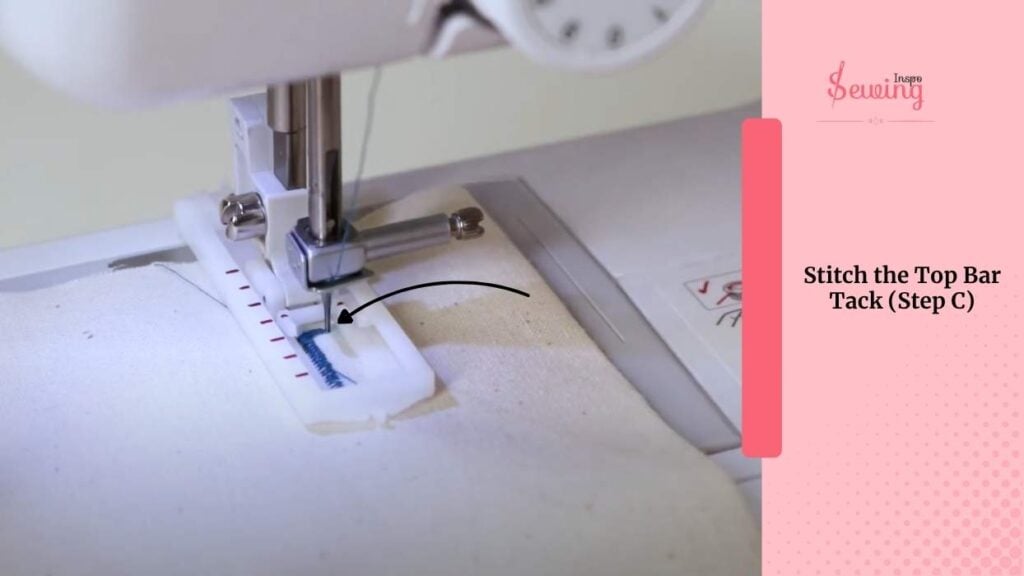
Stitch the Top Bar Tack (Step C)
Now turn your dial to C. This is where the machine sews the top bar tack, closing off the top of the buttonhole.
Like before,
Let the machine sew 5–6 zigzag stitches across. When it finishes, stop with the needle on the right-hand side. This makes it easier to start stitching the final side next.
Stitch the Right Side of the Buttonhole (Step D)
Finally, turn your dial to D. This stitches down the right-hand side of the buttonhole, heading back toward where you started. Try to keep the line even and straight, using your original fabric mark as a guide.
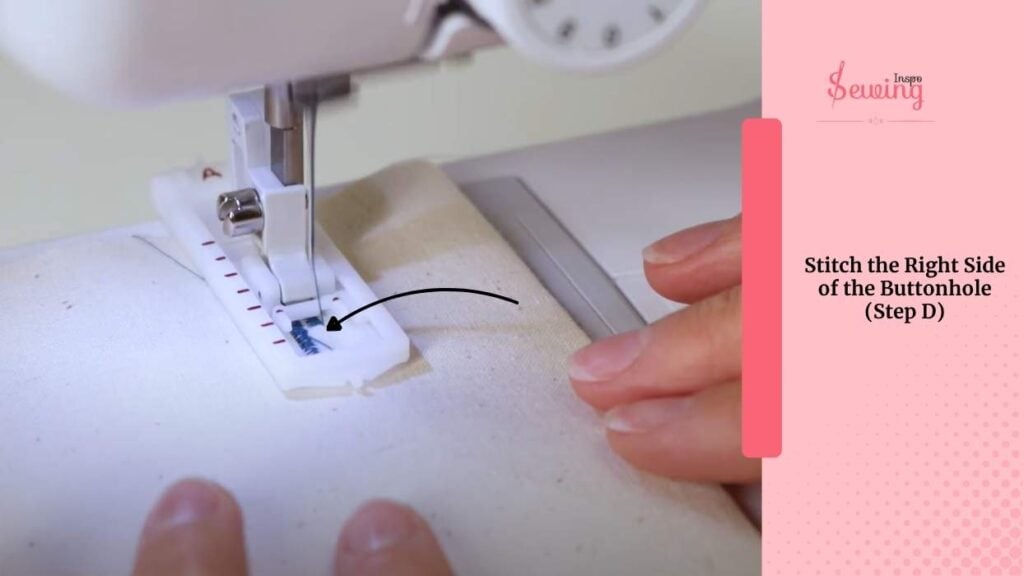
When you reach the starting point (the bottom bar tack), stop the machine and lift the presser foot.
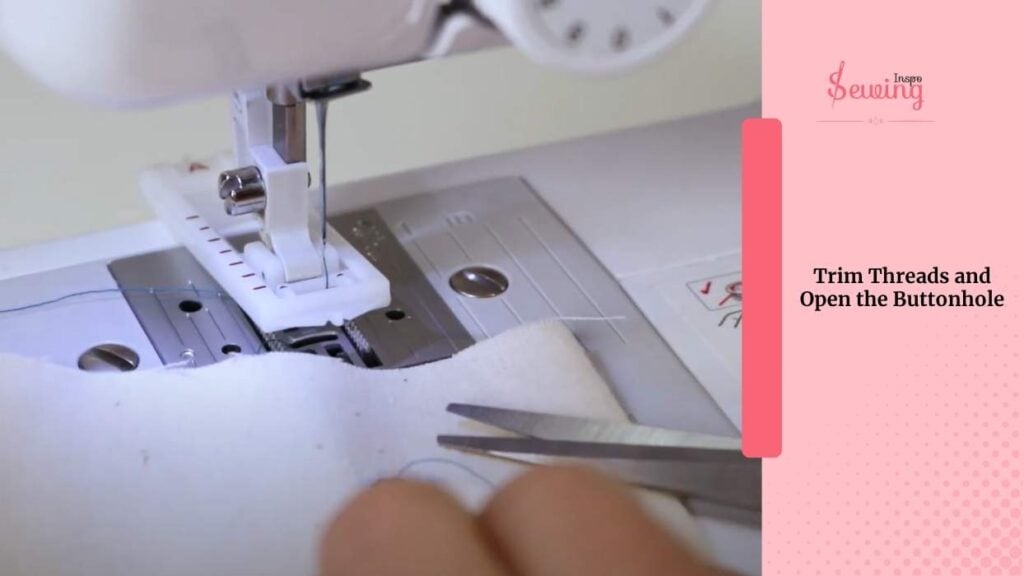
Trim Threads and Open the Buttonhole
Once you’re done stitching, snip any loose threads on the front and back of the fabric. Then it’s time to open the buttonhole. I like to place a pin across one end of the buttonhole to stop the seam ripper from going too far and slicing through the bar tack.
Then I carefully rip between the two lines of stitching. You can also use a buttonhole cutter if you have one—it’s cleaner and quicker.
That’s it, you got a 4-step buttonhole stitch.
If you are wondering how to lock stitch on sewing machine then give it a read.
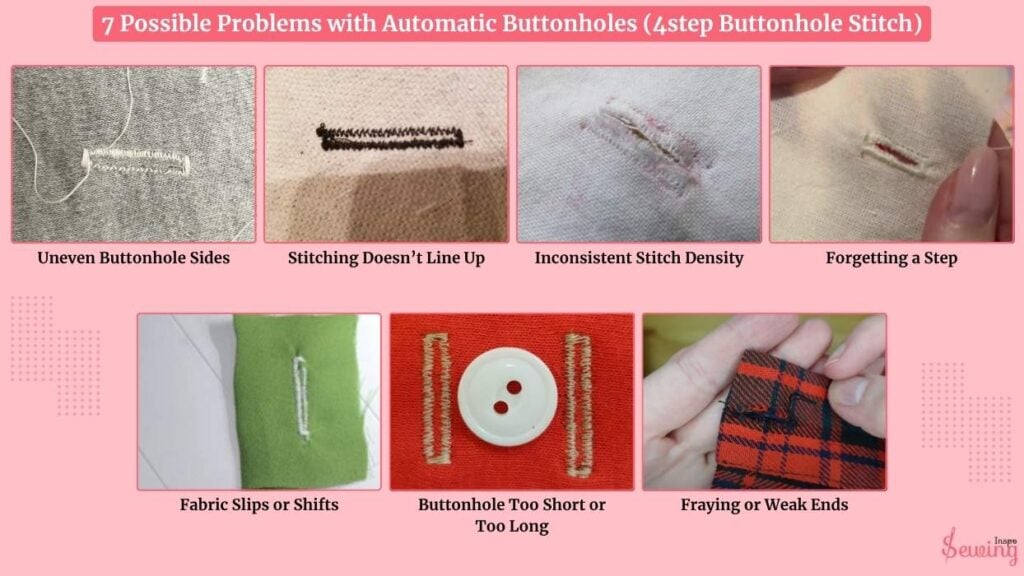
7 Possible Problems With Automatic Buttonholes (4step Buttonhole Stitch)
The 4-step buttonhole function is handy, especially on older or basic sewing machines. Buttonholes have their challenges. Because the process is broken down into four separate steps.
There’s more room for errors, especially if you’re just starting out. Here are some common issues you might run into:
- Uneven Buttonhole Sides
- Stitching Doesn’t Line Up
- Inconsistent Stitch Density
- Forgetting a Step
- Fabric Slips or Shifts
- Buttonhole Too Short or Too Long
- Fraying or Weak Ends
Solutions,
I know those are annoying problems. But every problem has a solution. So, to solve the issue,
Use fabric marking tools to outline first, and add interfacing to prevent shifting. Sew slowly, keeping the fabric flat and the presser foot down. Practice on scrap fabric to get even stitches, and always reinforce the bar tacks. Double-check button size before you start.
Final Thought:
The 4-step buttonhole stitch gets the job done, but it requires focus, good marking, and a steady hand. For cleaner results, always use interfacing, mark your buttonhole size clearly, and take your time with each step. If you find it frustrating, upgrading to a 1-step buttonhole machine might be worth considering!


Leave a Reply