Blind stitch is an easy way to finish fabric edge. But to do it perfectly, you gotta fold the hem correctly. That’s where every new swister struggles the most. As a newbie, I struggle too.
The struggle was so real that I got frustrated. I ran to Grandma and asked her to teach me how to fold a blind hem. She replied,
Fold the fabric to the desired hem length, then fold it back under, exposing a small edge for stitching.

I was not convinced enough; she knew from the look of my face. So she took a pair of pants from the closet and showed me how to fold pant leg for blind hem stitch. Cause perfect fold = perfect invisible look of the blind stitch.
How To Fold A Blind Hem For Beginners?
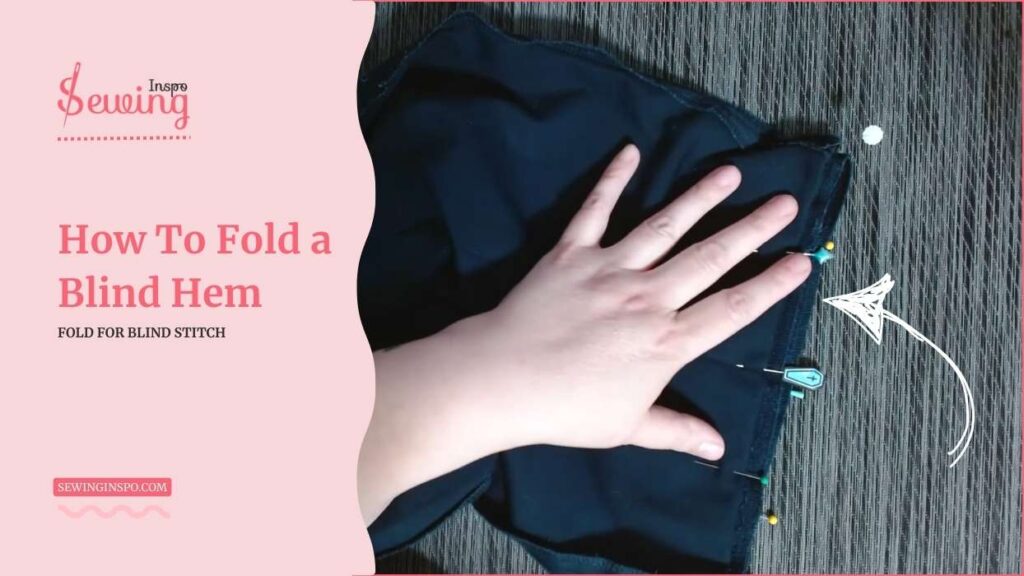
My struggle may get Grandma so concerned that she decided to show me practically. First, turn your pants inside out. This way, we can see the raw edge.

Turn Your Pants Inside Out To Fold A Blind Hem
Start by flipping your pants inside out. This is important because you’ll be stitching the hem on the inside, ensuring that the stitches are invisible on the outside. You should now be able to see the raw edges of the fabric, which is where the fold will be created.

Decide The Length Of The Fold For A Blind Hem
I usually fold the fabric around 1 to 1.5 inches (2.5 to 4 cm). This gives enough depth to hide the stitch while ensuring a clean, professional finish. I make sure the top edge of the fold is tucked under by about ¼ inch (0.6 cm) so the stitch catches just the right amount of fabric.

Fold the Folded Edge Back Under
Now, take the folded edge and fold it back under, but do not press it flat. The fold should remain somewhat loose to allow the blind hem stitch to be hidden within it.
Leave about ¼ inch of fabric at the top of the fold.
This is the part that the blind hem stitch will grab onto, keeping it secure while still remaining nearly invisible on the outside.

Pin The Folded Edge In Place To Make Fold A Blind Hem
To keep the fabric secure while you work, use pins to hold the folded edge in place. Pinning helps keep the fold consistent and prevents shifting during the stitching process.

Ensure the pins are placed close together, so the fabric doesn’t move out of alignment as you sew. Be sure to check that the fold is consistent and doesn’t have any wrinkles or uneven parts. It should look neat and smooth.
Fold And Pin The Other Seam To Make The Perfect Fold A Blind Hem
Once you’ve pinned one leg, repeat the same steps on the other pant leg. Make sure both folds are identical in length and size. These steps will not tug the thread of the blind stitch.
Start by folding the other seam the same way, matching it to the first one. No need to measure precisely. If you have a good eye for symmetry, adjust it until both sides match up evenly.

Pin the second fold securely, making sure it looks even and aligned with the first leg.
Pin Along the Entire Hem
Now that both pant legs are folded and pinned, it’s time to pin the entire length of the hem. This will secure the fabric in place while you stitch. This will help you to do the perfect invisible stitch.
As you pin along the hem, gently tug on the fabric to make sure it lies flat and smooth. The more evenly you pin it, the easier it will be to sew and the cleaner the result will be. Check the hem to ensure it’s not dipping lower on one side. The fold should be consistent around the entire hem.

Check For Final Adjustments For Fold A Blind Hem
Before you start sewing, give the hem one final check. Run your hands over the fold to check for wrinkles or inconsistencies. If you find anything wrong. Fix it before doing the final stitch.
And that’s it! You’ve got the fold for the blind stitch. This also works for double blind stitch.

Frequently Asked Questions
Why Do I Need To Pin At The Seams First?
Pinning at the seams first ensures that the fabric stays aligned properly. It keeps everything even and prevents shifting when you sew.
Do I Have To Measure The Fabric To Make Sure It’s Even?
Not necessarily! You can just line it up visually if you have a good eye. But you can measure or use a seam gauge if you want extra accuracy.
What If One Side Is Longer Than The Other?
That’s an easy fix! Just adjust by folding or trimming slightly until both sides match. It’s all about making small tweaks before you sew.
Closing
So yes, that’s how learning how to fold a blind hem went with my grandma. I am sharing this with you so my sewing inspo readers don’t have to struggle like. So what do you think? Was it helpful?


Leave a Reply