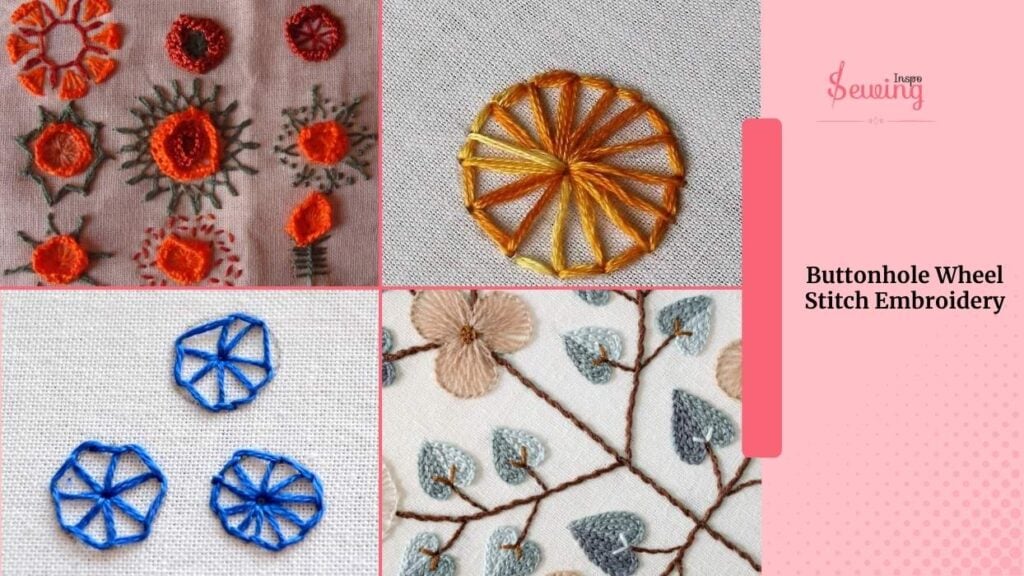
Buttonhole Wheel Stitch| Get Creative With 5 Versions of Buttonhole Wheel Stitches

Published:

Updated:

Trust me, I thought buttonhole stitch was just for buttons. But the more I learn about all the types of buttonhole stitches, the more I am amazed. You can do stunning embroidery with them! The other perfect embroidery stitch is the buttonhole wheel stitch.

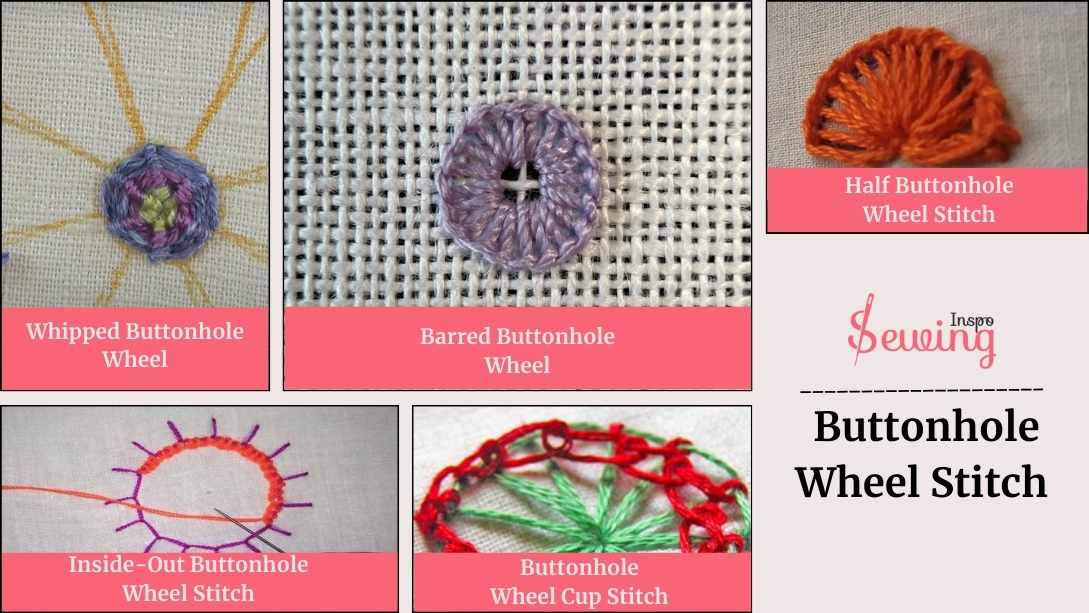
There are 5 types of buttonhole wheel stitch, other than traditional ones too,

Such as-

  1. Whipped Buttonhole Wheel
  2. Barred Buttonhole Wheel
  3. Inside-Out Buttonhole Wheel Stitch
  4. Buttonhole Wheel Cup Stitch
  5. Half Buttonhole Wheel Stitch

Those are advanced level one. But the traditional wheel buttonhole stitch is easy.

Here Is How You Can Do It-

To create a buttonhole wheel stitch, mark a small circle on your fabric, bring your needle up from the back along the outline while forming a loose loop, and continue doing it until the end.

That’s the basic one and a short description. Don’t you want to know other types? I know you do! Let’s get into it.

At A Glance:

  1. Wheel buttonhole stitch is a wheel form of stitch.
  2. There are 5 types of buttonhole wheel stitch.
  3. A barred Buttonhole Wheel is a wheel with a border.
  4. Buttonhole Wheel Cup Stitch is a 2d version of wheel buttonhole stitch.
buttonhole wheel stitch

What Is A Buttonhole Wheel Stitch?

Buttonhole wheel stitch is a stitch that looks like a wheel. It’s like doing a regular buttonhole stitch but in a round shape.

What Is A Buttonhole Wheel Stitch

People use this stitch to add pretty details to their projects, whether for flowers, accents, or just to make something stand out. It’s an easy way to add texture and a bit of charm to your sewing or embroidery work!

Can You Hand Sew A Buttonhole Wheel Stitch?

Yes, you can hand sew a buttonhole wheel stitch! It’s a simple and decorative stitch that doesn’t require a machine. All you need is some fabric, thread, and a needle, just like all different types of stitches.

Can You Hand Sew A Buttonhole Wheel Stitch

You start by making a circle of stitches and then working buttonhole stitches around the circle’s edge. It’s a great way to add a raised, textured look to your sewing or embroidery projects, and with a little practice, you can easily do it by hand!

How To Do Buttonhole Wheel Stitch By Hand?

To do buttonhole stitch by hand, you need to follow 4 steps:

  1. Mark a Circle
  2. Come Up With Your Needle From The Back
  3. Bring Your Needle Up Again From Outline Of Circle 
  4. Finish The Buttonhole Wheel Stitch
How To Do Buttonhole Wheel Stitch By Hand

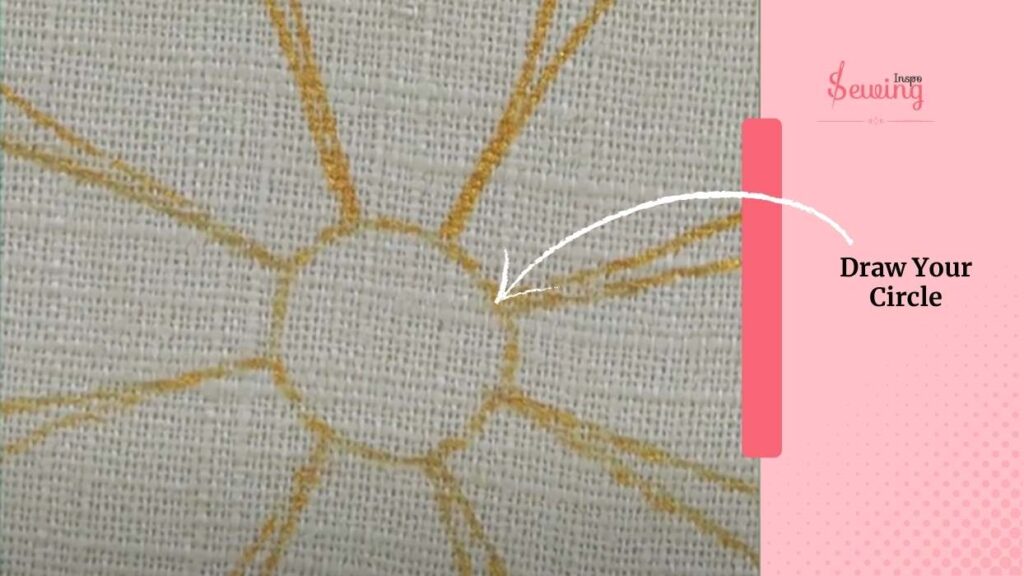
Mark A Circle

When you’re ready to start your buttonhole wheel stitch, mark a small 360 degree circle on your fabric. This circle will be your guide, helping you keep the sewing stitch neat and evenly spaced. 

You can use a fabric pencil, chalk, or even a disappearing ink pen—whatever you feel most comfortable with. This will also help you make a Double buttonhole stitch pattern.

Mark A Circle

Simply place the point of your marker where you want the centre of the wheel to be. From there, lightly draw a circle the size you want the stitch to be. It doesn’t have to be perfect! The goal is just to have a starting point as you begin stitching.

Come Up With Your Needle From The Back

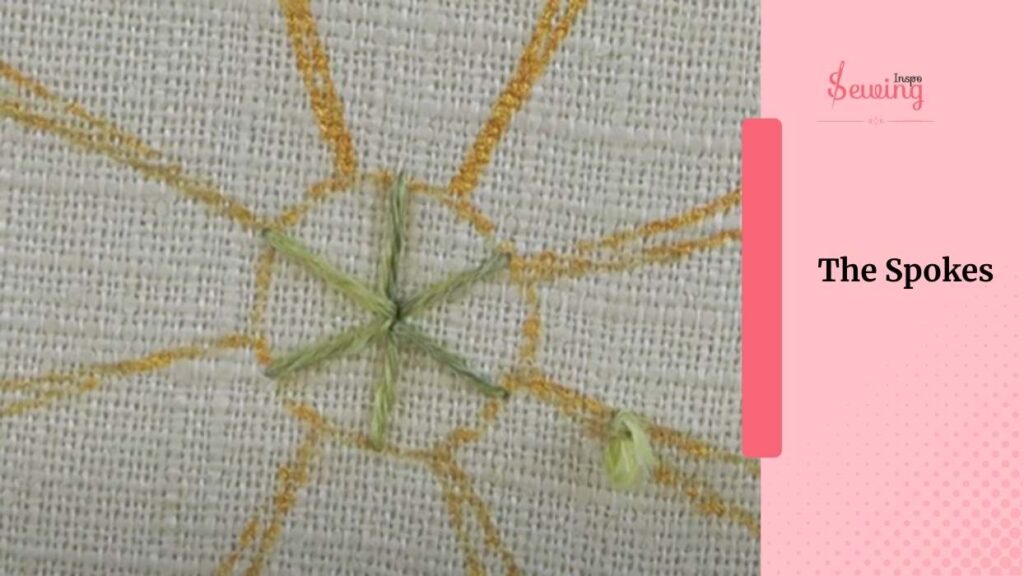
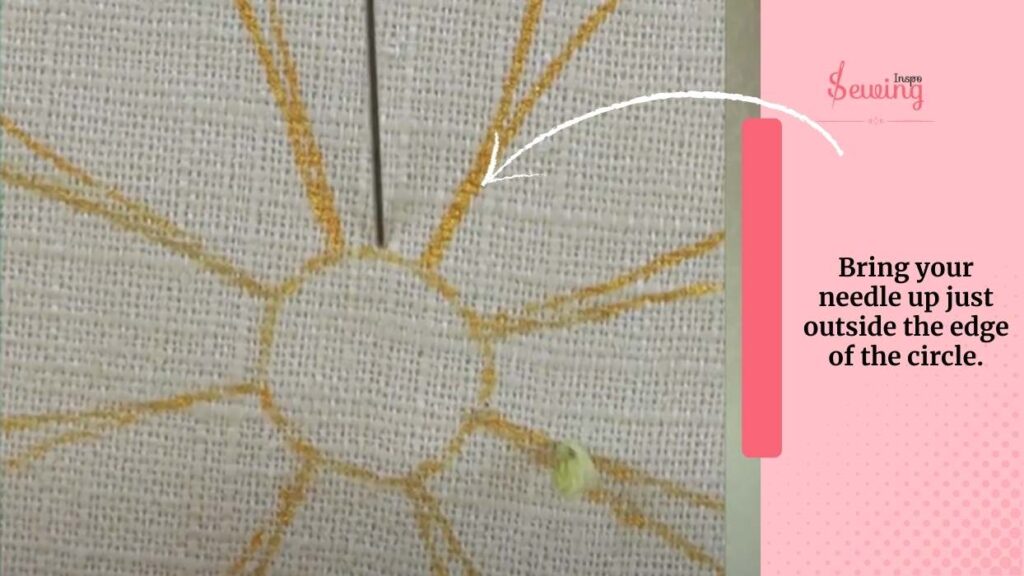
Your needle should be inserted with 100% cotton thread from the back of the fabric right on the outline of the circle. Then, push back the needle in the center of the circle and pull the thread through while leaving a loose buttonhole loop of working thread on the surface.

Come Up With Your Needle From The Back

Bring Your Needle Up Again From Outline Of Circle

Next, bring your size 7 or 8 embroidery needle up again at the circle’s edge, one stitch or ½ inch away from the previous one, catching the loose loop you created. 

As you pull your needle, bring it down through the center again. Make it evenly speed like an open buttonhole.

Bring Your Needle Up Again From Outline Of Circle

It will secure that loop and form a tight knot at the circle’s edge. Continue making stitches along the edge and guiding the loops with your needle until you’ve completed the circle!

Finish The Buttonhole Wheel Stitch

Once you’ve worked your way around and the circle is fully outlined with buttonhole stitches, bring your needle to the back of the fabric.

Secure the thread by making a small knot It ensures it’s tight enough to hold your stitches in place.

Finish The Buttonhole Wheel Stitch

Finally, trim any excess thread, and give the stitch a quick press with an iron if needed. Your buttonhole wheel stitch is complete, showing off its decorative raised texture!

I know the intrusions won’t be enough, so here is a buttonhole wheel stitch tutorial. Watch this video tutorial and do it for yourself

Buttonhole Wheel Stitch| How To Easy Embroidery Tutorial

Let’s Do Other 5 Types Of Buttonhole Wheel Stitch

Buttonhole wheel stitch alone is decorative enough. But if you want to add an extra touch, there are other ways. Here are 5 other types of buttonhole wheel stitch:

  1. Whipped Buttonhole Wheel
  2. Barred Buttonhole Wheel
  3. Inside-Out Buttonhole Wheel Stitch
  4. Buttonhole Wheel Cup Stitch
  5. Half Buttonhole Wheel Stitch
5 Types Of Buttonhole Wheel Stitch

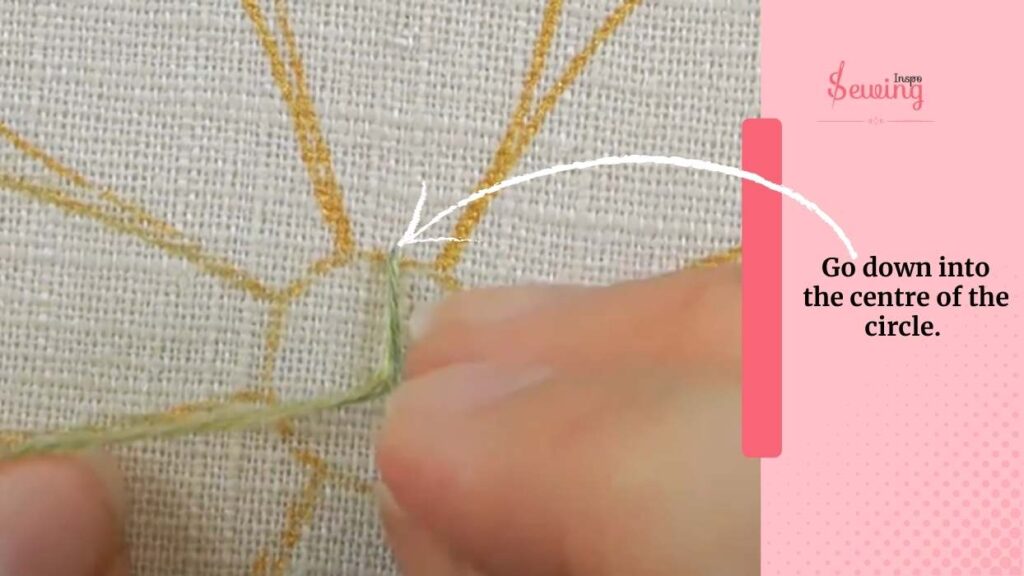
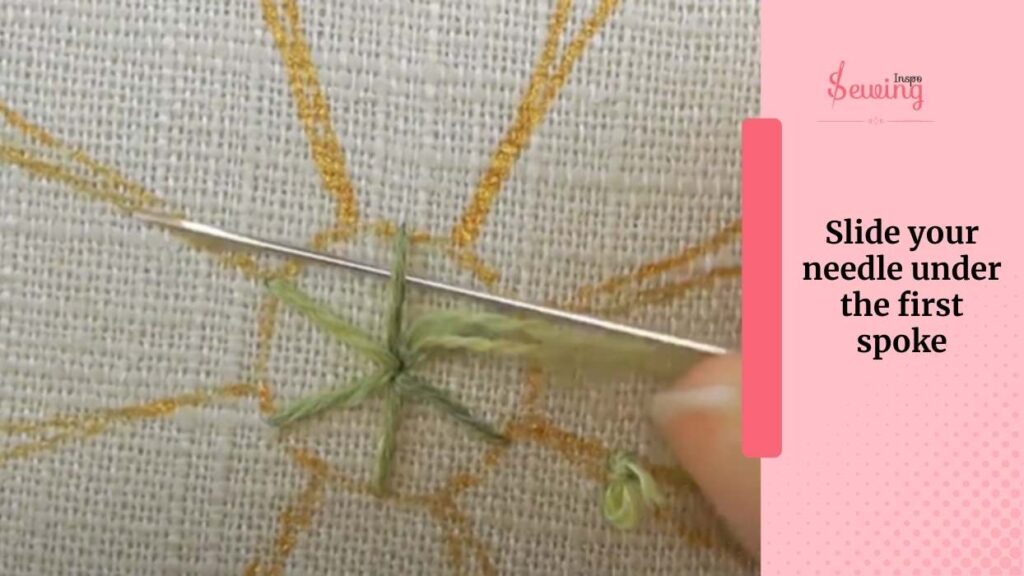
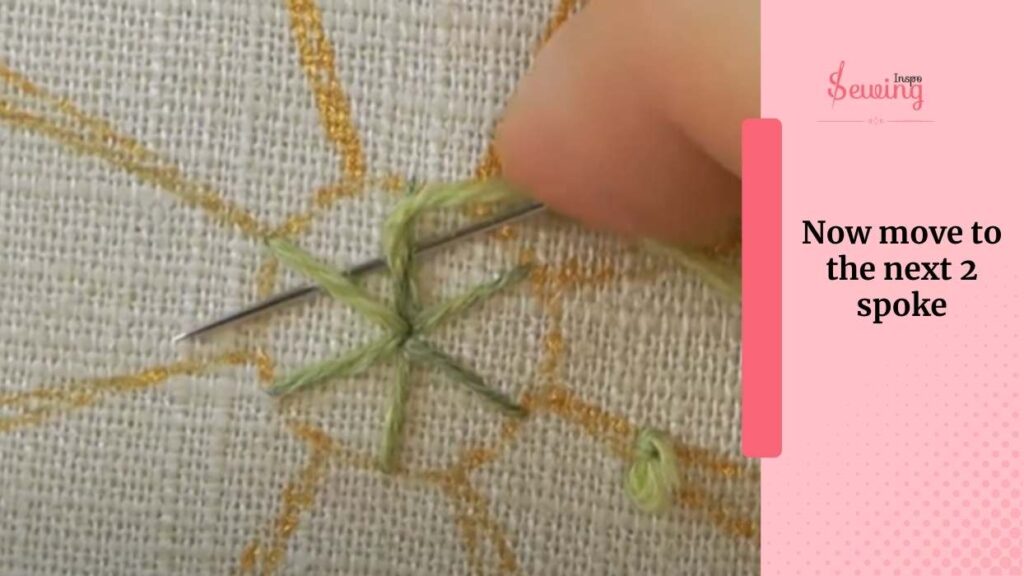
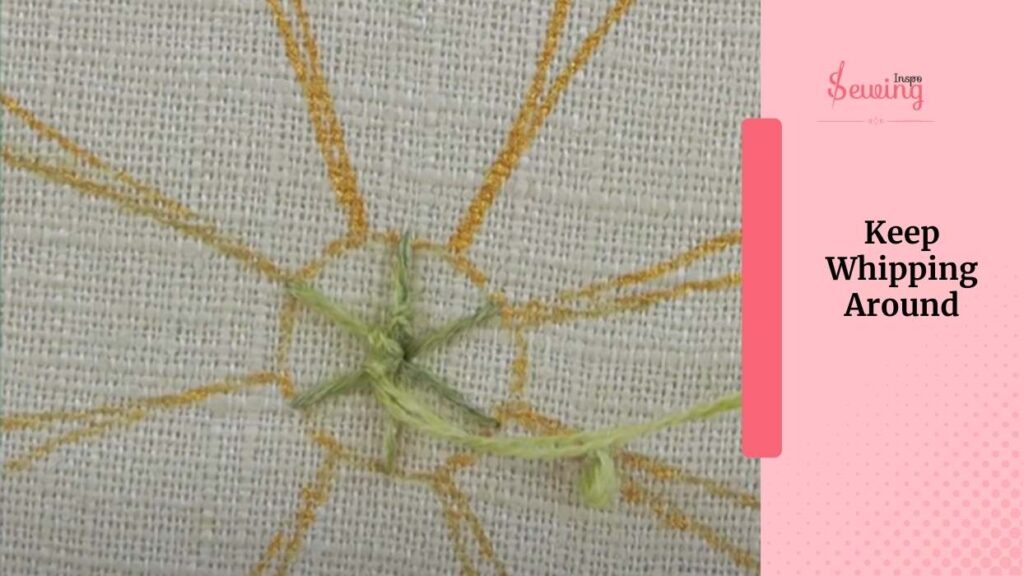
Whipped Buttonhole Wheel

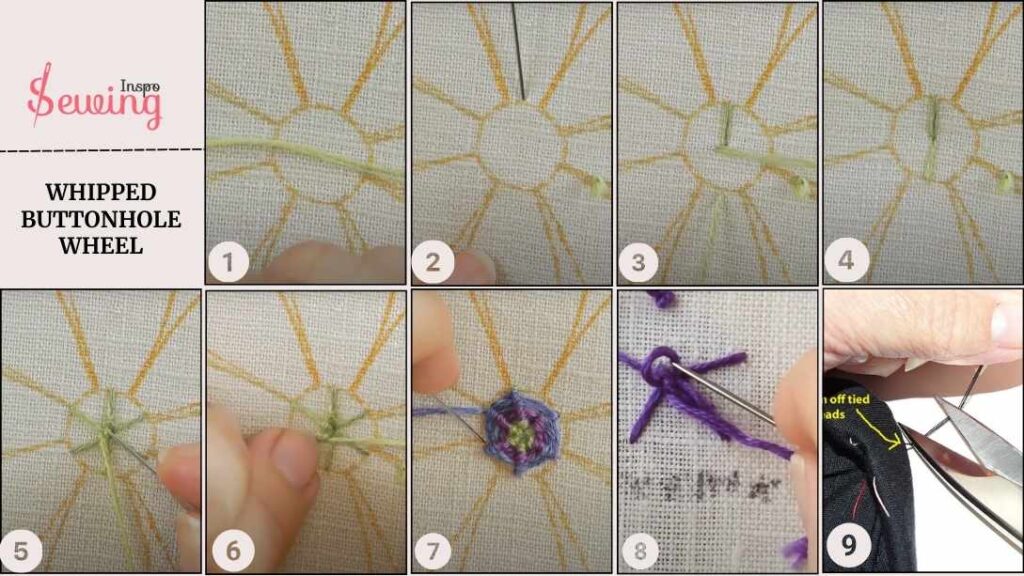
Remember doing whipped stitch? This is kind of like that but in a buttonhole stitch way. Here is how to do it:

Whipped Buttonhole Wheel
  1. Thread a needle with contrasting or matching thread.  You can follow these steps to create detached buttonhole stitch patterns.
  2. Come up through the fabric at the back of the stitch, near the wheel’s outer edge.
  3. Pass your needle under the stitch (without going through the fabric). It’s like doing a double buttonhole stitch.
  4. Pull the thread tight to create a twisted effect.
  5. Keep whipping the thread around each buttonhole stitch as you go.
  6. Ensure that each wrap is tight and uniform.
  7. Bring your needle to the back of the fabric once you’ve whipped around the wheel.
  8. Secure the thread with a small knot.
  9. Trim any excess thread.

Barred Buttonhole Wheel

The barred buttonhole wheel is a buttonhole wheel but with a border around it. Unlink the traditional wheel; it is short, and the stitches are close to each other.

Barred Buttonhole Wheel

It combines the classic buttonhole stitch with a playful twist—literally! Let’s do it-

  1. Bring the needle up outside the circle and down in the center.
  2. Visualize the center hole as divided into 4 quarters.
  3. Take stitches into the top right hole.
  4. Pull the working thread on the up stitch to open the fabric, creating characteristic holes in the center.
  5. Take stitches into the bottom right hole.
  6. Take stitches into the bottom left hole.
  7. Take stitches into the top left hole.
  8. To complete a neat circle, the final stitch should be taken under the first edging stitch.

Inside-Out Buttonhole Wheel Stitch

The inside-out buttonhole wheel stitch is another lovely and decorative technique that creates a textured, floral design. Here’s how to do it step by step:

Inside-Out Buttonhole Wheel Stitch
  1. Draw Your Design: Start by drawing a circle on your fabric adding outward-facing spokes or petals around the circle. Using a circle template can make this part easier and more precise.
  2. Start Stitching: Working clockwise, bring your needle up through the fabric between two spokes and pull the thread through completely.
  3. Create the First Stitch:
    • Insert the needle back into the fabric at the end of the spoke to the right.
    • Bring the needle back up at the base of the spoke.
    • Slide the thread under the end of the needle and pull it through to create a loop. This forms the first part of your stitch.
  4. Continue Around the Circle: Repeat this stitch around the entire circle, working between each spoke. Make sure to keep your stitches uniform for a clean look.
  5. Close the Wheel: When you reach the last spoke, insert the needle into the same hole where you started to complete the wheel shape.
  6. Add Decorative Elements: To finish your design, add a French knot in the center for a lovely focal point and a fern stitch stem to create small flowers. You can also adjust the length of the spokes or petals based on your design preference.

Buttonhole Wheel Cup Stitch

Buttonhole Wheel Cup Stitch is a double buttonhole stitch. It is mostly used in 3-dimensional embroidery. It’s like bringing life to your embroidery. Excited to know how to do Buttonhole Wheel Cup Stitch?Let’s go to do some buttonhole stitch embroidery.

Buttonhole Wheel Cup Stitch
  1. Begin by creating a foundation of a Buttonhole Wheel Stitch. Bring the needle out from one corner of a spoke on the wheel. 
  2. Next, make Blanket Stitches using the stitches along the wheel’s outer rim. This will create a lovely texture around your design.
  3. Once you’ve completed one trip around the rim, continue the same process, but use the previous stitch as your base this time. This technique builds up the cup effect around the wheel.
  4. After completing two trips, your Buttonhole Wheel Cup should look like this. Consider using a thicker thread and making the Buttonhole Wheel stitches closer together for a more pronounced’ cup’ effect.

Half Buttonhole Wheel Stitch

The half buttonhole wheel stitch is a simpler variation of the traditional buttonhole wheel stitch but in half-circle designs. This stitch provides a beautiful texture and can enhance various embroidery projects. Here’s how to create it:

Half Buttonhole Wheel Stitch
  1. Prepare Your Fabric: Start by marking a semi-circle or a half-circle on your fabric. You can use a fabric pencil or chalk for this.
  2. Begin the Foundation: Bring your needle up at one end of the semi-circle. This will be the starting point for your stitches.
  3. Create the First Stitch: Take a stitch along the semi-circle’s edge, ensuring it’s securely anchored. This is similar to the beginning of a buttonhole stitch.
  4. Work the Stitches:
    • Continue making buttonhole stitches along the edge of the semi-circle. Ensure each stitch is even and pulls tightly to create a clean edge.
    • You can adjust the spacing between stitches depending on how dense you want the final look.
  5. Finish the Half Circle:
    • Once you reach the other end of the semi-circle, insert your needle into the same hole where you begin to secure the stitches.
    • This completes your half-buttonhole wheel stitch.
  6. Add Decorative Elements (Optional): For added flair, you can incorporate additional stitches or embellishments in the center or around the edges of the half-circle.

Buttonhole Wheel Stitch Patterns

After knowing buttonhole wheel embroidery stitch instructions, it’s time to do some work yourself, right? What? Are you lost? Don’t know where to begin? No worries, I got your back here, too. Here are a few pattern ideas for buttonhole wheel stitch-

Buttonhole Wheel Stitch Patterns

Frequently Asked Questions

How Does The Buttonhole Wheel Stitch Differ From A Buttonhole Stitch?

While the basic buttonhole stitch is used for edges and straight lines, the buttonhole wheel stitch arranges these stitches in a circle. This technique allows you to create circular, radial patterns, adding a dimensional element to your design.

Where Can I Use The Buttonhole Wheel Stitch?

This stitch is great for adding embellishments to fabric, creating floral designs, or adding texture to larger embroidery pieces. It’s often used in hand embroidery projects for pillows, clothing, bags, or any fabric project that needs a decorative element.

What Type Of Fabric Is Best For A Buttonhole Wheel Stitch?

The buttonhole wheel stitch works well on medium to heavy-weight fabrics, as these can hold the shape of the stitch without puckering. Fabrics like linen, cotton, and Aida cloth are great options.

Sum Up

The buttonhole wheel stitch can add such a charming, handmade touch to your projects! It’s versatile, fun to learn, and a great way to add dimension to your embroidery. Try it, and watch how these little wheels add so much personality to your work! Happy stitching! Have more questions? Then contact us.

Maisha Soumee

Maisha Soumee

Hi there! I’m Maisha Soumee, the proud torchbearer of our family’s sewing legacy and the driving force behind this website. With Grandma Manha’s teachings as my foundation, I’m honored to continue the tradition of craftsmanship and creativity. As a passionate seamstress, I’m dedicated to sharing the joy of sewing with you, our valued community.

Leave a Reply

Your email address will not be published. Required fields are marked *

Latest Posts

  • What Does A Blanket Stitch Look Like? Learn Blanket Stitch Through Pictures

    What Does A Blanket Stitch Look Like? Learn Blanket Stitch Through Pictures

    I knew different type of stitches, but honestly, blanket stitches resemble buttonhole stitches so much that I mixed them up at first. I struggled at first so I thought, note down what does a blanket stitch look like. And take this chance to educate my sewing inspo readers. So basically,…

  • Types Of Blanket Stitch With Pictures| Find The One Stitch You Need To Try Today

    Types Of Blanket Stitch With Pictures| Find The One Stitch You Need To Try Today

    After learning what blanket stitches are, my thoughts instantly went to search for the types of blanket stitches. Surprisingly, there are 15 different types of blanket stitches. This is another versatile stitch. Among all those types, the most interesting ones are- Blanket Stitch Variations Sounds interesting? Others are more interesting,…

  • What Is A Blanket Stitch? Stitch Your Way To A Polished Finish.

    What Is A Blanket Stitch? Stitch Your Way To A Polished Finish.

    After learning the blanket stitch step from my grandma, my interest grew. ‘what is a blanket stitch? How and when do I use this? Questions like this pop up in my mind. So, I thought, why not research about it? Without brothering grandma, I started my research and found out.…