
When I first started sewing, I used to jump straight into new patterns. Excited, full of energy, and, let’s be honest, a little impatient.
But every time, something would be slightly off.
The shoulder didn’t sit right, or the waist felt weird. Then a friend told me about block sewing patterns, and honestly, it changed everything.
I remember spending an afternoon making my first block. Carefully measuring myself, cutting the fabric, and adjusting tiny details until it fit like a glove. It felt so easy and stressless.
Suddenly, I had this “base pattern” that I could use for anything. Dresses, tops, even jackets. I am not saying you need to buy it from somewhere. You can make your own. It’s not rocket science.
Basically,
Block Pattern
To make a block sewing pattern, take your body measurements, draft a basic pattern on paper, and adjust it until it fits perfectly before using it as your template for future designs.
But I know there are some complications and all. So I made this detailed guide.

Table of Contents
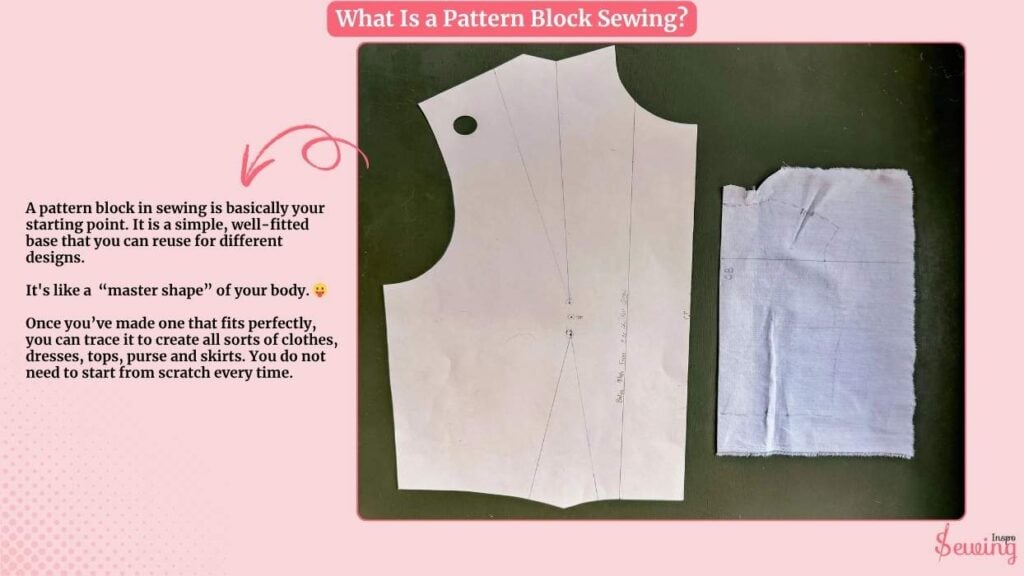
What Is A Pattern Block Sewing?
A pattern block in sewing is basically your starting point. It is a simple, well-fitted base that you can reuse for different designs.
It’s like a “master shape” of your body. 😛
Once you’ve made one that fits perfectly, you can trace it to create all sorts of clothes, dresses, tops, purse and skirts. You do not need to start from scratch every time.
Types Of Block Pattern
There are several types of block patterns in sewing, and each one serves a different purpose depending on what you’re making. It is like the building blocks of your wardrobe.
Once you have these, you can tweak and transform them into any design you want. Here are the main types of block patterns you’ll come across:
- Bodice Block
- Skirt Block
- Trouser Block
- Sleeve Block
- Dress Block
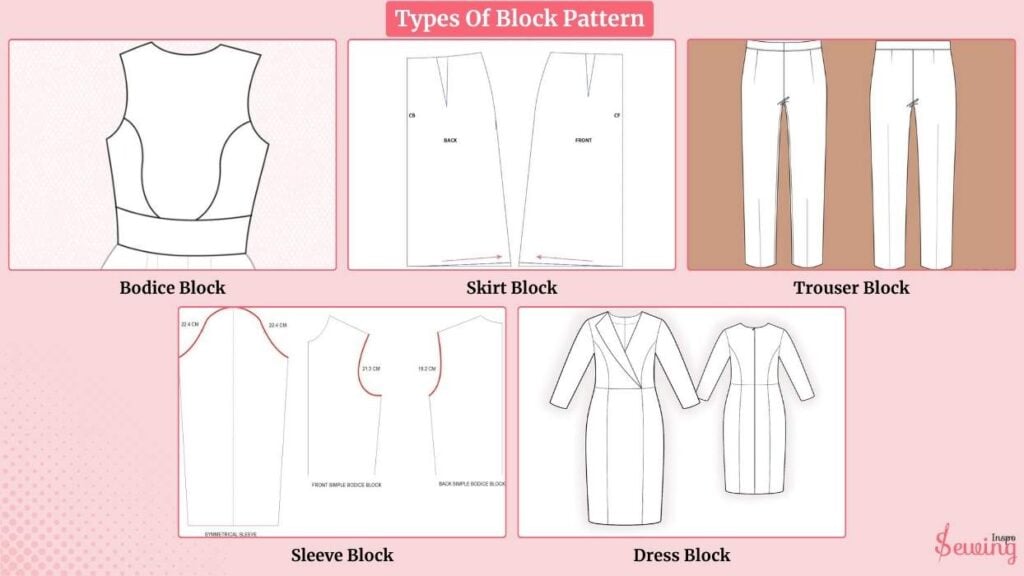
But once you’ve got these basic blocks, you can mix, match, and modify them endlessly.
What Is The Difference Between Block Pattern And Production Pattern?
People often mix up block patterns and production patterns and honestly, it’s easy to see why.
They both look similar on paper. But their purpose is completely different once you start sewing.
A block pattern (or sloper) is like your final template. It is the clean, simple base that’s made to fit your body’s exact measurements. It doesn’t have any fancy design lines, seam allowances, or style details like wave patterns.
A production pattern, on the other hand, is the ready-to-sew version.
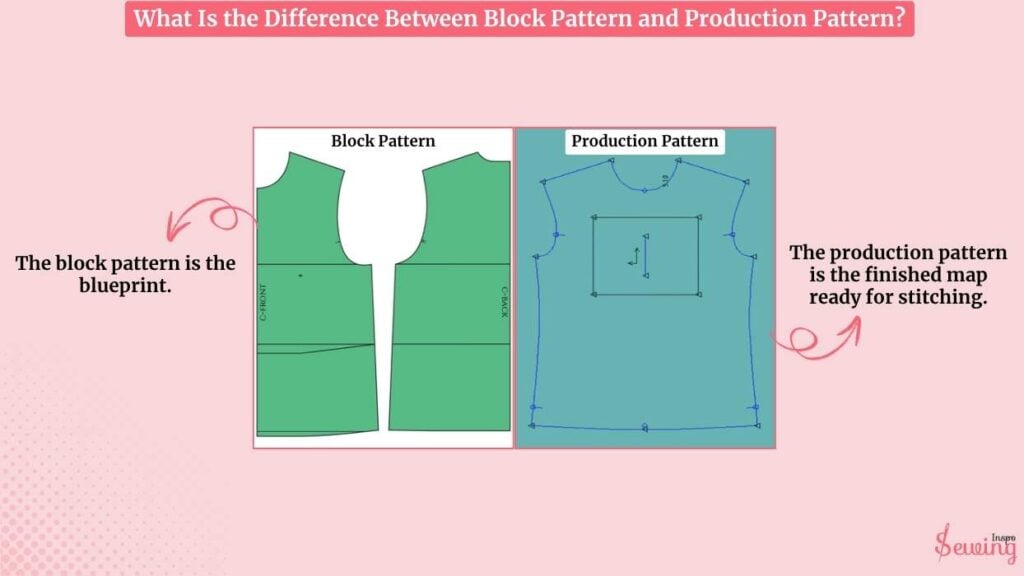
It’s what factories or home sewists use to actually cut and sew the final garment. This pattern includes seam allowances, notches, grainlines, labels, and all the details needed. It is to ensure consistent sizing and accurate assembly during production.
So, in short —
- The block pattern is the blueprint.
- The production pattern is the finished map ready for stitching.
Most people confuse the two because they both involve pattern drafting. But the main difference is: a block is for design and fit development, while a production pattern is for manufacturing and sewing.
How To Make A Block Sewing Pattern For Beginners?
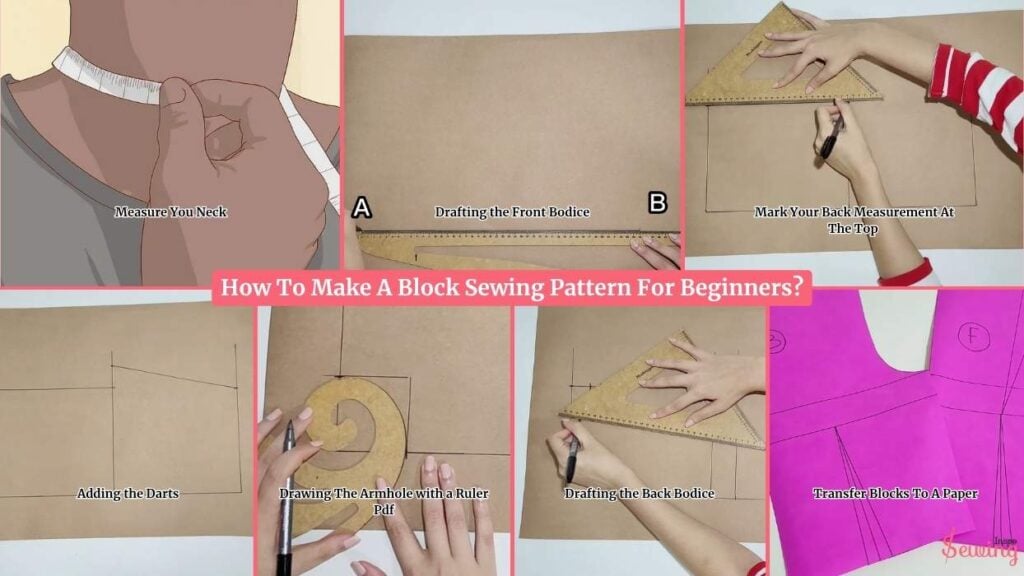
To make the Block sewing pattern, follow the steps-
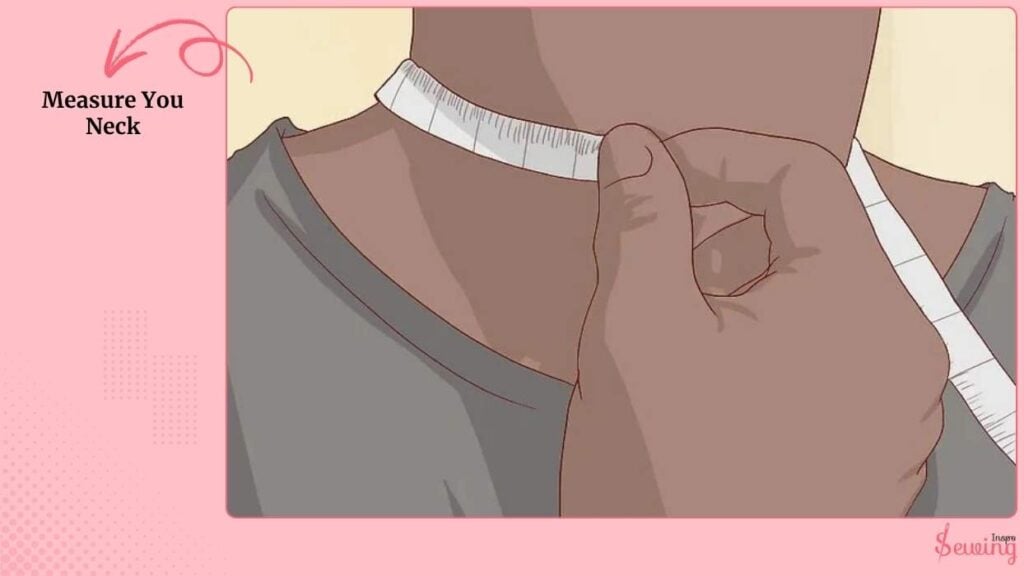
Measure You Neck
Start by measuring around your neck. This will give you your neck circumference. Next, measure around your bust.
Make sure you’re wearing the same bra style you plan to use with the garment, because that can change the shape of your bust.
Then measure your waist, followed by the width of your back. You might need someone to help with that. Finally, measure the total length of the top from your shoulders down to where you want it to end.
So basically, I need to make the following block pattern,
- Divide your bust and waist measurements by 4, then add 1 cm (or ⅜ inch) for seam allowance.
- Divide your neck measurement by 6 and add 1 cm.
- Divide your back measurement by 2 and add 1 cm for seam allowance.
- The total length stays the same
- For the armhole height, divide the total bodice length by 3 and add 6 cm.
When I mention these measurements from now on, I mean the numbers we just calculated.
Drafting the Front Bodice
Start by drawing a straight vertical line that matches your total bodice length. From the top of this line, mark the armhole height. Its like doing crocodile pattern.
Now, draw horizontal lines from all these points. A notebook corner works perfectly if you don’t have a 90° ruler.

Mark Your Back Measurement At The Top
Next, mark your back measurement at the top (point A) and at the armhole line (point C), then connect these points.
Mark your bust measurement at the bust line and your waist measurement at the waist line, connecting the points.
Now, let’s add the neckline.

From the top, mark your neck measurement to the side and down, and draw a square to guide the neckline circle. Drop the shoulder by 3 cm and connect it to the neckline.
Drop 4 cm at the bust line and mark it.
Adding the Darts
Mark the middle of the waist line. Draw a line up to the breast line.
For a small cup, use 2 cm for the bust dart; adjust bigger if needed (3–5 cm for larger busts).
Mark half the dart on each side, connect it to the bust point forming a triangle, then add the full dart measurement to the side and redraw the line.
Mark the middle of the shoulder line and go 4 cm to the right. Connect this point down to the bust line.
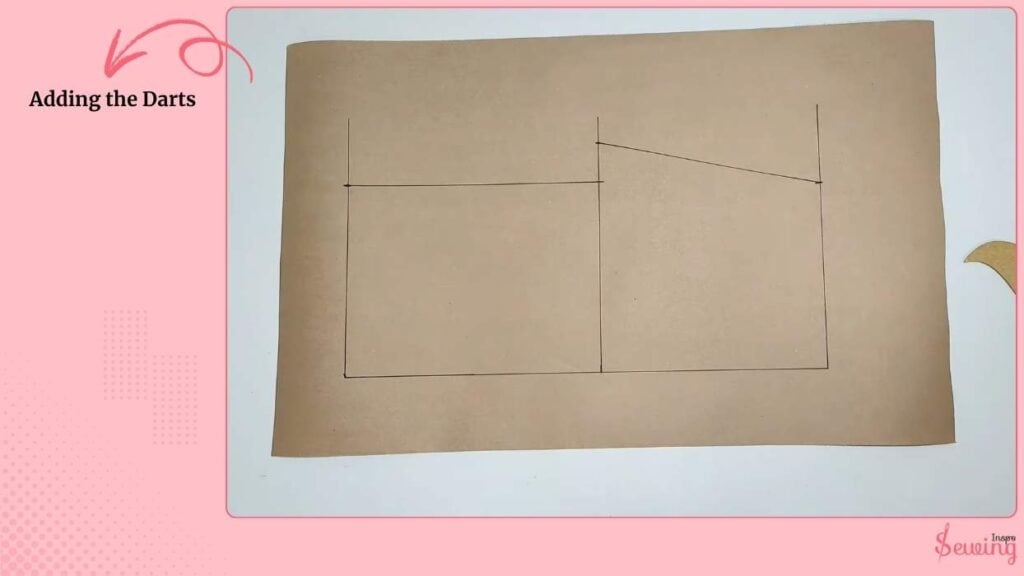
Fold the shoulder dart as shown and check that the shoulder length matches your original measurement. Redraw the shoulder line if needed.
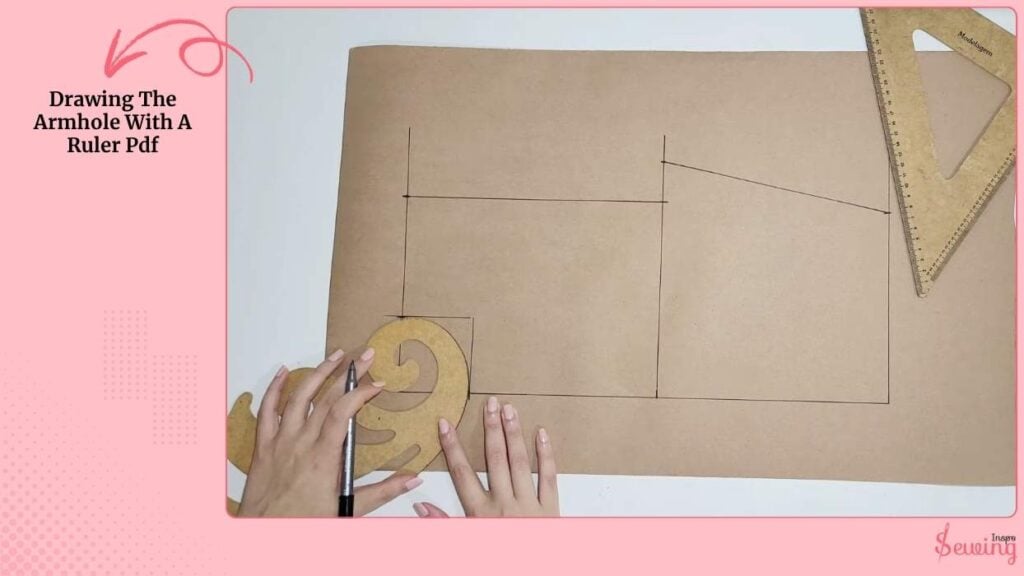
Drawing The Armhole With A Ruler Pdf
Use a curved ruler or a PDF guide to draw the armhole. Don’t worry if you don’t have a perfect ruler.
It is a notebook, or any straight edge works fine. Once done, cut carefully along the lines. Make sure the shoulder dart is closed when cutting.
And just like that, your front bodice block is ready.
Drafting the Back Bodice
Start with the same base as the front. Mark the neck to the right, drop 3 cm at the shoulder, and connect the lines.
Draw a vertical line at a 90° angle, mark 2 cm on each side, and connect the lines with a curved shape for the neckline.
Drop 4 cm again at the bust line, mark half the waist, draw a line up, and connect.

Add the back darts: 1 cm on each side, forming triangles up to the top. Add the 2 cm of darts to the side of the waist and redraw the line. Draw the armhole with a curved line, then cut out the back pattern.
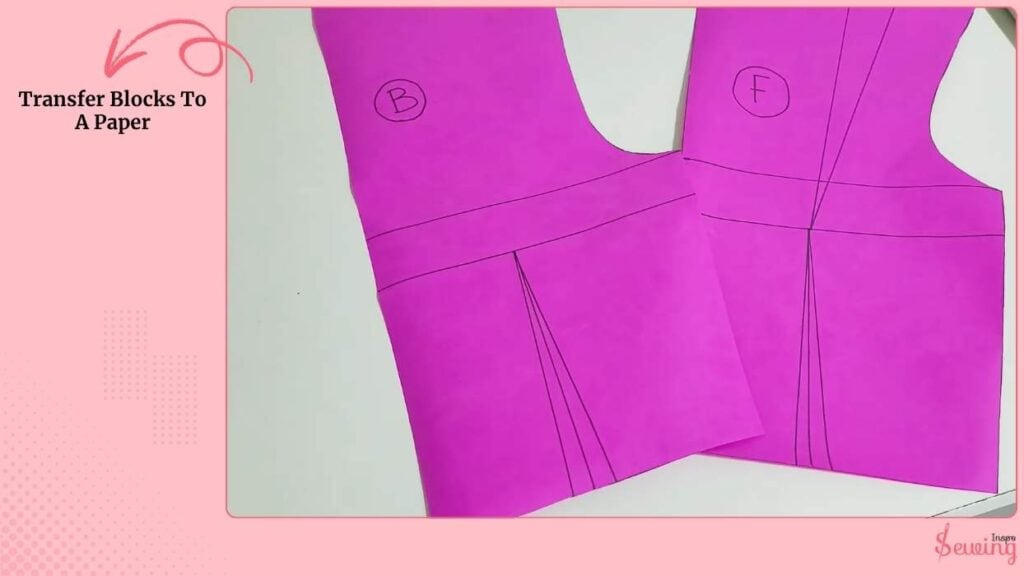
Transfer Blocks To A Paper
Transfer both the front and back blocks to a thicker paper so they last longer. And there you have it.
Your very own custom block sewing pattern is ready to use for any project.
If anything feels overwhelmed, then watch this video
Block Sewing Pattern Free PDF
If you easy to make any Block pattern design, then download this PDF and use it.
FAQs
What is a block sewing pattern used for?
A block pattern (or sloper) is your basic template. It’s what you build all your garment designs from. Once you have it, you can tweak it into dresses, tops, jackets, and more without starting from scratch every time.
Do I need a block pattern for every fabric type?
Not really! One well-fitted block can work for multiple fabrics. But if you switch to something that stretches a lot (like knit fabric), it’s smart to make a separate stretch block.
How long does it take to make a block pattern?
If you’re new, give yourself a few hours. Once you get the hang of it, you can draft one in under an hour. It’s mostly about accurate measuring and careful marking.
Conclusion
Creating your own block sewing pattern might feel intimidating at first. But once you do it, it’s a totally worth it.
You’ll finally have a base that fits you perfectly. No more adjusting store-bought patterns or guessing sizes. From this single block, you can design endless outfits that actually fit right.
Honestly, it’s one of those “once you try it, you never go back” moments in sewing.


Leave a Reply