When I first started machine stitching, I was completely lost—especially when it came to finishing the edges of fabric. I kept staring at the fraying threads, wondering, “What stitch am I even supposed to use here?”
Instead of overthinking and getting frustrated, I did the smart thing: I called my sewing-machine expert friend. She didn’t even let me finish explaining before she said, “Girl, just use the zigzag stitch!” I still didn’t know how, she laughed and said, ‘it’s easy’.
You don’t need a special machine; you need to dial in the right zigzag stitch settings!
To create a zigzag stitch on a sewing machine, select the zigzag stitch symbol, adjust the width and length, then sew.
Her explanation gave me confidence, but I still needed the specific numbers. So, I sat down, did some research, and created this guide to the best zigzag stitch settings for every fabric.
Zigzag Stitch at a Glance
- Best For: Finishing raw edges and sewing stretchy fabrics (knits).
- Settings (Woven Fabric): Length 2.5 mm | Width 3.5 mm.
- Settings (Knits): Length 1.5 mm | Width 0.5–1.5 mm (Narrow).
- The Symbol: Look for the squiggly line (⚡ or 〰️) on your dial.
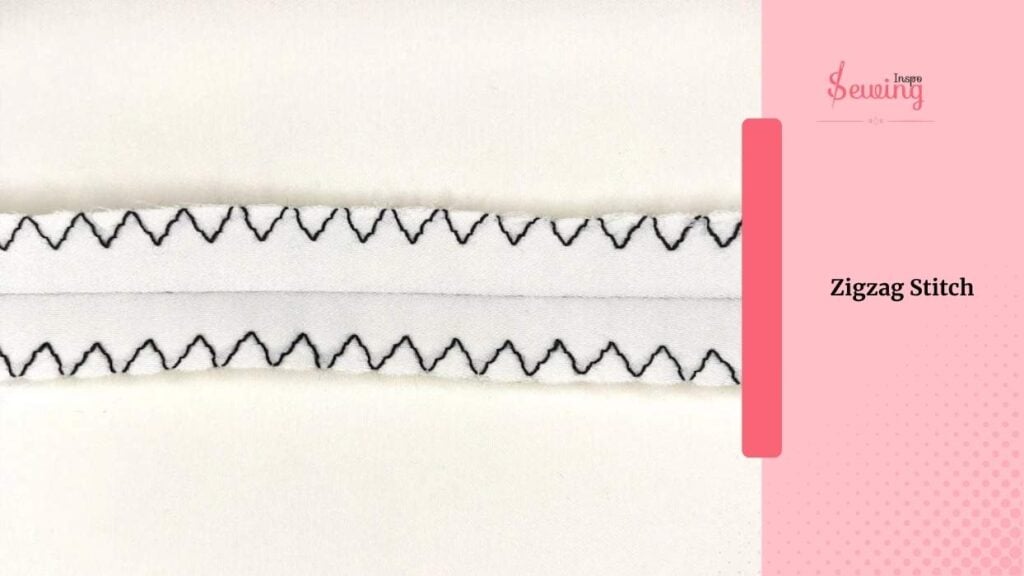
Table of Contents
What Is The Zigzag Stitch Used For?
The zigzag stitch is arguably the most versatile stitch on your machine. Unlike a running stitch, which locks fibers in place, the zigzag stitch moves back and forth. This side-to-side movement gives the thread “elasticity,” meaning the seam can stretch without snapping. It is generally stronger than a standard straight stitch but simpler than a Chain Stitch.

Depending on your zigzag stitch settings the four main ways to use a zigzag stitch are:
- Finishing Raw Edges (Overcasting): If you don’t have a serger, a wide zigzag stitch along the edge of your fabric helps prevent fraying in the wash.
- Sewing Stretchy Fabrics (Knits): Because the stitch creates a “zig” and a “zag,” it moves with the fabric. This makes it essential for sewing T-shirts, leggings, and jersey knits.
- Pro Tip: When sewing knits, always swap your standard needle for a Ballpoint Needle (check prices at Amazon or SewingMachinesPlus.com). Standard needles can pierce and break the fabric fibers, causing holes.
- Reinforcing Stress Points: You can use a tight zigzag to create a “Bartack” (a heavy-duty lock) on belt loops or pocket corners.
- Decorative & Appliqué: By shortening the stitch length, you can create a solid block of color (Satin Stitch) to attach patches.
Once I got the hang of it, I realized that zigzag stitching also adds a nice decorative touch if you experiment with the settings. Honestly, it’s now my go-to for so many projects.
Best Zigzag Stitch Settings (Cheat Sheet)
By now, I knew the zigzag stitch was versatile and strong, but I still needed to figure out which settings to use. While there’s no ‘one-size-fits-all’ answer, there are standard starting points. Instead of guessing, use this chart as your baseline and don’t forget to always test on a scrap piece of fabric first.
| Fabric/Use Case | Stitch Length | Stitch Width | Tension |
|---|---|---|---|
| Standard Cotton | 2.5 mm | 3.5 – 4.5mm | Auto (4) |
| Stretchy Knits | 1.5 – 2.0 mm | 0.5 – 1.5 mm (Narrow) | 3 – 4 |
| Denim / Heavy | 3.0 – 3.5 mm | 5.0 mm | 4 – 5 |
| Finishing Raw Edges | 1.0 – 1.5 mm | 5.0 mm (Wide) | 3 – 4 |
| Appliqué (Satin) | 0.2 – 0.5 mm | 3.0 – 4.0 mm | 2 – 3 |
Note: If your fabric is bunching up (tunnelling) under the stitches, your tension is likely too high. Lower it to 3, or place a strip of Tear-Away Stabilizer (either from SewingMachinesPlus.com or Amazon) under the fabric to keep it flat.

Variations of the Zigzag Stitch
Once you master the basic zigzag, you will notice your machine likely has a few “cousins” of this stitch:
Narrow Zigzag: As we discussed earlier, this is a “wobble stitch” (width 0.5mm) used for subtle stretching on lightweight knits.
Triple Zigzag (Tricot Stitch): This looks like a dashed zigzag line. It takes three stitches for every “zag.” It is much stronger than a regular zigzag and is perfect for heavy stretch fabrics like swimwear or elastic waistbands.
While you can experiment with settings, there are two extremes you should avoid as a beginner:
- The “Puckering” Zone (Width over 6.0mm): On lightweight fabrics, a super-wide zigzag pulls the fabric inward, creating a tunnel. Stick to a width of 3.5mm – 5.0mm for best results
- The “Jamming” Zone (Length under 0.3mm): Unless you are doing a specific Satin Stitch with a stabilizer, setting your length too short will cause the thread to pile up and jam your machine.

Troubleshooting & Tension (The “How-To” Fix)
Troubleshooting: Common Zigzag Problems
Zigzag stitching is easy, but if you skip a step, things can get messy. Here are the most common issues and how to fix them immediately.
1. The Needle Hits the Presser Foot
- The Cause: You likely left the “Straight Stitch” foot on the machine. This foot has a tiny single hole.
- The Fix: Stop immediately. Swap to the Universal Zigzag Foot (available from Amazon or SewingMachinesPlus.com), which has a wide oval opening that allows the needle to swing left and right safely.

2. The Fabric is “Tunnelling” (Bunching Up)
- The Cause: This happens on thin fabrics or knits because the zigzag pulls the fabric inward.
- The Fix: Lower your tension to 3 or place a strip of Tear-Away Stabilizer (available from Amazon or SewingMachinesPlus.com) under the fabric to keep it flat while you sew.
3. The Stitch Looks Like a Straight Line
- The Cause: Your stitch width is set to 0.
- The Fix: Turn your width dial up! For a standard zigzag, you want a width of at least 3.0 mm.
4. Skipped Stitches
- The Cause: Usually an old or wrong needle.
- The Fix: Re-thread your machine (top and bobbin) and insert a fresh needle. If sewing knits, ensure it is a Ballpoint needle.


What Is the Correct Tension for a Zigzag Stitch?
For most fabrics, the standard tension setting of 4 (Auto) is perfect. However, the zigzag stitch is more sensitive than a straight stitch.
How to Read Your Tension:
- Loops on Top? Your top tension is too loose. Dial it UP to 5.
- Bobbin Thread Showing on Top? Your tension is too tight. Dial it DOWN to 3.
- Puckering? The tension is fighting the fabric width. Loosen the tension slightly (2.5 – 3) to let the stitch relax.
What Does the Zigzag Stitch Symbol Look Like?
If you are staring at your machine’s dial and feeling confused, don’t worry. The zigzag stitch is usually the easiest one to spot.
The Icon: Look for a jagged line that looks like a continuous “W” or a lightning bolt (⚡).

On most modern machines (Brother, Singer, Janome), you will see a few variations side by side. It’s important not to mix them up, as they do very different things. Here’s how to read the symbols:
1. The Standard Zigzag
- The Symbol: A solid, continuous jagged line (like a “W” or lightning bolt).
- Use It For: This is your everyday stitch for finishing raw edges and general sewing.
2. The Narrow Zigzag
- The Symbol: It looks like the standard zigzag but much tighter or thinner. (On some machines, this is just the standard zigzag with the Width dial turned down to 0.5mm – 1.0mm).
- Use It For: Sewing lightweight knits and stretchy t-shirt fabrics. It puts less stress on the fabric than the wide version.
3. The Triple Zigzag (Tricot Stitch)
- The Symbol: A zigzag line made of dashes or dotted lines.
- Use It For: Heavy-duty stretch projects. It takes three stitches for every “zag,” making it incredibly strong. Use this for sewing elastic waistbands or swimwear.

Don’t confuse it with: A Lockstitch / Straight Stitch. The straight stitch is a single dashed line. If your machine is sewing straight even though you think you selected zigzag, check that your Stitch Width isn’t set to “0”.
On most sewing machines, it’s either shown as a basic zigzag or sometimes with different variations (like a tighter or wider zigzag). Just look for that squiggly line. You can’t miss it.
Once I knew what to look for, picking stitches was way less confusing. But different machines can have various kinds of symbols.
Below, I have given you an idea of a symbol. All kinds of machines actually use those for zigzag & overlock.
How to Sew a Perfect Zigzag Stitch (Step-by-Step)
Now that you have your settings dialled in and the right foot attached, it’s time to sew.
Because the needle moves side to side, the technique is slightly different from a straight stitch.
Before anything else, I stopped and looked at my sewing machine’s presser foot.
I made sure it had a wide opening in the centre, because I remembered the needle would swing left and right while stitching in a zigzag pattern. If I had used the regular straight stitch foot (the one with the small hole), the needle would have hit it – and I’d already broken a needle today!. So lets look at the 4 crucial steps in sewing a zigzag stitch on a machine.
1. Anchor the Needle. Before you press the foot pedal, hand-crank the wheel to lower the needle down into the fabric. This stops the fabric from sliding around when the machine starts moving.
2. Hold the Thread Tails (Crucial!) The zigzag stitch tends to “suck” the thread down into the bobbin area at the start. To prevent a bird’s nest tangle, hold the two thread tails behind the presser foot for the first 3-4 stitches.
3. Watch the Centre, Not the Needle. It is mesmerising to watch the needle swing left and right, but don’t look at it! If you watch the needle, your line will be crooked. Instead, keep your eyes on the edge of the presser foot or a guideline on your fabric to keep your seam straight.
4. Stop with the Needle Down. When you need to pivot or stop, try to end with the needle down in the fabric (preferably on the outer swing of the zigzag) to keep your place.
Some machines are old-school and have options like small, medium, and large zigzags. If that’s you, I’d recommend picking something around “medium” for your first try. But whatever you do keep the zigzag stitch sewing machine tension between 3-4.
- Slipped my fabric under the presser foot,
- Put the needle down into the fabric (super important so it doesn’t slip),
- Lowered the presser foot,
- And gently held the thread tails so they wouldn’t get sucked into the machine.

Then I pressed the pedal — slowly at first — and started sewing. Watching the needle swing left to right is satisfying. Always remember to use the correct presser foot; otherwise, things can go south fast.
Is Zigzag Stitch on a Sewing Machine Hard?
Nope, the zigzag stitch on a sewing machine isn’t hard at all. It just looks fancy! Once you set your machine to the zigzag setting and adjust the width and length.
It’s basically like sewing a straight stitch. The machine does all the side-to-side movement for you.

Frequently Asked Questions
Can all sewing machines do a zigzag stitch?
Most modern machines can. However, vintage “Straight Stitch Only” machines (like the old black Singers) cannot do a zigzag because their needle bar only moves up and down. If your machine doesn’t have the zigzag symbol on the dial, it likely cannot do this stitch.
Why is my zigzag stitch coming out straight?
This is the most common beginner mistake. It usually happens because your Stitch Width is set to 0. When the width is 0, the needle has no room to move side-to-side. Turn your width dial up to 3 or 4 to see the zigzag appear.
What is the best tension for a zigzag stitch?
Start with your tension dial on 4 (Auto). Because the zigzag stitch pulls on the fabric more than a straight stitch, you may need to lower the tension to 3 if you see the fabric bunching (tunneling).
Is a zigzag stitch stronger than a straight stitch?
It depends on the fabric. On stretchy fabrics (knits), the zigzag is stronger because it stretches without snapping. On rigid fabrics, a straight stitch is tighter, but a zigzag is better for finishing edges so they don’t fray.
Do I need to backstitch when sewing a zigzag?
Yes! Just like a straight stitch, you should backstitch (sew in reverse) for 2-3 stitches at the start and end of your seam to lock the threads in place.
Conclusion: Master the Zigzag
The zigzag stitch isn’t just a fancy feature—it is the backbone of garment sewing. Whether you are finishing raw edges to stop fraying or sewing a stretchy jersey top, you now have the exact zigzag stitch settings (width, length, and tension) to do it confidently.
Your Final Checklist:
- Select the Symbol: Look for the “W” or lightning bolt ⚡.
- Check Your Foot: Ensure you are using a Universal Zigzag Foot (available from Amazon or SewingMachinesPlus.com) so the needle doesn’t hit the metal.
- Watch the Width: Keep it narrow (0.5mm) for knits and standard (3.5mm) for cotton.
What Should You Learn Next? Now that you have mastered the zigzag, you are ready to try the Satin Stitch. It uses the exact same settings but with a shorter length to create beautiful appliqué designs!
I’d Love to Hear From You: Did this guide help you fix a “bunching” or tension issue? Or do you have a specific question about your machine model? Drop a comment below—I read and reply to every single one!
Happy Stitching!


Leave a Reply