It is 8 pm, and your child’s school costume needs a hem by 9 am tomorrow, but your sewing machine needle just broke. If you find yourself in this situation, then you are not alone. And that’s exactly when knowing a few basics of hand stitches becomes very useful. It is not just about learning the stitches; it is also about choosing the right one when you are short on time.
Here’s the truth: You don’t always need the perfect stitch. Sometimes a good enough stitch is the smarter choice.

This article will not only help you understand the type of stitches but also provide you with a simple 3-question method to determine which essential hand stitches to use. It shares real stories from hand-sewing experiences and offers you insights into balancing speed and quality. By the end of the article, you will know which stitch works for each project, whether you are fixing a last-minute costume, hemming everyday pants, or finishing a wedding dress by hand.
Let’s make hand sewing easy and enjoyable.
Essential Hand Sewing Repair Kit
New to hand sewing repairs? You don’t need much—just these 4 basics will handle everything from hemming pants to fixing torn seams.
Chenille Hand Needles (Size 24, 6-Pack)
These medium-sized needles are perfect for everyday repairs. The large eye makes threading easy (even without your glasses!), and they’re strong enough for denim but gentle enough for delicate fabrics.
Best for: All 7 stitches in this guide, especially backstitch and whip stitch on thick fabrics.
All-Purpose Sewing Thread Set (Assorted Colors)
The right thread makes all the difference! My top recommendation is the Singer set from either Amazon or Sewing Machines Plus (USA only), which includes all the essential neutral colours, a good range of matching colours for random repairs, and is high-quality. If you’re looking for a high-value option, try the Eoehro 72 pc Sewing Thread Kit.
Best for: Invisible repairs, hemming, and any project where thread color matters.
Also available at Sewing Machines Plus (US Only)
Fabric Marking Tools (32-Piece Professional Kit)
Mark your stitch lines before you start—it’s the difference between crooked repairs and professional-looking results. This Swpeet 32-piece set is great as it gives you options, including tailor’s chalk and erasable markers. Triangle chalk is great for rough fabrics, and pencils are an excellent choice for precision lines.
Best for: Hemming pants evenly, marking buttonhole placement, and ensuring straight seams.
Run your thread through thread conditioner or traditional beeswax conditioner before sewing to prevent tangles and double the thread strength. Game-changer for fixing jeans, backpacks, and anything that gets heavy wear.
For regular garment repairs, I prefer thread magic, but if working with leather, I recommend Dritz Beeswax to waterproof your seams.
Best for: Backstitch on denim, repairs that need to last through the washing machine.
Pro tip: Start with just the needles and thread. Once you’re comfortable with basic repairs, add the marking tools—they’ll take your hemming game to the next level!
Table of Contents
The 3-Question Decision Flowchart
Question 1: Is this stitch permanent or temporary?
✅ Temporary? → Use Tacking stitch
✅ Permanent? → Move to Question 2
Question 2: Do the stitches need to be invisible?
✅ Truly invisible? → Slip stitch
✅ Mostly invisible? → Hemming stitch
✅ Visibility doesn’t matter? → Move to Question 3
Question 3: How strong does it need to be?
✅ Very strong → Backstitch
✅ Medium → Blanket stitch or Whip stitch
✅ Quick & light → Running stitch
This simple flowchart removes the guesswork and helps you choose the right stitch every time.
7 Essential Hand Stitches (Speed vs Quality Guide)
Below are the seven essential hand stitches, explained with real-life, authentic sewing scenarios and honest time-quality trade-offs.
1. Running stitch – The speed champion
Time: 5 min per 12”
Visibility: Visible
Strength: 3/10
Speed: Fast
What exactly is it?
A simple in-and-out stitch, the quickest of all basic sewing stitches.
Best for:

Real-life scenario:
My nephew tore the seam of his school shorts right before the morning bus. I didn’t have time for anything fancy, so I doubled the thread and quickly stitched across the tear. In less than three minutes, he was out the door. It wasn’t perfect, but it held all day, and that day speed was more important than how it looked.
When to skip this stitch:
Trade-off:
Extremely fast but not durable.
2. Backstitch – The strength champion
Time: 25 mins
Visibility: Visible
Strength: 9/10
Speed: Slow
What exactly is it?
A strong overlapping stitch that mimics machine sewing.
Best for:
Real scenario:
A friend gave me her favourite canvas tote because it had a ripped side seam. I knew a running stitch wouldn’t hold the tote, so I spent about 25 minutes hand-stitching with a backstitch (/what-is-back-stitch-used-for/) through the thick canvas. It worked so well that even four years later, that seam is still strong. Backstitching takes time, but it provides the strength you need when it matters most.
When to skip this stitch:
Trade-off:
Slow but nearly unbreakable.
🧵 Want to Master Every Backstitch Technique?
You’ve learned the basics—now master all the backstitch variations with our comprehensive Backstitch Playbook.
✓ Multiple backstitch techniques with step-by-step photos
✓ When to use each stitch type
✓ Perfect for strong seams and decorative stitching
3. Blanket stitch: The decorative edge specialist
Time: 15 mins
Visibility: Decorative
Strength: 7/10
Speed: Medium
What exactly is it?
A looping edge stitch is used for both decoration and function.
Best for:
Real scenario:
I created a felt animal book for a toddler a few years ago. I hand-stitched every page of it by using the blanket stitch method. It took many hours, but the decorative loops added a charming, homemade look that machines cannot match. The edges remained neat, and the book held up well to a toddler’s rough handling.
When to skip this stitch:
Trade-off:
4. Whip stitch: The quick closer
Pretty and durable, but visible.
Time: 8 mins
Visibility: Slightly visible
Strength: 6/10
Speed: Fast
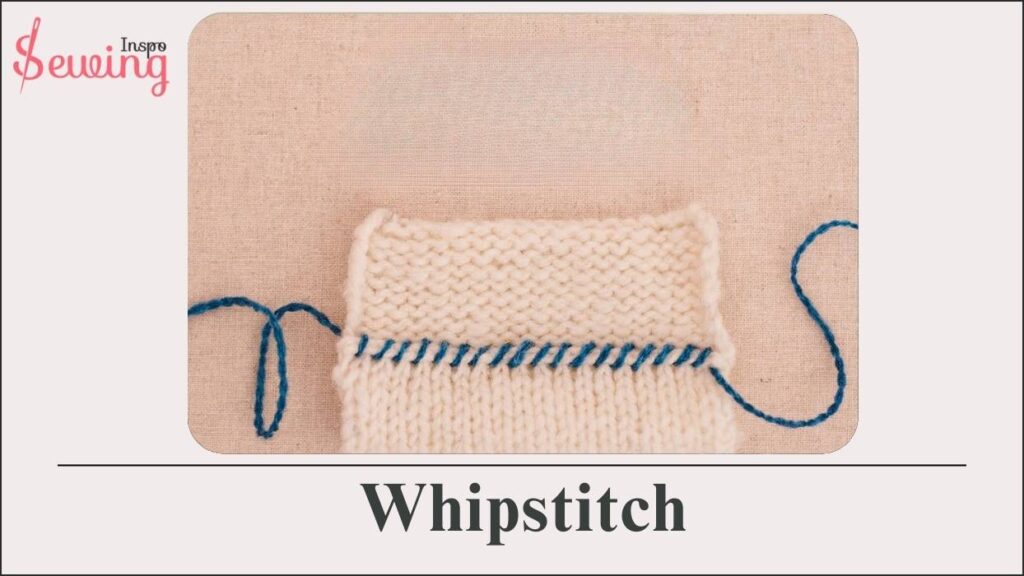
What exactly is it?
A lopping stitch wraps around the fabric edge.
Best for:
Real scenario:
My niece’s stuffed bunny tore open, and the stuffing spilled out. She became very upset. I quickly grabbed a needle and did a whip stitch because it is fast and brings the edges together neatly. In just a few minutes, the bunny was fixed and back in her arms. Yes, the stitches showed, but sometimes a child’s smile matters more than perfect finishing.
When to skip this stitch:
Trade-off:
Fast, functional, slightly visible.
5. Slip stitch (Ladder stitch) – The invisible champion
Time: 35 mins
Visibility: Invisible
Strength: 7/10
Speed: Slowest
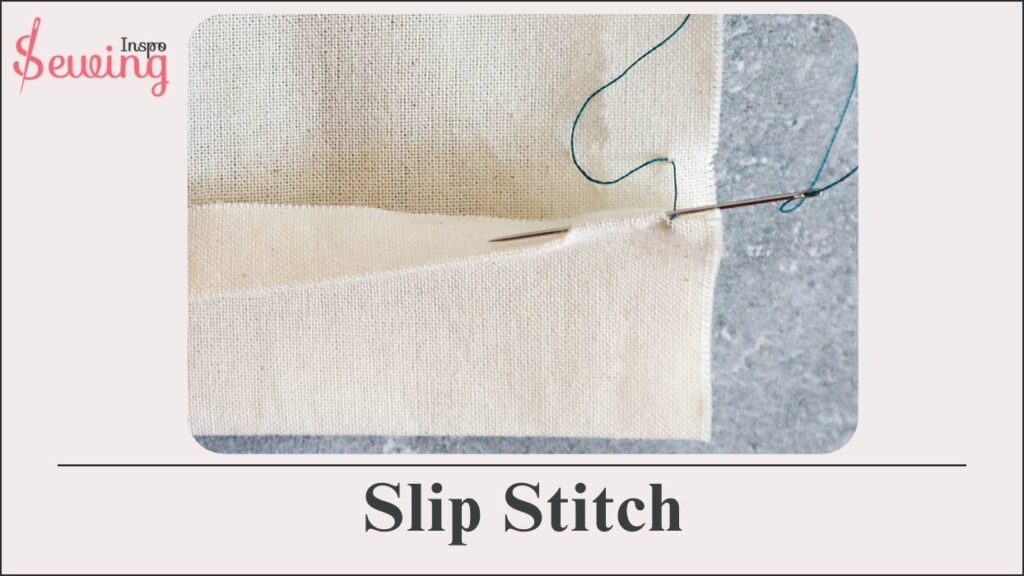
What exactly is it?
A hidden stitch that travels inside the fabric fold.
Best for:
Real scenario:
I once hemmed a satin bridesmaid dress by hand because the bride wanted no visible stitches. Using a slip stitch is slow, especially on satin, but it made the hem look professional. It takes me 35 to 40 minutes to do this hem, which can be tiring, but sometimes the perfect look is worth the sore fingers.
When to skip this stitch:
Trade-off:
Perfectly invisible, but the slowest stitch by far.
6. Hemming stitch – The most invisible hem
Time: 25 mins
Visibility: Mostly hidden
Strength: 6/10
Speed: Medium
What exactly is it?
A criss-cross stitch that gently tacks the hem without showing much on the outside.
Best for:
Real scenario:
When I hem trousers for my family, I usually use a hemming stitch (/types-of-hemming-stitches-by-hand/). It is quicker than a slip stitch, and the hem looks neat and professional from the outside. I have done many while watching Netflix, and it is my favorite method for anything worn often but not for formal occasions.
When to skip this stitch:
Trade-off:
Reliable and discreet, but not totally invisible.
7. Tacking stitch (Basting) – The temporary helper
Time: 3 mins
Visibility: Very visible
Strength: 1/10
Speed: Very fast
What exactly is it?
Loose, long stitches are used to temporarily hold pieces in place.
Best for:
Real scenario:
Once, I tried to sew a curved armhole without tacking first. That was a mistake I made. The fabric moved around and puckered, which meant I spent more time taking out stitches than actually sewing. Now, I always tack first for difficult seams. This saves me from frustration and prevents problems before they happen.
When to skip this stitch:
Trade-off:
Fastest stitch because it is meant to be removed.
Quick Reference: Time vs Quality Matrix
| Stitch | Time | Visibility | Strength | Best Use Case |
|---|---|---|---|---|
| Running | 5 min | Visible | 3/10 | Quick hems, gathering |
| Backstitch | 25 min | Visible | 9/10 | Permanent seams |
| Blanket | 15 min | Decorative | 7/10 | Felt, appliqué |
| Whip | 8 min | Slight | 6/10 | Toys, pillows |
| Slip/Ladder | 35 min | Invisible | 7/10 | Formal hems |
| Hemming | 25 min | Mostly hidden | 6/10 | Everyday hems |
| Tacking | 3 min | Very visible | 1/10 | Temporary holds |
When to choose Good enough vs Perfect stitching
If you choose speed (Running, whip, or tacking stitch):
If you choose balance (Blanket or hemming stitch):
If you choose perfection (Slip stitch or backstitch):
Point to Remember: Save slow stitches for projects that deserve them. Good enough is not lazy; it is smart.
Common Mistakes Beginners Make
Here are the most common mistakes I see beginners make:
❌ Using running stitch for permanent seams
Running stitch is fast but weak. For anything that needs to last, use backstitch instead.
❌ Spending hours slip-stitching kids’ clothes
Kids grow fast and are rough on clothes. A quick hemming stitch is good enough—save the slip stitch for special occasions.
❌ Skipping the tacking step on tricky seams
I learned this the hard way! Always tack curved seams, slippery fabrics, or anything tricky. The 3 minutes you spend tacking saves 30 minutes of unpicking mistakes.
❌ Using backstitch for everything
Yes, backstitch is strong, but it’s slow. For low-stress projects like practice pieces or kids’ crafts, a faster stitch is smarter.
Q1: Do I only need these 7 stitches?
Yes, these stitches are enough for most repairs, hems, and craft projects.
Which stitch should I learn first?
You can start with the running stitch, and then learn the backstitch.
Is hand sewing as strong as machine sewing?
A well-made backstitch can be as strong, or even stronger.
When should I use a “slow perfect” stitch?
You can use a slow stitch if the item will be photographed, given as a gift, or worn for a long time.
Hand sewing is easier and more enjoyable when you know which stitch you have to use and when. These seven essential hand stitches cover everything you need for quick fixes, everyday hems, and even formal finishes. You don’t need to aim for perfection with every project, just by using the right stitch for the job. By choosing wisely, you save time, avoid frustration, and still achieve great results. Learn these key hand stitches, and you will tackle every repair or project with confidence.


Leave a Reply